Are you hearing mysterious clunks and knocks from your vehicle’s front end? Does your steering feel a bit loose or wandering? If so, it might be time to give your lower control arm bushings some attention. Welcome to our comprehensive guide on “Lower Control Arm Bushings Replacement.
In this post, we’re diving deep into the world of these small but mighty components that play a crucial role in your vehicle’s suspension system. Lower control arm bushings may not be the most glamorous part of your car, but they’re essential for ensuring proper wheel alignment, absorbing road impacts, and providing smooth, controlled steering.
We’ll walk you through everything you need to know about these unsung heroes of your suspension:
- What lower control arm bushings are and why they’re important
- Signs that it’s time for a replacement
- A step-by-step guide to replacing them yourself
- Tips for choosing between polyurethane and rubber bushings
- Essential tools and safety precautions for the job
Whether you’re a DIY enthusiast looking to tackle this project yourself or just want to understand what’s happening under your vehicle, this guide has got you covered. So, grab your tools, put on your safety glasses, and let’s dive into the world of lower control arm bushings!
Table of Contents
Introduction to Lower Control Arm Bushings
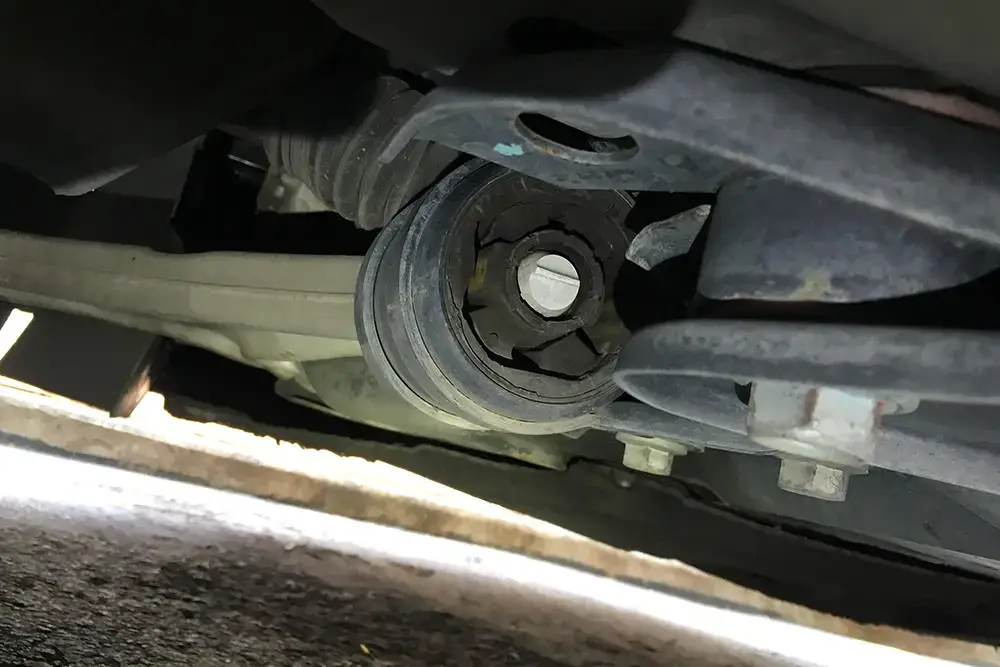
Lower control arm bushings are small but crucial rubber or polyurethane components that allow the lower control arms to pivot and articulate smoothly within the suspension system. The lower control arms connect the steering knuckles to the vehicle’s subframe or unibody, and the bushings act as cushioned pivot points where the control arms attach.
These bushings play a vital role in ensuring proper wheel alignment, absorbing road impacts, and providing a smooth and controlled steering response. Over time, however, the bushings can wear out and develop excessive play, leading to various issues.
Common signs that the lower control arm bushings need replacement include:
- Clunking or knocking noises from the front suspension, especially over bumps or during turns.
- Wandering or loose steering feel, making it difficult to maintain a straight line.
- Excessive play or movement in the lower control arm when inspected.
- Uneven tire wear or premature tire cupping, indicating alignment problems.
Replacing worn-out lower control arm bushings is essential for restoring proper suspension performance, handling characteristics, and extending the lifespan of other related components. Ignoring this issue can lead to further damage and potentially compromise vehicle safety.
Preparing for the Job
Before starting this repair, make sure you have all the necessary tools and supplies on hand. You’ll need:
- Basic hand tools like wrenches, sockets, and ratchets
- Torque wrench
- Pry bars
- Hammer
- Lubricating grease
- Replacement polyurethane or rubber control arm bushings
- Jack and jack stands (for raising the vehicle)
Safety should be the top priority. Always use jack stands to properly support the vehicle, as relying solely on a jack can be extremely dangerous. Wear protective gloves to avoid cutting your hands on sharp metal edges. Eye protection is also recommended.
This guide covers the process for replacing lower control arm bushings on most front-wheel drive cars and smaller rear-wheel drive vehicles. The specific steps may vary slightly depending on the make and model, so it’s advisable to consult the factory service manual for your particular vehicle.
Take all necessary safety precautions, have the right tools ready, and ensure you’re working on a level, solid surface. With proper preparation, this repair can be completed safely and effectively.
Accessing the Lower Control Arms
To access the lower control arm bushings, you’ll need to safely jack up the vehicle and remove the wheels and any components obstructing access. Follow these step-by-step instructions:
- Park the vehicle on a level, solid surface and engage the parking brake. Chock the rear wheels to prevent rolling.
- Locate the specified jacking points for your vehicle, typically reinforced areas on the pinch welds or dedicated jack pads. Consult your owner’s manual if unsure.
- Using a hydraulic floor jack or jack stands, carefully raise the front end of the vehicle until the front wheels are off the ground, leaving enough clearance to work underneath.
- Remove the front wheels by loosening the lug nuts while the wheels are still on the ground, then fully removing them once raised.
- Inspect the lower control arms and identify any components blocking access to the bushings, such as brake calipers, rotors, tie rods, or sway bar links. Refer to your vehicle’s service manual for the proper procedures to disconnect or remove these components safely.
- Once all obstructions are cleared, you should have direct access to the lower control arm bushings for removal and replacement.
Remember to follow all safety precautions when working under a raised vehicle, using jack stands or other appropriate support methods to prevent accidental lowering or collapse. Proceed carefully and methodically to avoid damaging any components during the disassembly process.
Removing Old Bushings
Removing the old, worn-out bushings is a critical step that requires care and attention to avoid damaging the control arm or other components. Here’s a detailed guide on how to properly remove the old bushings:
- Prepare the Work Area: Clear a space on your workbench or a flat, sturdy surface to work on the control arm. Lay down a clean cloth or towel to prevent scratches or damage to the control arm.
- Inspect the Bushings: Closely examine the bushings to determine the type of material they are made of. Common bushing materials include rubber, polyurethane, and metal-lined varieties. This will help you choose the appropriate removal method.
- Remove Retaining Clips or Bolts: Some bushings are secured with retaining clips, bolts, or other fasteners. Use the appropriate tools to carefully remove these components, taking note of their positions for reassembly later.
- Lubricate the Bushings (Optional): If the bushings seem particularly stuck or dried out, you can try lubricating them with a penetrating oil or silicone spray. Allow the lubricant to soak in for a few minutes before proceeding.
- Press Out Rubber or Polyurethane Bushings: For rubber or polyurethane bushings, you’ll need a bushing removal tool or a hydraulic press. Position the control arm securely in the press, ensuring that the bushing is aligned with the press ram. Slowly apply pressure to the ram, pressing the bushing out of the control arm. Be patient and apply even pressure to avoid damaging the control arm.

- Cut Out Metal-Lined Bushings: If the bushings are metal-lined, you’ll need to use a specialized bushing removal tool or a rotary cutting tool (e.g., a Dremel tool with a reinforced cut-off wheel). Carefully cut through the outer metal sleeve, being cautious not to damage the control arm. Once the outer sleeve is removed, you can press out the remaining bushing material.

- Clean the Control Arm Bore: After removing the old bushings, thoroughly clean the control arm bore using a wire brush or emery cloth. Remove any remaining debris, rust, or burrs to ensure a smooth surface for the new bushings.
- Inspect for Damage: Carefully inspect the control arm for any cracks, excessive wear, or damage. If the control arm is compromised, it may need to be replaced entirely.
Remember, patience and care are essential during this process. Take your time and follow the appropriate safety precautions to ensure a successful bushing replacement.
Cleaning and Inspecting Components
Once the old bushings are removed, it’s crucial to thoroughly clean the surfaces where the new bushings will mount. Use a wire brush or emery cloth to remove any rust, debris, or buildup from the control arm and frame mounts. Pay close attention to the bore where the bushings fit, ensuring it is smooth and free of any obstructions.
Next, inspect the control arm and surrounding components for any signs of damage or excessive wear. Check for cracks, bends, or severe corrosion on the control arm itself. Examine the ball joints and ensure they move freely without excessive play. If any parts show significant damage, it’s best to replace them to prevent premature failure.
Inspect the frame mounts where the control arm attaches. Look for any cracks, elongated holes, or signs of excessive wear. If the mounts are damaged, you may need to reinforce or replace them to ensure proper alignment and prevent bushing movement.
Finally, use a flashlight to peer into the control arm bore and frame mounts, looking for any remaining debris or obstructions that could interfere with the new bushing installation. A clean, smooth surface is essential for proper bushing seating and longevity.
Installing New Polyurethane Bushings
Polyurethane bushings require a specific installation process to ensure proper fitment and longevity. Here are the steps to press in new polyurethane bushings:
- Prepare the Bushings: Polyurethane bushings often come pre-lubricated from the manufacturer. If not, apply a thin coat of polyurethane-safe lubricant to the bushing’s inner and outer surfaces.
- Check the Bore: Inspect the bore where the bushing will be installed. It should be clean and free of any burrs or debris that could damage the bushing during installation.
- Use the Proper Tools: Polyurethane bushings require a specialized press tool or driver cup to evenly distribute the pressing force. An improper tool can cause the bushing to crack or deform during installation.
- Align the Bushing: Ensure the bushing is properly aligned with the bore before pressing. Misalignment can cause binding or premature wear.
- Apply Pressure Evenly: Use a hydraulic press or heavy-duty C-clamp to apply even pressure and press the bushing into the bore. Go slowly and continuously, ensuring the bushing remains aligned throughout the process.
- Check for Proper Seating: Once pressed in, the bushing should be flush with the bore’s opening and evenly seated all the way around. Inspect for any gaps or uneven seating, which could indicate a misaligned installation.
- Grease the Inner Sleeve: If the bushing has an inner sleeve or rotating surface, apply a high-quality polyurethane-safe grease to ensure smooth operation and prevent squeaking.
- Repeat for Additional Bushings: Follow the same process for any remaining bushings that need replacement.
Proper installation is crucial for polyurethane bushings to perform as intended and provide long-lasting service. Taking the time to use the correct tools and techniques will ensure a successful bushing replacement.
Installing New Rubber Bushings (If Applicable)
While many modern vehicles use polyurethane control arm bushings, some older models or certain makes and models still utilize traditional rubber bushings. The installation process for rubber bushings is slightly different from polyurethane.
If your vehicle has rubber control arm bushings, you’ll need to lubricate them with a rubber-compatible grease before installation. Polyurethane bushings typically don’t require lubrication. Apply a generous amount of the grease to the inner and outer surfaces of the new rubber bushing.
Rubber bushings are also more malleable than polyurethane, so you may need to use a bushing installation tool or a press to properly seat them in the control arm bracket. Gently work the bushing into place, being careful not to tear or damage it.
Once the rubber bushing is seated, you’ll likely need to use a lubricant like soap and water solution to help slide the control arm into the bushing. Polyurethane bushings usually don’t require this extra lubrication step.
Finally, when torqueing the control arm bolts, you may need to use a slightly lower torque value for rubber bushings compared to polyurethane. Consult your vehicle’s service manual for the proper torque specification.
Lubricating Bushings and Components
Proper lubrication is crucial for the long-term performance and longevity of the new control arm bushings and associated components. Using the correct lubricants and applying them thoroughly will prevent squeaks, binding, and premature wear.
For polyurethane bushings, a silicone-based grease is recommended. This type of lubricant adheres well to the polyurethane material and provides long-lasting lubrication. Apply a generous amount of silicone grease to the inner and outer surfaces of the bushings, as well as the contact areas on the control arm and frame mounting points.
If your vehicle uses rubber bushings, a conventional chassis grease or lithium-based grease is suitable. These lubricants are compatible with rubber and provide adequate lubrication without causing deterioration.
In addition to the bushings themselves, it’s essential to lubricate other pivot points and contact surfaces within the control arm assembly. This includes the ball joints, tie rod ends, and any other moving parts. Use the appropriate grease for each component, as specified in your vehicle’s service manual.
When reassembling the control arm components, ensure that all grease fittings (if present) are properly lubricated using a grease gun. This will help distribute the lubricant throughout the internal components and ensure adequate lubrication for their entire service life.
Finally, after the control arm is reinstalled and all components are torqued to specification, it’s a good practice to apply a thin layer of grease to any exposed metal surfaces or pivot points. This will protect against corrosion and ensure smooth operation of the suspension components.
By taking the time to properly lubricate the new bushings and associated components, you can minimize the risk of squeaks, binding, and premature wear, ultimately extending the lifespan of your suspension components and ensuring a smooth, quiet ride.
Torquing Bolts to Spec
Properly torquing the bolts that secure the lower control arm bushings is a crucial step that should never be overlooked. Using a torque wrench ensures the bolts are tightened to the manufacturer’s specified torque values, preventing issues like bushing preload, excessive component wear, and potential failure.
Most manufacturers recommend torquing lower control arm bolts to 70-90 ft-lbs for passenger vehicles and 100-120 ft-lbs for trucks and SUVs. Always refer to the factory service manual or repair guide for the exact torque specification for your vehicle’s make, model, and year.
Tighten the bolts in a crisscross or star pattern, working from the center outwards. Apply the specified torque in increments rather than one continuous motion. Double check each bolt with the torque wrench to verify it meets the correct value. Properly torqued bolts will keep the bushings securely in place and operating as designed.
Reassembling and Reinstalling Components
With the new bushings installed, you can begin reassembling the components in the reverse order of disassembly. Here are the step-by-step instructions:
- Reattach the lower control arm to the frame or subframe mounting points, using the new hardware if provided. Torque the bolts to the manufacturer’s specified values.
- Reconnect the tie rod end to the steering knuckle or spindle, and tighten the nut to the proper torque specification.
- Reinstall the sway bar end link (if applicable) and tighten the nut or bolt to the recommended torque.
- Reattach the shock absorber or strut to the lower control arm, ensuring the mounting bolts are correctly torqued.
- Reinstall the brake caliper and secure it to the steering knuckle or spindle, being careful not to damage the brake line.
- Reconnect the ABS sensor wire and secure it properly to avoid any interference or damage.
- Reinstall the wheel, tightening the lug nuts in a crisscross pattern to the specified torque value.
- Repeat the process for the other side if both lower control arms were serviced.
- Double-check all hardware connections, ensuring proper torque values and secure fitment.
- Perform a thorough visual inspection, verifying that all components are correctly installed and secured.
It’s crucial to follow the manufacturer’s instructions and torque specifications precisely to ensure proper reassembly and safe operation of the vehicle’s suspension components.
Performing Alignment Check
After replacing the lower control arm bushings, it is highly recommended to have a professional alignment check performed. The lower control arms play a crucial role in maintaining proper wheel alignment, and their bushings can significantly impact alignment angles if worn or damaged.
During the bushing replacement process, even with the utmost care, the suspension components can shift slightly from their original positions. This can throw off the camber, caster, and toe angles, leading to premature tire wear, poor handling, and potential safety issues.
The alignment check ensures that all the suspension components are correctly positioned, and the wheels are aligned according to the manufacturer’s specifications. A trained technician will use specialized equipment to measure the alignment angles and make necessary adjustments to restore proper wheel alignment.
During the alignment process, the technician will likely adjust the tie rod ends, and in some cases, may need to reposition the lower control arms or other suspension components to achieve the desired alignment settings. This process is essential to ensure optimal tire wear, straight-line tracking, and overall vehicle handling and stability.
It’s important to note that the alignment check should be performed after the vehicle has been driven for a short period, allowing the suspension to settle into its normal operating position. This helps ensure accurate alignment readings and adjustments.
By having a professional alignment check after replacing the lower control arm bushings, you can rest assured that your vehicle’s suspension is properly aligned, maximizing tire life, handling, and safety on the road.
Testing and Verifying Repair
After reassembling everything and tightening all the bolts to spec, it’s crucial to take the vehicle for a comprehensive road test. This will help verify that the new lower control arm bushings have been installed correctly and that any previous squeaks, clunks, or other noises related to the worn bushings have been eliminated.
Start by driving the vehicle slowly around a parking lot or quiet neighborhood, making tight turns in both directions. Listen and feel for any unusual noises or vibrations coming from the front suspension. The steering should feel smooth and responsive, without any binding or clunking sensations.
Next, take the vehicle out on the open road and gradually increase your speed. Pay close attention to how the vehicle tracks and handles over bumps and uneven surfaces. The ride should be noticeably smoother and more controlled, without any excessive bouncing or bottoming out.
During your test drive, make sure to perform a few hard acceleration and braking maneuvers, as well as some tight, low-speed turns. These actions will help to load and unload the suspension components, allowing you to detect any remaining issues with the new bushings or related components.
If you encounter any persistent noises, vibrations, or handling problems during your road test, it may be necessary to revisit the installation process and double-check your work. Ensure that all bolts are properly torqued, that the bushings are seated correctly, and that there are no other issues with the suspension components or alignment.
Once you’re satisfied that the new lower control arm bushings have been installed correctly and are functioning as intended, you can confidently consider the repair a success.
Maintenance and Bushing Lifespan
Proper maintenance is key to maximizing the lifespan of your new lower control arm bushings. Here are some tips to help you get the most out of your bushings:
Regular Inspections
Visually inspect the bushings every 6 months or 6,000 miles for signs of wear, cracking, or deterioration. Also, check for any loose or missing hardware.
Proper Lubrication
If your bushings require lubrication, follow the manufacturer’s recommendations for the type of lubricant and application intervals. Proper lubrication can significantly extend bushing life.
Avoid Harsh Impacts
Potholes, speed bumps, and other harsh impacts can accelerate bushing wear. Drive cautiously over rough surfaces and avoid bottoming out the suspension.
Maintain Alignment
Improper wheel alignment can cause uneven bushing wear. Have your alignment checked regularly and adjust as needed.
Consider Your Driving Style
Aggressive driving, heavy loads, and towing can increase stress on bushings and lead to premature failure. Adjust your driving style accordingly.
With proper care and maintenance, high-quality polyurethane bushings can last 50,000 miles or more. Rubber bushings typically have a shorter lifespan of around 30,000-40,000 miles. However, keep in mind that bushing life can vary significantly based on driving conditions, vehicle weight, and other factors. If you notice excessive play, clunking noises, or other signs of bushing failure, it’s time to replace them again.

