Are you ready to roll up your sleeves and dive into the world of tire maintenance? Welcome to our comprehensive guide on “Mounting and Demounting Tires Made Easy: A Step-by-Step Guide.” Whether you’re a DIY enthusiast or simply curious about the intricate dance between rubber and rim, this post will take you on a journey through the essential process of mounting and demounting tires.
Tires are the unsung heroes of our vehicles, quietly bearing the weight of our journeys and adventures. But like all heroes, they need care and attention. Understanding how to properly mount and demount tires isn’t just about saving a trip to the mechanic – it’s about ensuring your safety on the road, extending the life of your tires, and even improving your vehicle’s performance.
In this guide, we’ll walk you through everything you need to know: from the tools required and safety precautions to take, to the step-by-step process of removing an old tire and fitting a new one. We’ll demystify terms like “breaking the bead” and “seating the tire,” and share pro tips to make the process smoother.
So, whether you’re looking to change your tires at home, understand what happens during a tire change, or simply expand your automotive knowledge, buckle up! We’re about to embark on a tire-changing adventure that will leave you feeling more confident and informed about this crucial aspect of vehicle maintenance. Let’s get rolling!
Table of Contents
What is Mounting and Demounting a Tire?
Mounting and demounting a tire refer to the processes of installing a new tire onto a wheel or removing an existing tire from a wheel, respectively. These tasks are essential for vehicle maintenance, as tires wear out over time and need to be replaced periodically.
Proper mounting and demounting techniques are crucial for several reasons:
- Safety: Incorrectly mounted or demounted tires can lead to blowouts, loss of control, and accidents on the road. Proper techniques ensure that the tire is securely fastened to the wheel, minimizing the risk of failure.
- Tire and Wheel Integrity: Improper mounting or demounting can damage the tire, wheel, or both. This can result in costly repairs or replacements, as well as potential safety hazards.
- Balanced Ride: Properly mounted and balanced tires provide a smoother, more comfortable ride, and help extend the life of the tires and other components of the vehicle’s suspension system.
Safety should be the top priority when mounting or demounting tires. These processes involve working with heavy components under tension, which can be dangerous if not handled correctly. Appropriate safety gear, such as gloves and eye protection, should be worn, and proper tools and equipment should be used to minimize the risk of injury.
Tools and Equipment Needed
To mount and demount tires safely and effectively, you’ll need the proper tools and equipment. Here’s a list of essential items:
- Tire Machine: This specialized machine is designed to mount and demount tires from wheels. It typically has a clamping mechanism to secure the wheel, a tool arm for positioning the tire, and a bead breaker to separate the tire from the wheel.
- Bead Breaker: As the name suggests, this tool is used to break the bead of the tire, allowing it to be demounted from the wheel. It can be a separate tool or integrated into the tire machine.
- Tire Lubricant: A lubricant, such as a tire mounting paste or solution, is essential for lubricating the tire beads and facilitating the mounting process.
- Valve Core Tool: This small tool is used to remove and install the valve core from the tire’s valve stem, allowing for inflation or deflation.
- Tire Levers: These specialized levers are used to pry the tire beads over the wheel’s edge during the demounting process.
- Safety Gear: Proper safety gear, including gloves, safety glasses, and sturdy work boots, is crucial to protect yourself from potential hazards.
- Workstation Setup: A clean, well-lit, and organized workstation is essential for efficient and safe tire mounting and demounting. It should include a sturdy workbench, adequate lighting, and proper ventilation.
In addition to these essential tools, you may also need a tire balancer, wheel weights, and a compressed air source for inflating the tires. Having the right tools and equipment not only ensures a smooth and efficient process but also promotes safety during tire work.
Preparing the Tire and Wheel
Before mounting a new tire, it’s crucial to inspect both the tire and the wheel for any signs of damage or wear. Carefully examine the tire for cracks, bulges, or uneven tread wear, which could indicate underlying issues. Additionally, check the wheel for any bent or damaged areas, as these could prevent a proper seal and lead to future problems.
Once you’ve confirmed that both the tire and wheel are in good condition, it’s time to clean them thoroughly. Use a tire cleaning solution or a mild soap and water mixture to remove any dirt, debris, or residual lubricant from the previous tire. Pay special attention to the bead area of the tire, as well as the wheel’s mounting surface, to ensure a clean and secure fit.
After cleaning, it’s essential to lubricate the tire beads. This step helps the tire slide onto the wheel more easily and creates a better seal. Use a tire lubricant or a vegetable-based lubricant specifically designed for this purpose. Apply a thin, even layer of lubricant to both the tire beads and the wheel’s mounting surface, taking care not to over-lubricate, which can cause the tire to slip or spin on the wheel.
With the tire and wheel properly prepared, you’re now ready to proceed with the mounting process.
Demounting the Old Tire
Removing the old tire from the wheel is a crucial step in the tire mounting and demounting process. Here’s a step-by-step guide to demounting the old tire:
- Deflate the Tire: Before attempting to remove the tire, you must completely deflate it. Use a tire valve tool or a valve core remover to let out all the air from the tire.
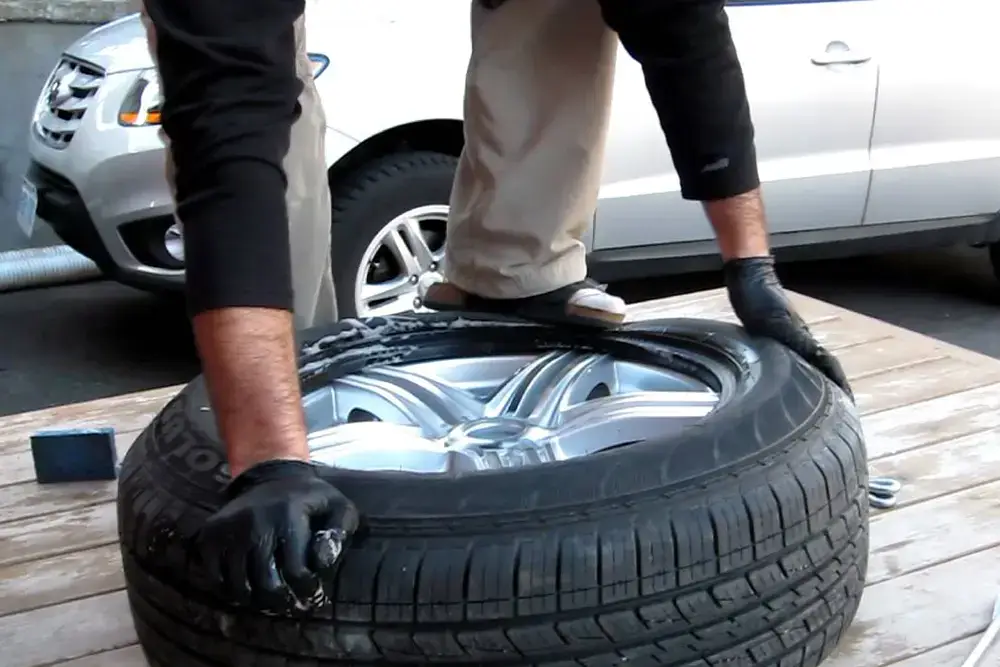
- Break the Bead: The bead is the edge of the tire that fits tightly against the wheel rim. To remove the tire, you need to break the bead free from the rim. This can be done using a tire bead breaker tool or a specialized bead breaker machine. Apply the bead breaker tool to the tire’s sidewall and lever it against the rim to break the bead.
- Lubricate the Tire: Apply a tire lubricant or a soap and water solution to the tire beads and the rim. This will help the tire slide off the rim more easily.
- Mount the Tire on the Demounting Tool: Place the tire on a tire demounting tool or a tire machine. This tool is designed to hold the tire securely while you pry it off the rim.
- Use the Tire Lever: Start at the point where the bead is already broken and insert the curved end of a tire lever between the tire bead and the rim. Carefully work the lever around the circumference of the tire, prying the bead over the rim’s edge.
- Remove the Tire from the Rim: Once the bead is completely separated from the rim, you can lift the tire off the wheel. Be careful not to damage the rim or the tire during this process.
- Inspect the Tire and Rim: After removing the tire, inspect both the tire and the rim for any signs of damage, wear, or debris. Clean the rim thoroughly before mounting the new tire.
It’s important to follow proper safety precautions and handle the tire and tools with care to avoid injury or damage. If you encounter any difficulties or are unsure about the process, it’s best to seek professional assistance.
Mounting the New Tire
Mounting a new tire onto a wheel is a crucial step that requires attention to detail and proper technique. Follow these steps to ensure a successful tire mounting process:
- Lubricate the Tire Beads: Apply an ample amount of tire lubricant or soap solution to the tire beads (the edges of the tire that sit against the wheel rim) and the wheel rim. This will help the tire slide onto the rim more easily and reduce the risk of damaging the tire or rim.
- Position the Tire onto the Wheel: Place the tire onto the wheel rim, ensuring that the tire’s rotation direction matches the intended direction of travel. Align the valve stem hole in the rim with the valve stem on the tire.
- Start Mounting the Tire: Using your hands or a tire mounting tool, begin working the tire onto the wheel rim. Start by pushing the bottom bead (the part of the tire that sits against the rim’s outer edge) over the rim’s edge. Work your way around the tire, using a tire iron or spoon if necessary, to guide the bead onto the rim.
- Seat the Lower Bead: Once the bottom bead is completely mounted onto the rim, use a tire iron or a bead setter tool to work the upper bead over the rim’s edge. Apply force evenly around the tire to prevent the bead from popping off on one side as you work on the other.
- Inflate the Tire: Once both beads are mounted onto the rim, partially inflate the tire using an air compressor or a portable inflator. This will help seat the beads properly against the rim’s edges.
- Seat the Beads: If the beads are not fully seated against the rim after partial inflation, use a bead seater tool or a rubber mallet to gently tap around the tire’s sidewalls. This will help the beads pop into place against the rim.
- Inflate to Proper Pressure: Once the beads are fully seated, inflate the tire to the recommended pressure level specified by the tire or vehicle manufacturer. Double-check the pressure with a high-quality tire gauge to ensure accurate inflation.
- Inspect the Mounted Tire: Visually inspect the mounted tire to ensure that the beads are properly seated all the way around the rim, and there are no bulges or irregularities in the tire’s shape.
Remember, mounting a tire requires patience and care. If you encounter any difficulties or have concerns, it’s always best to seek assistance from a professional tire technician to avoid potential safety risks or damage to the tire or wheel.
Balancing the Tire
Balancing a tire is a crucial step in the mounting process to ensure a smooth and comfortable ride. An unbalanced tire can cause excessive vibration, premature wear on suspension components, and decreased fuel efficiency. The balancing process involves adding small weights to the wheel to counteract any heavy spots on the tire and wheel assembly.
The importance of tire balancing cannot be overstated. Properly balanced tires provide a smoother ride, improved handling, and extended tire life. Unbalanced tires can lead to excessive vibration, which not only creates an uncomfortable driving experience but also puts additional stress on various components of the vehicle, such as the suspension system, bearings, and steering components.
The balancing process typically involves mounting the tire and wheel assembly on a specialized balancing machine. This machine spins the assembly at a high speed and detects any imbalances. The technician then adds small weights, either clip-on or adhesive, to the inner or outer rim of the wheel to counteract the heavy spots.
There are two main types of balancing weights:
- Clip-on weights: These weights are clipped onto the outer or inner rim of the wheel. They are easy to install and remove, making them a popular choice for tire shops and DIY enthusiasts.
- Adhesive weights: These weights are applied directly to the wheel using an adhesive backing. They provide a more permanent and aesthetically pleasing solution, as they are less visible than clip-on weights.
The balancing process may need to be repeated several times until the desired level of balance is achieved. It is important to follow the manufacturer’s recommended specifications and procedures to ensure proper balancing and avoid potential issues.
Balancing tires is an essential part of the mounting process, and it should not be overlooked. Properly balanced tires not only provide a smoother ride but also contribute to improved vehicle safety, better handling, and extended tire life.
Safety Precautions
Safety should be the top priority when mounting and demounting tires. These tasks involve handling heavy and bulky components, which can lead to injuries if proper precautions are not taken.
One of the most significant risks is improper lifting and handling of tires and wheels. Tires, especially those for larger vehicles, can weigh over 50 pounds, and wheels can be equally heavy. Attempting to lift these components without proper technique can lead to back injuries, muscle strains, or dropped components that can cause foot or toe injuries.
To avoid such injuries, it is crucial to use proper lifting techniques. When lifting tires or wheels, keep your back straight, bend at the knees, and use your leg muscles to lift. Avoid twisting or jerking motions, and keep the load close to your body. If the tire or wheel is too heavy to lift safely, seek assistance or use mechanical aids like a tire dolly or wheel lift.
Another safety concern is the presence of pinch points, areas where body parts can become trapped between the tire and wheel or other components. These pinch points can cause severe injuries, including crushed fingers, hands, or limbs. Always be aware of potential pinch points and keep hands, fingers, and other body parts clear of these areas during the mounting and demounting process.
Wearing appropriate personal protective equipment (PPE) is also essential. Gloves can protect your hands from cuts, abrasions, and pinch points. Safety glasses or goggles can prevent debris or tire particles from entering your eyes. Steel-toed boots can protect your feet from dropped tires or wheels.
Finally, maintain a clean and organized workspace. Clutter and debris can create tripping hazards or obstruct your movements, increasing the risk of accidents. Keep the work area clear and ensure adequate lighting for better visibility.
By following these safety precautions and maintaining a safety-conscious mindset, you can significantly reduce the risk of injuries during tire mounting and demounting tasks.
Common Mistakes and Troubleshooting
Mounting and demounting tires can be a challenging task, even for experienced mechanics. Several common mistakes and issues can arise during the process, leading to frustration and potential safety hazards. Here are some of the most common problems and troubleshooting tips:
Bead Leaks
One of the most common issues when mounting a tire is a bead leak, which occurs when the tire bead fails to seal properly against the wheel rim. This can cause air to escape, leading to a flat tire or uneven wear. Bead leaks can be caused by several factors, including:
- Dirt or debris on the wheel rim or tire bead
- Damaged or worn tire bead
- Improper use of lubricant or bead sealer
To troubleshoot a bead leak, start by inspecting the wheel rim and tire bead for any debris or damage. Clean the surfaces thoroughly and apply a suitable bead sealer or lubricant. If the leak persists, you may need to replace the tire or wheel.
Improper Seating
Another common issue is improper seating of the tire on the wheel rim. This can occur when the tire bead is not properly seated or when the tire is not inflated to the correct pressure. Improper seating can lead to vibrations, uneven wear, and potential tire failure.
To troubleshoot improper seating, ensure that the tire bead is properly lubricated and seated on the wheel rim. Inflate the tire to the recommended pressure and check for any bulges or irregularities. If the issue persists, you may need to demount and remount the tire.
Damage to Wheels or Tires
During the mounting and demounting process, it’s possible to accidentally damage the wheels or tires. This can occur due to improper tool usage, excessive force, or carelessness.
To avoid damaging wheels or tires, always use the correct tools and follow the manufacturer’s instructions. Inspect the wheels and tires for any signs of damage before and after the process. If you notice any damage, replace the affected components immediately.
Improper Balancing
Proper tire balancing is crucial for a smooth and safe ride. Imbalanced tires can cause vibrations, uneven wear, and potential safety issues.
To troubleshoot balancing issues, ensure that the tire is mounted correctly and that the wheel weights are properly installed. If the issue persists, you may need to have the tire professionally balanced or replaced.
By being aware of these common mistakes and troubleshooting techniques, you can minimize the risk of issues and ensure a safe and successful tire mounting and demounting process.
Professional vs. DIY Tire Mounting
Mounting and demounting tires is a task that can be done by both professionals and DIY enthusiasts. However, there are pros and cons to each approach, and it’s essential to understand when it’s appropriate to tackle the job yourself and when it’s better to seek professional assistance.
Pros of DIY Tire Mounting
- Cost Savings: Mounting and demounting tires yourself can save you a significant amount of money compared to paying a professional service. This can be especially appealing if you need to change tires frequently or have multiple vehicles.
- Convenience: Being able to change your tires at home or on the go can be incredibly convenient, especially if you live in a remote area or have a busy schedule.
- Sense of Accomplishment: For many DIY enthusiasts, there’s a sense of pride and satisfaction that comes with learning a new skill and successfully completing a task like tire mounting.
Cons of DIY Tire Mounting
- Safety Risks: Tire mounting and demounting can be dangerous if not done properly. Improper techniques can lead to injuries from the tire or the tools used, as well as potential damage to the tire or wheel.
- Specialized Tools Required: Mounting and demounting tires requires specialized tools, such as tire machines, bead breakers, and tire lubricants. These tools can be expensive to purchase, especially for occasional use.
- Potential for Mistakes: Without proper training and experience, it’s easy to make mistakes that can lead to tire or wheel damage, improper seating of the tire, or other issues that can compromise safety and performance.
When to Seek Professional Assistance
While DIY tire mounting can be a rewarding experience for those with the right skills and equipment, there are situations where it’s advisable to seek professional assistance:
- Complex or Specialized Tires: Some tires, such as those with low-profile sidewalls or run-flat designs, can be more challenging to mount and demount. Professionals have the expertise and specialized equipment to handle these tires safely and effectively.
- Lack of Proper Tools or Experience: If you don’t have access to the necessary tools or lack the experience to mount and demount tires correctly, it’s best to leave the task to professionals. Improper techniques can lead to costly mistakes and potential safety hazards.
- Time Constraints: If you’re in a time crunch or need to get back on the road quickly, taking your vehicle to a professional tire service can save you valuable time and ensure the job is done right.
Ultimately, whether you choose to mount and demount tires yourself or seek professional assistance depends on your skill level, access to proper tools, and the specific circumstances. It’s always better to err on the side of caution and prioritize safety over potential cost savings.
Maintenance and Care
Proper maintenance and care are crucial for ensuring the longevity and safety of your tires and wheels. Here are some essential tips to keep in mind:
Proper Storage and Handling
- Store tires in a cool, dry place away from direct sunlight, heat sources, and ozone-producing equipment.
- Avoid stacking tires too high or placing heavy objects on top of them, as this can cause deformation.
- Handle tires and wheels carefully to prevent scratches, dents, or other damage.
Regular Inspections
- Inspect tires regularly for signs of wear, cracks, bulges, or other damage.
- Check tire pressure at least once a month and adjust it according to the manufacturer’s recommendations.
- Look for any objects stuck in the tread or sidewall that could cause punctures or leaks.
- Rotate tires according to the recommended schedule (usually every 5,000 to 8,000 miles) to promote even wear.
- Replace tires when the tread depth reaches the minimum recommended level (usually 2/32 of an inch).
- Consider replacing all four tires at once for optimal performance and handling.
Wheel Care
- Clean wheels regularly to prevent brake dust and road grime buildup, which can cause corrosion and damage.
- Check for any cracks, dents, or other damage to the wheels and replace them if necessary.
- Ensure that the wheels are properly torqued to the manufacturer’s specifications after mounting or demounting tires.
By following these maintenance and care guidelines, you can extend the life of your tires and wheels, improve vehicle safety, and ensure a smooth and comfortable ride.

