You’re standing in your driveway, staring at a flat tire, and you just shoved a sticky rope plug into the puncture. Now comes the question that nobody seems to answer clearly: can you drive on it right now, or do you need to wait?
I’ve been in that exact situation more times than I’d like to admit. Over the years, I’ve plugged tires on my own vehicles, helped friends in parking lots, and tested multiple plug kits from different brands to see how they actually perform in real-world conditions.
The answer isn’t as simple as most forums make it sound, and getting it wrong could cost you a tire — or worse.
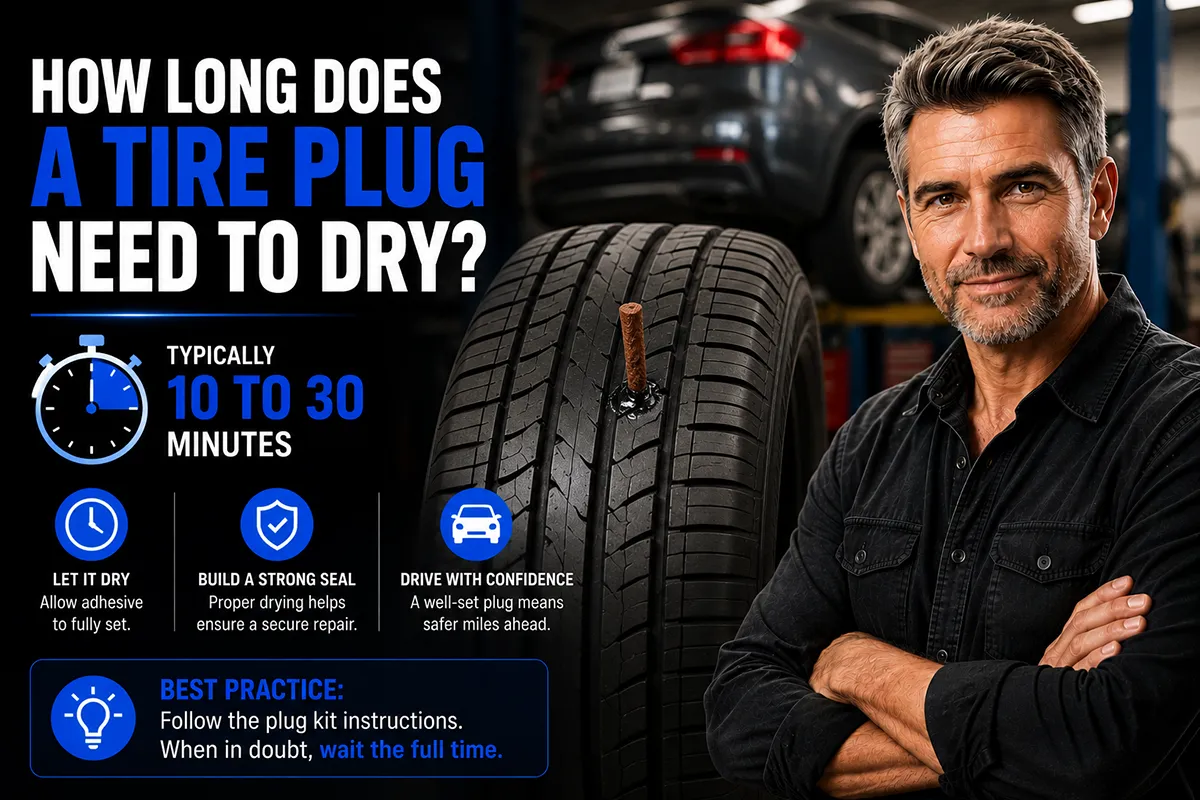
- Most tire plugs using rubber cement need 5 to 10 minutes of drying time before you can safely drive at moderate speeds.
- Self-vulcanizing plugs (like those in most modern kits) can be driven on almost immediately after installation.
- A patch-plug combo installed by a tire shop needs about 24 hours for the adhesive to fully cure, though you can drive on it right away at normal speeds.
- Temperature, humidity, and the type of adhesive all affect drying time.
- A plug is a temporary fix — I always recommend getting a proper patch-plug repair within a few days.
What Actually Happens When You Plug a Tire
Before I get into drying times, it helps to understand what’s actually going on when you insert a tire plug. A tire plug is a sticky, tar-coated rope of rubber that gets forced into a puncture hole using a special insertion tool.
The plug works by filling the hole and creating a friction seal against the inner walls of the puncture. The rubber cement or vulcanizing compound on the plug chemically bonds with the tire rubber as it cures, creating a more permanent seal over time.
I think of it like gluing two pieces of rubber together — the initial stick happens fast, but the full bond takes longer.
The Short Answer: Most Plugs Need 5 to 10 Minutes
In my experience with the most common plug kits you’ll find at AutoZone, Walmart, or Amazon, the drying time before you can safely drive is about 5 to 10 minutes. That’s it.
I know that sounds surprisingly fast, but here’s why: the plug doesn’t need to be “fully cured” before you drive. It just needs to be set enough that the air pressure inside the tire won’t push it back out.
The internal air pressure actually helps the plug seal better, pressing it outward against the puncture walls. I’ve driven on freshly installed plugs after waiting just a few minutes, and in most cases, the seal held perfectly.
Different Plug Types, Different Drying Times
Not all tire plugs are created equal. I’ve used several types over the years, and they each have different characteristics when it comes to drying and curing time.
Standard Rope Plugs with Rubber Cement
These are the most common type you’ll find in inexpensive plug kits from brands like Slime, Victor, and ARB. They come with a separate tube of rubber cement that you apply to the plug before insertion.
With these, I recommend waiting at least 5 to 10 minutes after installation before driving. The rubber cement needs a few minutes to get tacky and begin bonding. In my testing, driving immediately after insertion sometimes caused a slow leak that resolved itself after the cement fully set — but why risk it?
Self-Vulcanizing Plugs
These plugs come pre-coated with a vulcanizing compound that activates through friction and heat when you insert the plug. Brands like Stop & Go and Boulder Tools use this technology in their kits.
With self-vulcanizing plugs, you can technically drive almost immediately. The insertion process itself generates enough friction to start the bonding. I’ve used Stop & Go plugs on road trips and been back on the highway within two minutes with zero issues.
Mushroom Plugs (Patch-Plug Combos)
These are the professional-grade repairs done at tire shops like Discount Tire, Firestone, or your local mechanic. A mushroom plug combines a plug that fills the puncture from inside with a patch that covers the inner liner.
The adhesive used in these repairs typically needs about 24 hours to fully cure. However, tire shops will let you drive on it immediately because the mechanical seal is strong enough on its own. The adhesive cure is just extra insurance.
In my experience, patch-plug combos are by far the most reliable repair method. I’ve had them last the entire remaining life of a tire without any issues.
Drying Time Comparison Table
Here’s a quick reference based on my experience with different plug types and conditions:
| Plug Type | Wait Before Driving | Full Cure Time | Max Speed After Plug |
|---|---|---|---|
| Rope Plug with Rubber Cement | 5–10 minutes | 24–48 hours | 45–50 mph initially |
| Self-Vulcanizing Plug | 1–2 minutes | 12–24 hours | 50–55 mph initially |
| Mushroom Patch-Plug (Shop Repair) | Immediate | 24 hours | Normal highway speeds |
| Tire Sealant (Slime, Fix-a-Flat) | Immediate | N/A (temporary) | 50 mph max |
Factors That Affect How Long a Tire Plug Takes to Dry
Through my testing over the years, I’ve found that several factors can speed up or slow down the curing process. If you want the most reliable seal, pay attention to these variables.
Temperature
Temperature plays a huge role. Rubber cement and vulcanizing compounds cure faster in warm conditions. On a hot summer day in Texas or Arizona, I’ve seen plugs set up in under 5 minutes. During a cold winter repair in my Minnesota friend’s garage, the same plug took closer to 15 minutes before I felt comfortable driving.
If you’re plugging a tire in cold weather (below 40°F), I’d recommend waiting at least 15 to 20 minutes. You can also warm the area with a heat gun or hair dryer to speed things up, though I’d be careful not to overheat the rubber.
Humidity
High humidity can slow down the drying process for rubber cement-based plugs. If you’re doing a repair in Florida or along the Gulf Coast during summer, give it a few extra minutes.
I’ve noticed that in dry climates like Colorado or Nevada, the cement sets up almost twice as fast as in humid conditions. It’s a small difference, but it’s noticeable.
Puncture Size
The size of the puncture matters too. A small nail hole (1/4 inch or less) is going to seal faster because the plug fills the hole tightly with less exposed adhesive surface. A larger puncture from a screw or bolt might need more time for the adhesive to set because there’s more area to seal.
In my experience, any puncture larger than 1/4 inch in diameter should probably go straight to a tire shop for a proper patch-plug repair rather than a DIY rope plug.
Tire Pressure
Here’s something most people don’t think about: the pressure you inflate to after plugging affects how well the seal holds during the initial cure. I always reinflate to the manufacturer’s recommended PSI — never higher.
Over-inflating puts extra stress on a fresh plug and can push it out before the adhesive has set. I learned this the hard way when I inflated a freshly plugged tire to 40 PSI on a tire rated for 35 PSI. The plug held, but it developed a slow leak that I had to re-address later.
My Step-by-Step Process for Plugging a Tire
Since drying time is just one part of the equation, let me walk you through my complete process. Getting the installation right is just as important as the drying time.
Step 1: Find the Puncture
I always start by inflating the tire and spraying soapy water around the tread area. Bubbles will form at the leak site. If I can see a nail or screw, even better — that tells me exactly where the puncture is.
Step 2: Remove the Object
Pull out the nail, screw, or whatever caused the puncture using pliers. The tire will start losing air immediately, so work quickly from this point.
Step 3: Ream the Hole
This is a step that many people skip, and it’s a mistake. Use the reaming tool (the round, rasping tool in your plug kit) to clean and slightly enlarge the hole. Push it in and out several times.
Reaming creates a uniform channel and roughens the inner surface so the plug adhesive has something to grip. I’ve found that plugs installed without reaming are significantly more likely to fail.
Step 4: Thread the Plug
Thread a plug strip through the eye of the insertion tool so that equal lengths hang on both sides. Apply rubber cement generously to the plug if your kit includes it. I like to also squeeze a little cement into the hole itself.
Step 5: Insert the Plug
Push the insertion tool with the plug straight into the puncture with firm, steady pressure. You want about 1/4 to 1/2 inch of plug material sticking out above the tread surface.
Pull the tool straight out quickly. The plug should stay in place with the two tails sticking out.
Step 6: Trim the Excess
Wait a minute or two, then trim the excess plug material flush with the tread using a razor blade or sharp knife. Don’t trim it too close — leave it just slightly above the tread surface.
Step 7: Inflate and Wait
Reinflate the tire to the proper PSI and spray soapy water over the plug to check for bubbles. If there are no bubbles, the seal is good.
Now wait. This is where the drying time matters. I set a timer for 10 minutes and check the tire pressure again. If the pressure hasn’t dropped, I’m confident enough to drive.
Can You Drive on a Tire Plug Immediately?
I get asked this question constantly, and my honest answer is: it depends on the type of plug, but in most cases, you should wait at least a few minutes.
I’ve driven on self-vulcanizing plugs almost immediately after installation and had zero issues. But with rubber cement-based plugs, I’ve had a couple of early failures when I tried to drive within the first minute or two. The cement just hadn’t had enough time to get tacky.
Here’s my rule of thumb: if you can wait 10 minutes, wait 10 minutes. Use that time to check the seal with soapy water, verify your tire pressure, and make sure everything looks good. It’s not worth risking a blowout on the highway to save 10 minutes.
How Fast Can You Drive After Plugging a Tire?
During the initial drying period — meaning the first 24 to 48 hours after plugging — I recommend keeping your speed below 50 mph. This gives the adhesive time to fully cure without the stress of high-speed rotation and heat.
After the first couple of days, assuming the plug is holding air and showing no signs of leaking, you can gradually return to normal highway speeds. I’ve driven at 70+ mph on plugged tires for extended periods without any problems, but only after confirming the repair was solid.
That said, I want to be clear: a rope plug alone is not considered a permanent repair by the Rubber Manufacturers Association (RMA) or the U.S. Tire Manufacturers Association (USTMA). They recommend a patch-plug combination applied from inside the tire for any permanent repair.
When a Tire Plug Is NOT Enough
Over the years, I’ve learned the hard way that not every puncture can be saved with a plug. Here are the situations where I skip the plug and go straight to a tire shop — or replace the tire entirely.
Sidewall Damage
Never plug a sidewall puncture. The sidewall flexes constantly during driving, and a plug will not hold. I’ve seen people try it, and it always fails — usually at the worst possible time.
Punctures Near the Shoulder
If the puncture is within an inch of the sidewall, in the shoulder area of the tread, a plug is risky. The rubber is thinner there and flexes more than the center of the tread. I’ve had marginal success plugging shoulder punctures, but I always get them professionally repaired within a day.
Large Punctures
Any hole larger than 1/4 inch in diameter is too big for a standard rope plug. I tried plugging a 3/8-inch gash once, and while it held initially, it started leaking within a few hours.
Multiple Punctures Close Together
If you have two or more punctures within a couple of inches of each other, the structural integrity of that section of tread is compromised. I’d replace the tire rather than try to plug both holes.
Previously Repaired Tires
If a tire has already been plugged or patched in the same area, adding another repair weakens the structure. I personally follow a “two repairs max” rule — after the second plug or patch, I replace the tire.
DIY Plug Kits I’ve Actually Used and Recommend
I’ve tried a lot of plug kits over the years, and here are the ones I keep in my vehicles and recommend to friends.
Boulder Tools Heavy Duty Tire Repair Kit — $15 to $20
This is my everyday carry kit. It comes with self-vulcanizing plugs, a solid T-handle reaming tool, and a good insertion tool. The case is compact enough to fit in a glove box. I’ve used this kit on at least a dozen repairs, and the plugs cure fast — usually ready to drive within a couple of minutes.
Stop & Go Pocket Tire Plugger — $10 to $15
This is the ultra-compact option I keep in my motorcycle kit, but it works great on car tires too. The plugs are pre-coated and self-vulcanizing. I’ve used it in emergency situations where time mattered, and the plugs sealed almost instantly.
Slime Tire Plug Kit — $8 to $12
This is the budget option you’ll find at Walmart and most auto parts stores. It uses rubber cement-based plugs, so you need to wait the full 5 to 10 minutes. The tools feel a little cheaper than the Boulder Tools kit, but they get the job done. I keep one of these in my wife’s car as a backup.
ARB Speedy Seal Kit — $30 to $40
This is the premium option for off-road enthusiasts. The plugs are thick, the tools are heavy-duty, and the whole kit is built to survive being bounced around in an off-road rig. I’ve used this kit on trail rides and it’s excellent, though overkill for most daily drivers.
Tire Plug vs. Tire Patch vs. Patch-Plug: What’s the Difference?
I think a lot of confusion about drying times comes from people mixing up these three different repair types. Let me clarify.
Tire Plug (Rope Plug)
A rope plug is inserted from the outside of the tire without removing it from the rim. It fills the puncture hole but doesn’t cover the inner liner. It’s a quick, emergency repair that I consider temporary.
Drying time: 5 to 10 minutes before driving.
Tire Patch
A patch is applied to the inside of the tire after removing it from the rim. It covers the inner liner over the puncture but doesn’t fill the hole itself. Patches alone are not recommended by industry standards because moisture can seep into the tire body through the unfilled hole.
Drying time: 15 to 30 minutes for the adhesive, though the tire needs to be remounted and balanced.
Patch-Plug Combination
This is the gold standard. A mushroom-shaped plug fills the hole from inside while an integrated patch covers the inner liner. This is the only repair method the USTMA considers permanent.
Drying time: the adhesive needs 24 hours to fully cure, but you can drive on it immediately after the tire is remounted.
What Happens If You Don’t Let the Plug Dry?
I’ve made this mistake, so I can speak from experience. If you drive on a freshly installed rubber cement plug before the adhesive has had time to set, a few things can happen.
The most common issue is a slow leak. The plug shifts slightly under the stress of driving, and the adhesive bond breaks before it fully forms. You might not notice it immediately, but over the next few hours, the tire slowly loses pressure.
In a worse scenario, the plug can actually blow out. I’ve seen this happen once — a friend plugged a tire and hit the highway immediately. About 20 minutes later, the plug ejected and the tire went flat at 65 mph. Nobody was hurt, but it was a scary situation that could have been avoided with a few minutes of patience.
In the worst case, driving on an improperly sealed plug at highway speeds can lead to a blowout. This is rare with modern tires, but the risk is real.
How to Tell If Your Tire Plug Is Holding
After installing a plug and waiting the appropriate drying time, here’s how I verify the repair is solid before driving.
Soapy water test: Spray or brush soapy water over the plug. If bubbles form, the seal isn’t complete. Let it sit longer or redo the repair.
Pressure check: Inflate to the proper PSI, wait 10 minutes, and check again. If you’ve lost more than 1 PSI, something isn’t right.
24-hour check: After driving for a day, check the pressure again. A properly plugged tire should hold pressure within 1-2 PSI over 24 hours (accounting for temperature changes).
Visual inspection: Look at the plug after driving. If it’s protruding more than when you installed it, or if you see any rubber cement oozing, the repair may be compromised.
I make it a habit to check the pressure on a plugged tire every day for the first week. After that, I check it weekly until I either get a proper shop repair or replace the tire.
Should You Use Tire Sealant Instead of a Plug?
Products like Fix-a-Flat and Slime tire sealant are tempting because they’re even faster than plugging — just connect and spray. But in my experience, they’re a last resort, not a first choice.
Tire sealants work by coating the inside of the tire with a liquid compound that seals small punctures. They can get you to a tire shop, but they create a mess inside the tire that makes proper repair more difficult and expensive.
I’ve had mechanics charge me an extra $15 to $25 just to clean out tire sealant before they could do a patch-plug repair. Some shops won’t even touch a tire that’s had sealant in it.
If you have the choice between a plug kit and a can of Fix-a-Flat, go with the plug every time. It’s a better seal, it doesn’t damage the tire, and it gives you a more reliable temporary fix.
My Final Take: Don’t Overthink the Drying Time
After years of plugging tires on the side of the road, in parking lots, and in my garage, here’s what I’ve landed on: 10 minutes is the magic number for most situations.
Wait 10 minutes after installing a rope plug with rubber cement. Check the seal with soapy water. Verify the pressure. Then drive — carefully, at moderate speeds — to a tire shop for a proper patch-plug repair.
If you’re using self-vulcanizing plugs, you can cut that time down to a couple of minutes. And if you get a professional patch-plug combo, you can drive normally right away.
The most important thing isn’t the drying time — it’s understanding that a DIY plug is a temporary repair. It’s there to get you home or to a tire shop safely. It’s not a set-it-and-forget-it solution.
I always keep a plug kit in every vehicle I own, and I’ve recommended them to every driver I know. But I also make sure to get a proper repair done within a few days of plugging a tire. That’s the approach that’s kept me driving safely for years, and it’s the approach I recommend to every reader on this site.
Frequently Asked Questions
How long does a tire plug need to dry before driving?
Most tire plug kits using rubber cement or vulcanizing adhesive need about 5 to 10 minutes to dry before you can safely drive on the repaired tire. I recommend waiting the full 10 minutes and then checking the plug for any air leaks with soapy water before hitting the road. Keep in mind that driving conditions matter — if you’re in colder US climates like the Midwest or Northeast, curing may take slightly longer due to lower temperatures.
Can you drive immediately after plugging a tire?
Technically some plug-only kits like the Slime Tire Plug Kit advertise that you can drive right away at reduced speeds, but I wouldn’t recommend it. Giving the plug at least 5 to 10 minutes to set ensures the vulcanizing cement bonds properly with the rubber and creates a stronger seal. Driving immediately on a freshly plugged tire, especially at highway speeds, increases the risk of the plug failing and leaving you stranded.
Does a tire plug need rubber cement to seal properly?
Yes, rubber cement or vulcanizing adhesive is a critical part of a proper tire plug repair. The cement chemically bonds the plug material to the inside of the puncture, creating an airtight seal that holds up under pressure. Most quality tire plug kits from US brands like Slime, ARB, and Stop & Go include the adhesive, and skipping it significantly increases the chance of a slow leak developing over time.
How long does a tire plug last compared to a tire patch?
A properly installed tire plug can last anywhere from 7 to 10 years or the remaining life of the tire, but a combination plug-patch repair is considered the industry gold standard by the RMA and TIA. A plug alone works great as a temporary roadside fix, but for long-term reliability — especially if you’re driving in harsh US conditions like summer heat in Texas or potholes in Pennsylvania — I’d recommend getting a plug-patch combo done at a tire shop for around $20 to $40.
Is it safe to plug a tire yourself or should you visit a tire shop?
Plugging a tire yourself is safe for small tread punctures caused by nails or screws, and a good DIY plug kit costs between $8 and $15 at stores like AutoZone or Walmart. However, if the puncture is on the sidewall, larger than 1/4 inch, or at an angle, you should take it to a professional tire shop immediately. A shop can perform a proper plug-patch repair from the inside of the tire and inspect for hidden internal damage that a DIY plug won’t reveal.
What happens if a tire plug doesn’t dry completely before driving?
If you drive before the rubber cement fully cures, the plug may not bond correctly to the puncture walls and could work itself loose under pressure. This often results in a slow air leak that gets worse over time, and at highway speeds the plug could even blow out entirely. I’ve seen cases where drivers had to pull over within a few miles because they rushed the drying process, so the extra 10 minutes of waiting is absolutely worth it for your safety.
Do tire plug dry times vary between different plug kit brands?
Yes, drying and curing times can vary between brands and adhesive types. Standard vulcanizing cement used in kits from brands like Victor, Slime, and Safety Seal typically cures in 5 to 10 minutes under normal conditions. Some newer self-vulcanizing plug strips don’t require separate cement at all and can seal almost instantly, but I still recommend waiting at least 5 minutes and verifying the seal before driving, especially if you plan to travel at US interstate speeds of 65 mph or higher.

