I’ll never forget the first time I got a flat tire. I was on a two-lane highway outside of Flagstaff, Arizona, with no cell signal, no AAA card in my wallet, and absolutely zero idea how to swap a tire.
It took me over an hour of fumbling, scraped knuckles, and a YouTube video that buffered every three seconds before I got back on the road. That experience changed everything for me.
Now, after years of reviewing tires and helping everyday drivers make smarter decisions, I’ve changed more flats than I can count — on sedans, SUVs, trucks, and even my neighbor’s minivan in a rainstorm. I want to make sure you never feel as helpless as I did that day in Arizona.
- Changing a flat tire takes about 15-30 minutes once you know the steps.
- You need a jack, lug wrench, and spare tire — all usually stored in your trunk.
- Always pull over to a flat, stable surface away from traffic before starting.
- Loosen the lug nuts BEFORE you jack the car up — this is the #1 mistake beginners make.
- Your spare tire (especially a donut) is a temporary fix — don’t drive over 50 mph or for extended distances on it.
- Practicing at home once can save you 30+ minutes of stress on the roadside.
Why Every Driver Needs to Know How to Change a Flat Tire
According to AAA, roughly 32 million drivers in the US experience a flat tire, blowout, or tire-related issue every single year. That’s nearly 1 in 7 drivers. And here’s the surprising part — fewer and fewer people actually know how to handle it themselves.
I’ve noticed this trend firsthand. When I talk to readers and fellow drivers, many admit they’ve never even opened their trunk to check if they have a spare. In my experience, knowing how to change a flat tire isn’t just a nice skill to have — it’s a genuine safety necessity.
Roadside assistance is great when it’s available, but I’ve personally waited over two hours for a tow truck on a busy Saturday afternoon. If I’d known what I was doing, I could have been back on the road in 20 minutes.
This guide is the one I wish I’d had that day in Arizona. I’m going to walk you through 10 simple steps, explain the mistakes I’ve made so you can avoid them, and share some tips that only come from real hands-on experience.
Before You Start: What You’ll Need
Before we get into the step-by-step process, let’s make sure you have everything you need. I always tell people to check their trunk at home — not on the side of I-95 when it’s 97°F and cars are flying by at 70 mph.
Essential Tools (Usually in Your Trunk)
- Spare tire — Either a full-size spare or a compact “donut” spare. Most sedans come with a donut; many trucks and SUVs include a full-size spare.
- Car jack — Typically a scissor jack that comes with the vehicle. It’s small, lightweight, and stored near the spare.
- Lug wrench — The L-shaped or cross-shaped wrench used to remove and tighten lug nuts.
Extras I Always Keep in My Car
- Flashlight with fresh batteries — Flat tires don’t wait for daylight. I’ve changed tires at 11 PM more than once.
- Reflective warning triangles or road flares — These are cheap (usually $10-$15 at Walmart or AutoZone) and can literally save your life by alerting oncoming traffic.
- Gloves — A pair of basic work gloves. Lug nuts and road grime will tear up your hands.
- Rain poncho — Because Murphy’s Law applies to flat tires more than anything else in life.
- Wheel wedges or a brick — To prevent the car from rolling while it’s jacked up.
- A small piece of plywood (about 12″ x 12″) — This gives the jack a stable base on soft ground. I learned this the hard way when my jack sank into hot asphalt in a Texas parking lot during summer.
A Quick Note About Your Spare Tire
I cannot stress this enough: check your spare tire’s air pressure regularly. A flat spare is useless. I recommend checking it every time you check your regular tires — roughly once a month. Most donut spares require 60 PSI, which is higher than your regular tires. The correct pressure is printed on the sidewall of the spare.
Also, some newer cars don’t come with a spare tire at all. Instead, they include a tire inflator kit or a can of fix-a-flat sealant. If that’s your situation, I’d strongly recommend buying a compact spare tire kit. You can find them for $80-$200 depending on your vehicle, and it’s some of the best money you’ll ever spend on peace of mind.
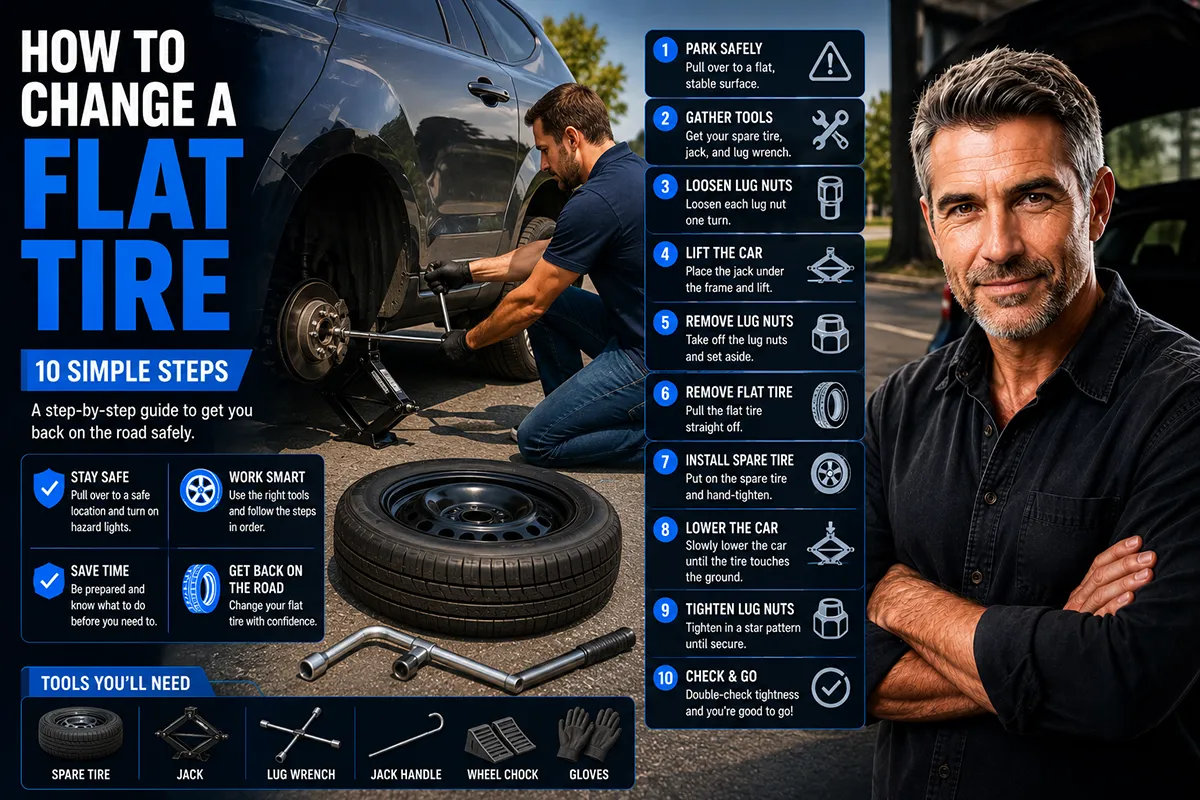
The 10 Steps to Change a Flat Tire
Alright, let’s get into it. I’ve broken this down into 10 clear, manageable steps. I’m writing them in the order I follow every single time, whether I’m changing a tire on my own car or helping someone else.
Step 1: Pull Over Safely and Turn on Your Hazard Lights
The moment you realize you have a flat — whether it’s a sudden blowout, a TPMS warning light, or that unmistakable thumping sound — your first priority is getting off the road safely.
Do NOT slam on the brakes. Gradually reduce your speed, turn on your hazard lights immediately, and look for a flat, stable surface to pull over on. Ideally, you want a parking lot, a wide shoulder, or a straight stretch of road where other drivers can see you from a distance.
In my experience, the shoulder of a highway curve is one of the most dangerous places to stop. If you can limp another quarter mile to a safer spot, do it. Yes, you’ll damage the tire further, but a tire is replaceable — you are not.
I always look for level ground. A slope or soft dirt makes jacking up the car dangerous and frustrating. If you’ve ever had a jack slip on an incline, you know exactly what I mean.
Step 2: Apply the Parking Brake and Set Wheel Wedges
Once you’re safely stopped, put the car in Park (or first gear if you drive a manual) and engage the parking brake. This is non-negotiable.
Then, place wheel wedges — or a brick, a large rock, or even a chunk of wood — behind the tires on the opposite end of the car from the flat. If your rear tire is flat, wedge the front tires. If the front tire is flat, wedge the rear tires.
This prevents the car from rolling while it’s jacked up. I’ve seen cars roll off jacks, and it’s terrifying. This step takes 10 seconds and could prevent a catastrophe.
Step 3: Remove the Hubcap or Wheel Cover (If Applicable)
If your flat tire has a hubcap or plastic wheel cover, you’ll need to remove it to access the lug nuts underneath. Most hubcaps can be pried off using the flat end of your lug wrench.
Some vehicles have exposed lug nuts with no hubcap, so you might be able to skip this step entirely. If you’re unsure, check your owner’s manual.
I’d recommend placing the hubcap upside down nearby — it makes a great little tray to hold your lug nuts so they don’t roll away into the grass or under your car. I learned this trick from an old mechanic, and it’s saved me countless headaches.
Step 4: Loosen the Lug Nuts (But Don’t Remove Them Yet)
This is the single most important tip in this entire article: loosen the lug nuts BEFORE you jack the car up.
If you try to loosen them while the tire is off the ground, the wheel will just spin freely, and you’ll get nowhere. I made this mistake my first time and wasted a solid 15 minutes before figuring out what was going on.
Using your lug wrench, turn each lug nut counterclockwise about a quarter to a half turn. You’re not removing them yet — just breaking them loose.
What If the Lug Nuts Won’t Budge?
This happens more often than you’d think, especially if the last shop that rotated your tires used an impact wrench and over-torqued them. Here’s what I do:
- Stand on the wrench. Position the lug wrench so the handle extends to the left, then carefully step on it with your body weight. This gives you significantly more leverage than arm strength alone.
- Use a breaker bar or a cheater pipe. If you keep a length of pipe in your trunk, you can slide it over the lug wrench handle to extend it. More leverage = less effort.
- Spray penetrating oil. A small can of PB Blaster or WD-40 can help with corroded lug nuts. Spray it on, wait a few minutes, then try again.
If you absolutely cannot loosen the lug nuts, that’s when you call for help. Don’t risk rounding them off or injuring yourself.
Step 5: Position the Jack Under the Vehicle Frame
Now it’s time to jack the car up. But where you place the jack matters enormously.
Every vehicle has designated jack points — reinforced areas of the frame designed to support the weight of the car. These are usually located along the bottom edge of the car’s body, behind the front tires and in front of the rear tires.
Check your owner’s manual for the exact locations. On most sedans, you’ll see a small notch or arrow on the pinch weld (the metal lip running along the underside of the car) indicating where the jack should go.
Placing the jack in the wrong spot can crush body panels, crack plastic trim, or — worst case — cause the car to fall off the jack. I’ve seen someone jack up a car on the floorpan, and it crumpled like a soda can. Don’t let that be you.
If you’re on soft ground (grass, dirt, hot asphalt), place that piece of plywood I mentioned under the jack base for stability.
Step 6: Raise the Vehicle Off the Ground
Using the jack, raise the vehicle until the flat tire is about six inches off the ground. You don’t need to go higher than that — just enough that you can remove the flat tire and fit the spare.
With a scissor jack, you’ll turn the jack handle clockwise. It takes some effort, but keep a steady pace. If the car feels unstable at any point, lower it back down, reposition the jack, and try again.
I always make a point of never putting any part of my body underneath the car while it’s on a jack. A jack is a lifting tool, not a support tool. If you need to work under a car, use jack stands. For a tire change, though, you should never need to go underneath.
Step 7: Remove the Lug Nuts and Take Off the Flat Tire
Now that the tire is off the ground, finish unscrewing the lug nuts by hand. Place them somewhere safe — inside that hubcap tray, in your pocket, or in a cup. Losing a lug nut on the side of the road is a frustrating experience I wouldn’t wish on anyone.
With the lug nuts removed, grip the flat tire by the treads and pull it straight toward you. It might take a little wiggling if the tire is stuck to the hub from corrosion or dirt.
Set the flat tire on its side under the vehicle, near where you’re working. This is a safety trick I always use — if the jack fails and the car drops, it’ll land on the old tire instead of the ground (or your foot). It’s not a foolproof safety measure, but it adds a layer of protection.
Step 8: Mount the Spare Tire
Lift the spare tire and align it with the lug bolts. This can be a little tricky, especially if you’re dealing with a heavy full-size spare on a truck or SUV. Don’t be afraid to rest it on your knee or foot to help guide it into position.
Push the spare onto the hub until the lug bolts poke through the holes in the rim. Then, hand-tighten the lug nuts as much as you can. Just snug them up — you’ll do the final tightening in the next step.
A Quick Comparison: Full-Size Spare vs. Donut Spare
| Feature | Full-Size Spare | Compact Donut Spare |
|---|---|---|
| Size | Same size as regular tires | Smaller and narrower |
| Speed Limit | Normal driving speeds | 50 mph max |
| Distance Limit | No special restriction | ~50-70 miles (temporary use only) |
| Weight | Heavier (25-35 lbs typically) | Lighter (around 15-20 lbs) |
| Handling | Normal driving feel | Reduced grip and braking ability |
| Trunk Space | Takes up more room | Compact, saves space |
| Cost to Replace | $80-$200+ | $50-$120 |
| Common On | Trucks, SUVs, some older sedans | Most modern sedans and compact cars |
If you’re driving on a donut spare, treat it as a “get me to the tire shop” solution — not a long-term fix. I’ve driven on a donut spare for a few days before, and I could feel the difference in handling immediately. The car pulled slightly, braking felt less confident, and I found myself white-knuckling it on highway on-ramps.
Step 9: Lower the Vehicle and Tighten the Lug Nuts
With the spare mounted and lug nuts hand-tightened, lower the vehicle using the jack until the spare tire is resting on the ground but the full weight of the car isn’t on it yet. This is what I call the “half-down” position.
Now, use your lug wrench to tighten the lug nuts firmly. Here’s the critical part: tighten them in a star (crisscross) pattern, not in a circle.
If you have five lug nuts, imagine they’re numbered 1-5 going clockwise. You’d tighten in this order: 1, 3, 5, 2, 4. For four lug nuts, go diagonal: top-left, bottom-right, top-right, bottom-left.
This star pattern ensures the wheel seats evenly against the hub. Tightening in a circle can cause the wheel to sit crooked, which leads to vibrations and uneven wear — or worse, a loose wheel.
Once the lug nuts are tight, lower the car completely and remove the jack. Then give each lug nut one more firm tighten.
How Tight Is Tight Enough?
If you have a torque wrench (which most people don’t carry in their trunk, and that’s okay), the typical spec for passenger cars is 80-100 ft-lbs. For trucks and SUVs, it’s often 100-140 ft-lbs. Check your owner’s manual for the exact specification.
If you don’t have a torque wrench, tighten them as firmly as you can with the lug wrench, using reasonable force. I recommend driving to the nearest tire shop within a day or two and asking them to torque the lug nuts to spec. Most shops will do this for free.
Step 10: Clean Up and Check the Spare’s Pressure
You’re almost done. Put the flat tire, jack, lug wrench, and hubcap back in your trunk. If you set out reflective triangles or road flares, collect those too.
Before you drive off, check the spare tire’s air pressure if you have a portable gauge (and you should — I keep a $7 digital gauge from Amazon in my glove box at all times). If the pressure seems low, drive carefully to the nearest gas station and fill it up.
What to Do After Changing Your Flat Tire
Changing the tire is only half the battle. Here’s what I always recommend doing in the hours and days after a flat tire change.
Get Your Flat Tire Inspected
Don’t automatically assume your flat tire is garbage. Many flats caused by nails, screws, or small punctures can be repaired for $15-$30 at most tire shops. Places like Discount Tire, Tire Rack installation partners, Costco Tire Center, and local shops all offer affordable plug-and-patch repairs.
However, if the damage is on the sidewall, if the puncture is larger than a quarter inch, or if you drove on the flat for a while before stopping, the tire will likely need to be replaced.
Replace Your Spare ASAP
If you’re on a donut spare, get to a tire shop within a day or two. During my years of reviewing tires and driving on various spares, I’ve felt firsthand how much they compromise handling, braking, and overall safety.
If you need a new tire, this is also a good time to consider whether your other tires are getting worn. I always recommend checking your tread depth while you’re at the shop. If the other three tires are significantly worn, you may want to replace them in pairs (or all four) rather than mixing a brand-new tire with older ones.
Re-Torque Your Lug Nuts
After driving several days on a newly mounted tire — whether it’s the spare or a replacement — I always have the lug nuts re-torqued. Lug nuts can settle and loosen slightly after initial installation. A quick re-torque takes 60 seconds at any tire shop and costs nothing.
Restock Your Emergency Kit
If you used any supplies during the tire change (gloves, flares, etc.), replace them as soon as you can. I keep a small checklist taped inside my trunk organizer so I always know what’s in my roadside kit.
Common Mistakes to Avoid When Changing a Flat Tire
Over the years, I’ve either made these mistakes myself or watched others make them. Learn from our collective pain.
- Not loosening lug nuts before jacking up the car. I’ve said it twice already because it’s that important. The wheel will spin freely if it’s off the ground.
- Jacking the car on a slope or soft surface. The jack can slip, tilt, or sink. Always seek level, firm ground.
- Forgetting to engage the parking brake. This seems obvious until you’re flustered on the side of the road. Make it the first thing you do.
- Over-tightening or under-tightening lug nuts. Over-tightening can warp brake rotors. Under-tightening can cause the wheel to loosen while driving. Use the star pattern and firm, even pressure.
- Ignoring the spare tire’s pressure for months or years. A flat spare is as useful as no spare at all.
- Driving too fast or too far on a donut spare. I’ve seen people drive on donuts for weeks. Don’t do this — the tire isn’t designed for it, and your car’s differential can suffer damage.
- Putting yourself in a dangerous position relative to traffic. Always work on the side of the car that’s away from traffic. If your flat is on the driver’s side and you’re on a busy highway, call for professional help. Your safety is worth the wait.
Should You Invest in Run-Flat Tires or a Tire Repair Kit?
This is a question I get from readers constantly, so I want to address it directly.
Run-Flat Tires
Run-flat tires have reinforced sidewalls that allow you to keep driving even after a puncture — typically up to 50 miles at up to 50 mph. I’ve tested several run-flat models over the past few years from brands like Bridgestone (DriveGuard), Michelin, and Continental.
The upside: you don’t need to stop and change a tire on the roadside. The downside: run-flats tend to cost 20-40% more than standard tires, they offer a slightly firmer ride quality, and they can’t always be repaired after a puncture.
In my experience, run-flats are a great option if you frequently drive alone, commute in areas where pulling over isn’t easy, or simply want the peace of mind. But they’re not for everyone.
Tire Repair Kits (Fix-a-Flat, Slime, etc.)
Aerosol sealant products like Fix-a-Flat or Slime are sold at every auto parts store in the country for about $8-$15. They can temporarily seal small punctures and inflate the tire enough to get you to a shop.
I keep a can in my trunk as a backup, but I want to be clear: these products are not a replacement for knowing how to change a tire. They don’t work on large punctures, sidewall damage, or blowouts. And the sealant inside can make a mess that some tire shops will charge extra to clean up before performing a proper repair.
Think of them as one more tool in your toolbox, not the only tool.
Practice at Home — Seriously
I know this sounds like something your parents would say, but hear me out. Spend 20 minutes on a Saturday afternoon practicing a tire change in your driveway.
Find your spare. Find your jack. Find your lug wrench. Identify the jack points on your vehicle. Loosen and re-tighten your lug nuts. Jack the car up a few inches and lower it back down.
The first time I did this as a “practice run” at home, I discovered that my lug wrench didn’t fit my lug nuts because a previous owner had aftermarket wheels installed. I would have found this out on the side of the highway if I hadn’t checked first.
I also discovered my spare tire was at 22 PSI when it should have been at 60 PSI. Completely flat, basically.
Twenty minutes of practice at home can save you an hour of stress, confusion, and danger on the roadside. I cannot recommend this enough.
When to Call for Help Instead
There’s no shame in calling roadside assistance. In fact, there are situations where I strongly recommend it over a DIY tire change:
- You’re on a narrow highway shoulder with heavy traffic. Being struck by a passing vehicle is a real risk.
- You’re physically unable to loosen the lug nuts. Over-torqued lug nuts can be nearly impossible to break free without tools you don’t have.
- The ground is unstable — mud, steep incline, gravel, snow, or ice.
- It’s dark and you have no flashlight or reflective gear.
- You feel unsafe for any reason. Trust your instincts.
AAA membership costs about $60-$80 per year for their basic plan, and it covers roadside tire changes, towing, lockouts, and more. Many insurance companies and credit cards also offer roadside assistance. Check what you already have before you need it.
Final Thoughts: A Flat Tire Doesn’t Have to Ruin Your Day
I’ve changed flat tires in parking lots, on highway shoulders, in neighborhood driveways, and once in the rain at a rest stop in Tennessee. Every single time, the process is the same 10 steps.
The more you understand these steps, the faster and calmer you’ll be when a flat tire happens — and statistically, it will happen at some point. A flat tire goes from a crisis to a minor inconvenience once you know what you’re doing.
If you take one thing away from this article, let it be this: go check your trunk today. Make sure you have a spare, a jack, and a lug wrench. Make sure the spare has air in it. That five-minute check could be the difference between a 20-minute roadside tire change and a two-hour wait for a tow truck.
Stay safe out there, and as always — if you’re shopping for replacement tires after your flat, I’ve got plenty of reviews and buying guides right here on TireAdvise.com to help you find the right fit for your car, your budget, and your driving style.
Frequently Asked Questions
How long does it take to change a flat tire by yourself on the side of the road?
If you follow the 10 simple steps and have all your tools ready, changing a flat tire typically takes 15 to 30 minutes. Your first time may run closer to 45 minutes, but once you’ve practiced the process in your driveway, roadside changes go much faster. I recommend doing a dry run at home so you’re confident when it actually happens on a busy US highway or interstate shoulder.
What tools do I need to change a flat tire and are they included with my car?
At minimum you need a spare tire (full-size or compact), a lug wrench, and a jack—most US vehicles come with all three stored under the trunk floor or beneath the vehicle. I also recommend keeping a flashlight, wheel wedges, gloves, and a rain poncho in your roadside emergency kit. If your car came with a tire repair kit or inflator instead of a spare, check your owner’s manual because many newer models from brands like Ford, Chevy, and Tesla have dropped the spare altogether.
Can I drive on a spare tire and how far is it safe to go?
If you have a compact or donut spare, you should stay under 50 mph and drive no more than 50 to 70 miles to the nearest tire shop. A full-size matching spare can be driven on normally, but I still recommend getting a permanent replacement as soon as possible. Driving too long on a temporary spare can damage your differential and suspension, turning a $150 tire replacement into a $1,000-plus repair.
How much does it cost to replace a flat tire if it can’t be repaired?
A single replacement tire in the US typically costs between $60 and $200 for most passenger cars and sedans, while SUV and truck tires from brands like Michelin, Goodyear, or Bridgestone can range from $150 to $350 each. Mounting and balancing usually adds another $15 to $45 per tire at most shops. If the flat is caused by a simple nail puncture in the tread area, a professional plug-and-patch repair costs only $20 to $40 and saves you from buying a whole new tire.
Is it safe to change a flat tire on the highway or should I call roadside assistance?
If you can safely pull onto a wide, flat shoulder away from traffic, you can absolutely change the tire yourself using the 10 steps outlined above—just turn on your hazard lights and set up reflective triangles or flares behind your vehicle. However, if you’re on a narrow shoulder, a busy interstate, or changing the tire on the traffic side, I strongly recommend calling roadside assistance through AAA, your insurance provider, or your car manufacturer’s program. Your safety is always more important than saving the $50 to $100 a tow or tire-change service call might cost.
How do I know if my flat tire can be patched or if I need to buy a new one?
A tire can usually be repaired if the puncture is in the tread area and the hole is smaller than a quarter-inch in diameter. If the damage is on the sidewall, the tire has been driven on while completely flat, or you can see steel belts or cords exposed, the tire needs to be replaced entirely. I always have a tire professional inspect it rather than guessing—most shops like Discount Tire, Tire Rack installations, or Walmart Auto Centers will assess the damage for free.
How often should I check my spare tire to make sure it’s ready when I need it?
I check my spare tire’s air pressure at least once every six months or before any long road trip, because spare tires lose about 1 to 2 psi per month just sitting in your trunk. Most compact spares require 60 psi, which is higher than your regular tires, so use a reliable gauge and inflate at any gas station. Also inspect the spare for dry rot and cracking—if it’s more than 6 to 10 years old, replace it before you actually need it, even if it looks fine at a glance.

