I was driving home on I-95 after having my tires rotated at a quick-service shop when I heard a faint clicking noise coming from the front left wheel.
Within a few minutes, that clicking turned into a rhythmic wobble I could feel through the steering wheel. I pulled over, grabbed my lug wrench, and discovered that three of the five lug nuts on that wheel were barely finger-tight.
That experience happened years ago, and it still makes my palms sweat. A loose lug nut isn’t a minor inconvenience — it’s a ticking time bomb that can send your wheel flying off at highway speed. I’ve since made lug nut inspection a non-negotiable part of my tire maintenance routine, and I want to share everything I’ve learned so you never end up on the shoulder of a highway wondering if today is the day your wheel separates from your car.
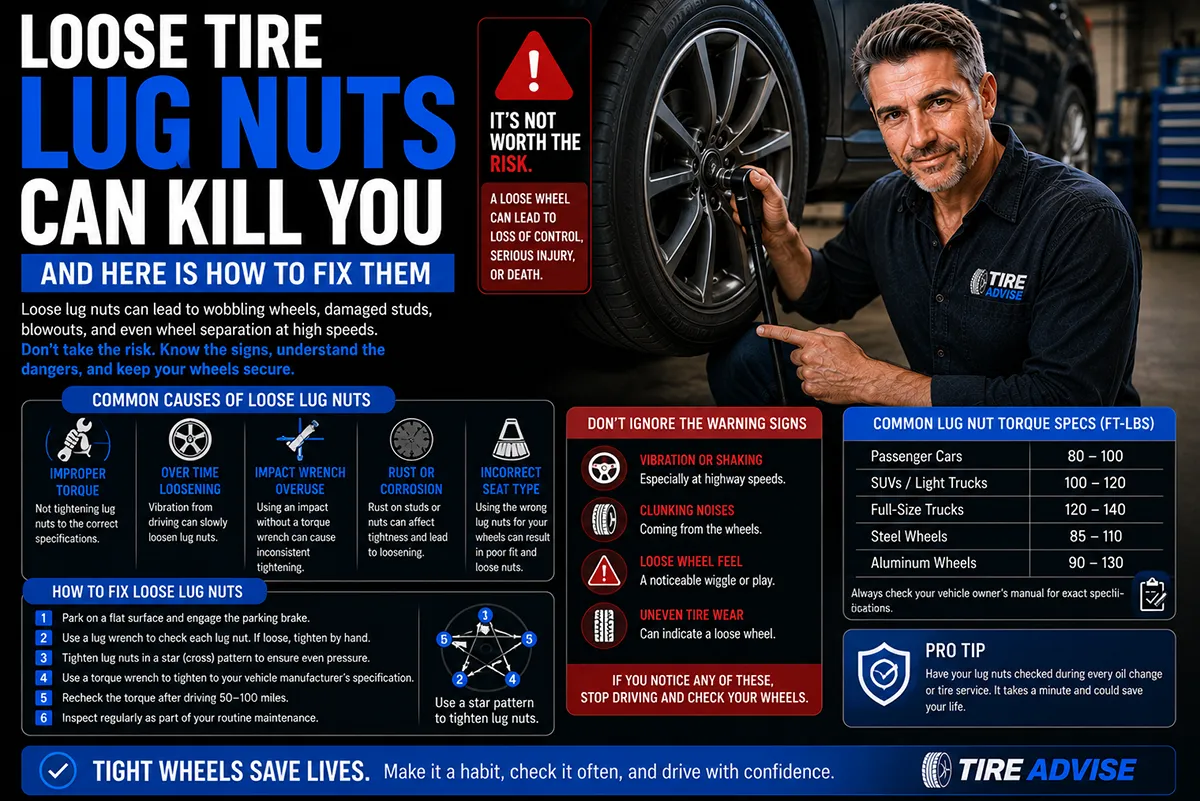
- Loose lug nuts are one of the most dangerous and preventable tire-related failures on the road.
- Common causes include improper torque during installation, corrosion, cross-threading, and skipping re-torque after new tire or wheel service.
- Warning signs include vibration, clicking/knocking sounds, and visible wheel wobble.
- Always use a calibrated torque wrench — never an impact gun alone — and re-torque after the first 50–100 miles of driving on newly installed wheels.
- A quality torque wrench costs $25–$80 and can literally save your life.
Why Loose Lug Nuts Are More Dangerous Than Most Drivers Realize
Let me be blunt: a wheel that separates from a vehicle at speed is one of the most catastrophic failures that can happen on a road. The National Highway Traffic Safety Administration (NHTSA) has documented hundreds of complaints related to wheel separations, and many of those trace back to improperly torqued lug nuts.
When a wheel comes off, you lose steering control instantly. The exposed brake rotor digs into the pavement, creating a shower of sparks, and the vehicle drops onto the hub assembly. I’ve seen the aftermath photos — they’re terrifying.
But here’s the thing that frustrates me most: this is almost always preventable. A $30 torque wrench and 60 seconds of your time after any wheel service can eliminate this risk entirely. The problem is that most drivers don’t know they’re supposed to re-torque their lug nuts, and many shops rush through the process.
What Actually Causes Lug Nuts to Come Loose
Over the years, I’ve encountered loose lug nuts on my own vehicles and on cars belonging to friends and family members who asked me to take a look. In every case, the root cause fell into one of a handful of categories.
1. Improper Torque During Installation
This is the number one cause, and I’ve seen it happen at every type of shop — from national chains to independent mechanics. The technician either over-torques or under-torques the lug nuts, and both are dangerous.
Under-torquing is obvious: the nut isn’t tight enough, and it loosens over time from road vibration. Over-torquing is sneakier. When you crank a lug nut beyond its specification, you can stretch the wheel stud or warp the brake rotor. That stretched stud loses its clamping force over time, and the nut gradually works itself loose.
I’ve personally caught over-torqued lug nuts on my wife’s SUV after a tire shop used an impact gun without a torque stick. When I went to rotate her tires a few weeks later, I could barely break the nuts free — and one stud snapped clean off.
2. Skipping the Re-Torque
This is the silent killer. After any wheel installation — whether it’s new tires, a rotation, or putting your winter wheels on — the lug nuts need to be re-torqued after a short break-in period. Most manufacturers and tire professionals recommend re-torquing after the first 50 to 100 miles of driving.
Why? Because the wheel and hub mating surfaces settle slightly under load. Metal parts compress, paint or coatings on contact surfaces wear in, and everything shifts just enough that the initial torque value drops. I always re-torque after a few days of normal driving, and I’ve caught nuts that lost noticeable tension every single time.
Most shops will tell you to come back for a re-torque. Most drivers forget. Don’t be most drivers.
3. Corrosion and Rust
If you drive in the Rust Belt or anywhere that uses road salt in winter, this one is especially relevant. Corrosion builds up on wheel studs, hub faces, and inside lug nut threads. That rust creates a false sense of tightness during installation — the friction from the corrosion makes the nut feel tight when it actually hasn’t achieved proper clamping force.
Then, as you drive and the rust breaks down from vibration and heat cycling, the effective torque drops. I’ve seen this happen on vehicles in the Northeast and Midwest more than anywhere else. Cleaning the hub face and stud threads before mounting a wheel is a step that takes two minutes but makes a massive difference.
4. Cross-Threading
Cross-threading happens when a lug nut is started at an angle and forced onto the stud. This damages both the stud and the nut threads, and the nut will never achieve proper clamping force on a cross-threaded stud.
I always start lug nuts by hand before using any tool. If it doesn’t spin on smoothly with your fingers for the first few turns, something is wrong. Stop. Back it off and try again. Forcing it with an impact gun is how studs get ruined.
5. Mismatched Lug Nuts or Seats
Not all lug nuts are the same, and this is something I see people get wrong when they buy aftermarket wheels. There are three main seat types: conical (tapered), ball (radius), and flat (mag style). Using a conical lug nut on a wheel that requires a ball seat — or vice versa — means the nut isn’t making proper contact with the wheel. It might feel tight, but the clamping force is concentrated on a tiny contact patch instead of a full seat.
I always verify the lug nut seat type matches the wheel before installation. It’s a simple visual check that takes seconds.
6. Damaged or Worn Wheel Studs
Wheel studs don’t last forever, especially if they’ve been subjected to repeated over-torquing, cross-threading, or corrosion. A stretched or damaged stud won’t hold a lug nut properly. I’ve replaced studs on two of my own vehicles over the years, and it’s a relatively inexpensive repair — usually $5 to $15 per stud plus labor if you’re not doing it yourself.
Warning Signs of Loose Lug Nuts You Should Never Ignore
In my experience, loose lug nuts almost always announce themselves before catastrophic failure. The trick is knowing what to listen and feel for.
Vibration Through the Steering Wheel or Seat
A vibration that wasn’t there before — especially one that changes intensity with speed — is a red flag. Loose lug nuts allow the wheel to shift slightly on the hub, and that movement creates an imbalance you’ll feel as vibration. It often gets worse as speed increases.
I want to be clear: vibration can come from many sources, including unbalanced tires, warped rotors, or worn suspension components. But if you recently had tire work done and notice new vibration, check your lug nuts immediately.
Clicking, Clunking, or Knocking Sounds
This is the sound that saved me on I-95. A loose wheel rocks back and forth on the hub with each rotation, and the lug nuts tap against the wheel holes. It creates a rhythmic clicking or clunking that changes speed with the wheel’s rotation.
If you hear this, pull over safely as soon as possible. Don’t “drive to the next exit” — the situation can deteriorate rapidly.
Visible Wheel Wobble
If you can see the wheel wobbling while someone drives the car slowly past you, the lug nuts are dangerously loose. At this point, you’re likely seeing the wheel moving on elongated or damaged stud holes, and the situation is critical.
Steering Feels “Loose” or Unresponsive
When a front wheel isn’t properly secured, you might notice the steering feels vague or delayed. The wheel is essentially floating on the hub instead of being rigidly clamped, and your steering inputs aren’t translating directly to the tire’s contact patch.
How to Properly Check and Tighten Your Lug Nuts
I check my lug nuts at least once a month and always after any tire service. Here’s exactly how I do it.
What You Need
- A calibrated torque wrench — This is non-negotiable. A click-type torque wrench from brands like Tekton, EPAuto, or Pittsburgh (Harbor Freight) costs between $25 and $80 and is worth every penny.
- The correct socket — Match it to your lug nut size. Common sizes in the US are 17mm, 19mm, 21mm, and 22mm. Some domestic vehicles use SAE sizes like 3/4″ or 13/16″.
- Your vehicle’s torque specification — This is in your owner’s manual. If you don’t have it, a quick Google search for your year, make, and model will give you the spec. Most passenger cars fall between 80 and 100 ft-lbs. Trucks and SUVs are typically 100 to 140 ft-lbs.
Step-by-Step Process
- Set your torque wrench to your vehicle’s specified torque value.
- Work on one wheel at a time. You don’t need to jack the car up — just check the torque with the vehicle on the ground.
- Tighten in a star (criss-cross) pattern, not in a circle. This ensures even clamping pressure across the wheel.
- Listen and feel for the click. When the torque wrench clicks, stop. Don’t keep going.
- Check all wheels, including the spare if it’s a full-size spare mounted on a matching hub.
The whole process takes me about five minutes for all four wheels. I do it in my driveway, usually on a Saturday morning before I head out for errands.
The Star Pattern Matters
I cannot stress this enough: always tighten lug nuts in a star pattern. On a 5-lug wheel, this means tightening in a sequence like 1-3-5-2-4 (skipping every other nut as you go around). On a 4-lug wheel, tighten opposite nuts in pairs.
Tightening in a circular pattern pulls the wheel unevenly against the hub, creating uneven clamping force. I’ve seen warped brake rotors and premature lug nut loosening caused entirely by circular tightening.
Common Torque Specifications by Vehicle Type
Here’s a reference table I keep on a laminated card in my garage. These are general ranges — always verify with your owner’s manual or manufacturer specifications.
| Vehicle Type | Typical Torque Range (ft-lbs) | Common Lug Nut Size | Examples |
|---|---|---|---|
| Compact Cars | 76–90 ft-lbs | 17mm or 19mm | Honda Civic, Toyota Corolla, Mazda3 |
| Midsize Sedans | 80–100 ft-lbs | 19mm or 21mm | Toyota Camry, Honda Accord, Hyundai Sonata |
| Crossovers/Small SUVs | 80–110 ft-lbs | 19mm or 21mm | Toyota RAV4, Honda CR-V, Ford Escape |
| Full-Size SUVs | 100–140 ft-lbs | 21mm or 22mm | Chevy Tahoe, Ford Expedition, Jeep Grand Cherokee |
| Half-Ton Pickup Trucks | 120–150 ft-lbs | 21mm or 22mm | Ford F-150, Ram 1500, Chevy Silverado |
| Heavy-Duty Trucks (3/4 & 1 ton) | 130–175 ft-lbs | 22mm or 7/8″ | Ford F-250/350, Ram 2500/3500, Chevy 2500HD |
What to Do If You Discover Loose Lug Nuts While Driving
If you notice any of the warning signs I described above while you’re on the road, here’s exactly what I recommend based on my own experience and what I’ve learned from professional mechanics over the years.
Pull Over Immediately — But Safely
Don’t slam on the brakes or make sudden steering inputs. Reduce speed gradually, turn on your hazard lights, and find the safest place to stop — ideally a flat, paved surface away from traffic. A parking lot is better than a highway shoulder if one is close.
Inspect All Wheels
Don’t just check the wheel you suspect. Check all four. If one wheel was improperly serviced, there’s a good chance the same technician handled the others. I carry a small torque wrench in my trunk specifically for this purpose.
Hand-Tighten If That’s All You Have
If you don’t have a torque wrench, use your vehicle’s tire iron (the L-shaped lug wrench in your spare tire kit) to snug the nuts down as tight as you can by hand. Then drive slowly — I’m talking under 30 mph — to the nearest tire shop for proper torquing.
Look for Damage
Before tightening, look at the wheel stud holes. If they’re elongated (oval-shaped instead of round), the wheel has been running loose for a while and the holes have wallowed out. A wheel with elongated lug holes is unsafe and needs to be replaced. Similarly, check the studs — if any are bent, stretched, or broken, don’t drive on that wheel. Call for a tow.
The Re-Torque Step That Almost Nobody Does
I mentioned this earlier, but it deserves its own section because I believe it’s the single most important piece of information in this entire article.
After any wheel installation — new tires, tire rotation, seasonal wheel swap, brake job, anything that required removing a wheel — you must re-torque the lug nuts after a short period of driving. The general recommendation is after the first 50 to 100 miles, which for most people is after a few days of normal commuting.
I’ve made this a personal ritual. Every time I have tire work done, I put a reminder in my phone for three days later. On that day, I spend five minutes in my driveway with my torque wrench going around all four wheels. Without exception, I find at least one or two nuts that have lost a few foot-pounds of torque.
This isn’t a sign that the shop did a bad job. It’s physics. Metal settles, coatings compress, and surfaces mate more fully under load. The re-torque compensates for this completely natural process.
Most good tire shops will offer a free re-torque if you come back. Discount Tire, for example, encourages customers to return for this service. Take them up on it.
Tools I Recommend for At-Home Lug Nut Maintenance
Over the years, I’ve tried a variety of torque wrenches and related tools. Here’s what I currently use and recommend for everyday drivers who want to stay safe without spending a fortune.
Budget Pick: EPAuto 1/2-Inch Drive Click Torque Wrench
This wrench runs about $25 to $35 on Amazon and has been surprisingly accurate in my testing. I compared it against a calibrated Snap-on wrench at a friend’s shop, and it was within 2% across the range I tested. For a tool that lives in your trunk, it’s unbeatable value.
Mid-Range Pick: Tekton 1/2-Inch Drive Click Torque Wrench (24335)
Tekton is a Michigan-based company with excellent customer service, and this wrench (around $40 to $50) is what I keep in my garage. It feels solid, the click is satisfying and definitive, and it comes with a certificate of calibration. I’ve been using mine for several years and it’s still dead-on accurate.
Upgrade Pick: GEARWRENCH 1/2-Inch Drive Micrometer Torque Wrench (85066)
At around $60 to $80, this is overkill for most home users, but if you do a lot of your own automotive work, it’s a beautiful tool. The micrometer adjustment makes setting torque values precise and easy, and the build quality is noticeably better than budget options.
Don’t Forget Anti-Seize (With a Caveat)
There’s an ongoing debate about whether to use anti-seize compound on wheel studs. Here’s my take after years of doing this: if your vehicle manufacturer says not to use it, don’t use it. Torque specifications are typically calculated for dry threads. Adding anti-seize reduces friction, which means the same torque value produces higher clamping force — potentially too much, leading to stretched studs.
However, if you live in a heavy-salt environment and your studs are corroding badly, a very light application of nickel anti-seize on the threads (not the seat faces) can prevent seized nuts. Just know that you should reduce your torque value by roughly 15-20% to compensate. Or better yet, consult your vehicle’s service manual.
How Tire Shops Should Be Handling Lug Nuts (And What to Watch For)
I’ve been to dozens of tire shops across the eastern US — Discount Tire, Tire Rack-affiliated installers, Costco Tire Centers, independent shops, and quick-lube chains. Here’s what I look for when evaluating whether a shop handles lug nuts properly.
Green Flags
- They use a torque wrench for final tightening. It’s fine to use an impact gun to run the nuts down, but the final tightening should always be done with a calibrated torque wrench or at minimum a torque-limiting extension (torque stick).
- They clean the hub face. A wire brush on the hub mating surface takes 30 seconds and ensures full metal-to-metal contact. I always watch for this.
- They hand-start the lug nuts. This prevents cross-threading. A tech who threads every nut on by hand before reaching for a tool is a tech who cares.
- They remind you about the re-torque. Good shops will verbally tell you and often include a note on your receipt.
Red Flags
- Impact gun only, no torque wrench. If I see a tech zip the lug nuts on with an impact gun and move on to the next car, I’m speaking up or finding a different shop.
- Rushing. Wheel installation should never be rushed. If a shop is stacking cars and the techs are visibly stressed, mistakes happen.
- No mention of re-torque. A shop that doesn’t mention re-torquing either doesn’t know or doesn’t care. Neither is acceptable.
- Using the wrong lug nuts. When installing aftermarket wheels, the shop must use lug nuts that match the wheel’s seat type. I’ve seen shops use OEM conical lugs on aftermarket wheels that require ball-seat nuts. This is dangerous.
Special Considerations for Aftermarket Wheels
Since many readers on TireAdvise are shopping for new tires and potentially new wheels, this section is especially important.
Aftermarket wheels often have different requirements than OEM wheels. The lug seat type might differ, the center bore might be larger (requiring hub-centric rings), and the stud length engagement might change if the wheel has a different mounting surface thickness.
I always verify three things when installing aftermarket wheels:
- Lug nut seat type matches the wheel. Conical, ball, or flat — use the right one.
- Thread engagement is sufficient. The stud should engage the lug nut for a length equal to or greater than the stud diameter. For example, a 12mm stud should have at least 12mm of thread engagement. If your aftermarket wheel is thicker than OEM, you might need longer studs.
- Hub-centric rings are in place. These rings center the wheel on the hub. Without them, you’re relying entirely on the lug nuts for centering, which can lead to vibration and uneven load on the studs.
Seasonal Wheel Swaps: A High-Risk Window
If you swap between summer and winter tires on separate wheel sets — something I do every year — you’re doubling your exposure to loose lug nut risk. Every time a wheel comes off and goes back on, there’s an opportunity for error.
I’ve developed a personal checklist for seasonal swaps:
- Clean all hub faces with a wire brush before mounting.
- Inspect every stud for damage or corrosion.
- Hand-start every lug nut to verify clean threading.
- Torque to spec in a star pattern.
- Set a phone reminder to re-torque after a few days of driving.
- Store the off-season wheels with lug nuts lightly threaded onto the studs (if stored on a wheel tree) to keep everything organized and prevent loss.
This routine takes me about 90 minutes for all four wheels including the re-torque appointment with myself a few days later. It’s become almost meditative — I put on a podcast, work methodically, and know that my family is driving on properly secured wheels.
What Happens When You Ignore Loose Lug Nuts
I want to end with a serious section because I think some readers might still be underestimating this issue.
When lug nuts are loose and a wheel separates from a vehicle, the consequences range from costly to fatal. Here’s the progression I’ve seen described in NHTSA complaints and accident reports:
- Studs stretch and eventually shear off. The wheel is now free from the vehicle.
- The wheel bounces away at whatever speed the car was traveling. A 40-pound wheel and tire assembly bouncing down a highway is a lethal projectile to other drivers.
- The vehicle drops onto the brake rotor, which digs into the pavement. Steering becomes nearly impossible on the affected side.
- The vehicle veers sharply toward the side that lost the wheel, often crossing lanes or leaving the road.
I’ve read firsthand accounts from drivers who lost wheels at highway speed. Several described being unable to control the vehicle at all once the wheel departed. Others described the wheel bouncing into oncoming traffic.
This is not hypothetical. This happens. And in nearly every case, it was preventable with proper torquing and a simple re-torque check.
My Final Advice
After years of testing tires, rotating wheels, swapping seasonal sets, and visiting more tire shops than I can count, here’s what I want every reader to take away from this article.
Buy a torque wrench. A $30 tool can prevent a catastrophe. Keep it in your trunk or garage.
Learn your torque spec. Write it on a piece of tape and stick it inside your fuel door, glove box, or on the torque wrench itself. You should know this number the way you know your tire pressure.
Always re-torque. After any wheel service, re-torque after a few days of driving. Make it a habit. Set an alarm. Do not skip this step.
Trust your senses. If something sounds wrong, feels wrong, or looks wrong with your wheels, pull over and check. Five minutes of inspection can save your life and the lives of everyone on the road around you.
I’ve been writing tire reviews and guides for a long time, and I’ve covered everything from tread compounds to load ratings. But nothing I’ve ever written is more important than this: check your lug nuts. Do it today. Do it after every tire service. Make it as routine as checking your mirrors before you pull out of the driveway.
Your life might depend on it.
Frequently Asked Questions
What causes tire lug nuts to come loose while driving?
The most common causes of loose lug nuts are improper torque during installation, worn or corroded wheel studs, and thermal cycling from repeated heating and cooling during normal driving. If you recently had new tires mounted or a tire rotation, the lug nuts may not have been torqued to your vehicle’s exact specification. I always recommend rechecking lug nut torque after driving 50-100 miles on newly installed wheels, as this is when they’re most likely to loosen.
What are the warning signs of loose lug nuts on your car?
The most noticeable symptom is a vibration or wobbling sensation in the steering wheel, especially at speeds above 40 mph. You may also hear a rhythmic clicking, rattling, or clunking noise coming from the wheel area. In more severe cases, you might notice uneven tire wear on your replacement tires or even see the wheel visually wobbling. If you experience any of these signs, pull over safely and inspect your lug nuts immediately before driving further.
How tight should lug nuts be and do I need a torque wrench?
Yes, you absolutely need a torque wrench to properly tighten lug nuts — guessing with a breaker bar or impact gun is one of the leading causes of loose or over-tightened lugs. Most passenger cars and SUVs in the US require lug nut torque between 80 and 100 ft-lbs, while light trucks often call for 120-140 ft-lbs, but you should always check your owner’s manual for the exact spec. A reliable click-type torque wrench costs between $25 and $60 at stores like AutoZone or Harbor Freight and is a worthwhile investment if you handle your own tire changes or rotations.
Can loose lug nuts damage my new tires or wheels?
Loose lug nuts can absolutely damage both your new replacement tires and your wheels. When a wheel isn’t securely fastened, it wobbles on the hub, which elongates the bolt holes in the wheel and creates uneven contact with the rotor surface. This leads to accelerated and irregular tire wear, warped brake rotors, and potentially cracked or permanently damaged alloy wheels — repairs that can easily cost $200-$500 or more per corner. Catching and correcting loose lugs early saves you from having to replace tires and wheels prematurely.
How often should I check my lug nuts for tightness?
I recommend checking your lug nut torque every time you rotate your tires, which should be every 5,000-7,500 miles for most US drivers. You should also recheck them 50-100 miles after any wheel service, including new tire installation, flat repairs, or brake work. Seasonal checks are especially important if you drive in areas with extreme temperature swings, harsh winters, or on rough roads and potholes, as these conditions accelerate loosening. A quick torque check takes under five minutes and can prevent a dangerous wheel-off situation.
What should I do if a lug nut falls off while driving?
If you lose a lug nut while driving, reduce your speed immediately and carefully pull over to a safe location as soon as possible. Most vehicles can temporarily limp on four out of five lug nuts at low speeds, but driving this way long-term puts dangerous stress on the remaining studs and can cause the wheel to detach entirely. Check that the remaining lug nuts are tight using a wrench, then drive slowly to the nearest tire shop or auto parts store to get a replacement lug nut and inspect the wheel stud for damage. A single replacement lug nut typically costs $2-$10, but a damaged wheel stud may require a $50-$150 repair.
Should I replace lug nuts when buying new replacement tires?
It’s not always necessary, but I strongly recommend inspecting your lug nuts every time you buy new tires and replacing any that show signs of corrosion, stripped threads, rounded edges, or swollen caps — a common issue with two-piece decorative lug nuts found on many Ford, Chevy, and Dodge trucks. A full set of quality replacement lug nuts typically runs $20-$60 depending on your vehicle, which is a small price compared to the cost of a loose wheel damaging your brand-new tires. If you’re switching to aftermarket wheels with your new tires, make sure you get the correct lug nut seat type — conical, ball, or flat — to ensure a secure and safe fit.

