I’ve seen perfectly good tires get thrown away years before their time — all because the owner never bothered to rotate them.
It’s one of those maintenance tasks that feels easy to skip, right up until you notice one pair of tires is bald while the other pair still looks brand new. That uneven wear isn’t just a waste of money. It’s a safety hazard.
After spending over a decade reviewing tires and maintaining multiple test vehicles, I can tell you that a simple rotation schedule is the single cheapest thing you can do to extend tire life. And yet, it’s the task most drivers forget or flat-out ignore.
- Tire rotation moves each tire to a different position on your vehicle to promote even tread wear.
- Most vehicles need rotation every 5,000–7,500 miles or roughly every six months — whichever comes first.
- The correct rotation pattern depends on your drivetrain (FWD, RWD, AWD) and whether your tires are directional or staggered.
- You can DIY a rotation with a floor jack, jack stands, and about 30 minutes.
- Skipping rotations can cut your tire lifespan nearly in half and void your tread-life warranty.
Why Tire Rotation Matters More Than You Think
Let me put this bluntly: your tires do not wear evenly on their own. It’s physically impossible given how modern vehicles distribute weight and power.
On a front-wheel-drive car — which accounts for the majority of sedans and crossovers sold in the US — the front tires handle steering, most of the braking force, and all of the acceleration. I’ve measured front tires wearing out nearly twice as fast as rears on FWD vehicles I’ve tested over extended periods.
Rear-wheel-drive trucks and sports cars have the opposite problem. The rears take the acceleration abuse, and I’ve seen the outside edges of rear tires on pickup trucks chew through tread alarmingly fast — especially when the bed is loaded.
Even on all-wheel-drive vehicles, wear isn’t perfectly balanced. Most AWD systems send varying amounts of torque to the front and rear axles depending on conditions, which still creates uneven wear patterns over time.
The Real Cost of Skipping Rotations
Here’s what I tell every friend and family member who asks me about tires: if you spend $600–$800 on a new set of all-season tires (a pretty standard range for mid-tier options in the US market), skipping rotations could effectively cost you $300–$400 in lost tread life.
I’ve personally tracked sets of tires on test vehicles where I intentionally skipped rotations to document the difference. The results were dramatic. Front tires on a FWD test sedan reached the 2/32″ legal minimum tread depth while the rears still had well over half their tread remaining.
That means you’d be forced to replace all four tires based on the condition of two — or run mismatched tires, which I never recommend.
Beyond cost, uneven wear creates handling imbalances. I’ve felt it during wet-weather testing — a car with significantly more tread in the rear than the front understeers noticeably in rain. It’s the kind of thing that doesn’t matter until it suddenly matters a lot.
When Should You Rotate Your Tires?
The industry-standard recommendation is every 5,000 to 7,500 miles. For most Americans driving around 12,000–15,000 miles per year, that works out to roughly every six months — or about every other oil change if you’re on a standard service schedule.
I personally set a calendar reminder every six months. It’s simpler than tracking exact mileage, and it keeps me honest.
Signs You’re Overdue for a Rotation
If you can’t remember the last time your tires were rotated, look for these telltale signs I check on every vehicle I evaluate:
- Visible tread depth differences: Use the penny test on all four tires. Insert a penny with Lincoln’s head pointing down into the tread grooves. If you can see the top of Lincoln’s head on the front tires but not the rears (or vice versa), you’ve got uneven wear that rotation would have prevented.
- Increased road noise: Unevenly worn tires often develop irregular wear patterns like cupping or feathering, which produce a humming or droning noise at highway speeds. I’ve diagnosed this on multiple test vehicles.
- Vibration through the steering wheel: While this can indicate a balance issue, uneven tread wear is a common contributing factor.
- The car pulls slightly to one side: Uneven front tire wear can mimic alignment problems.
Special Timing Considerations
There are situations where I recommend rotating sooner than the standard interval:
- Aggressive driving: If you regularly accelerate hard or take corners fast, your tires wear faster. I notice this immediately when testing performance-oriented vehicles.
- Heavy loads: Truck owners who frequently tow or haul should rotate more frequently. The added weight accelerates rear tire wear significantly.
- Rough roads: If your daily commute involves potholed city streets or unpaved roads, tread wears faster and less evenly.
- New tires: I always recommend a first rotation slightly earlier than normal with a brand-new set. In my experience, this helps establish an even wear pattern from the start.
Tire Rotation Patterns Explained
This is where most guides lose people, so I’m going to make this as straightforward as possible. The correct rotation pattern depends on three things: your drivetrain, whether your tires are directional, and whether your tires are staggered (different sizes front and rear).
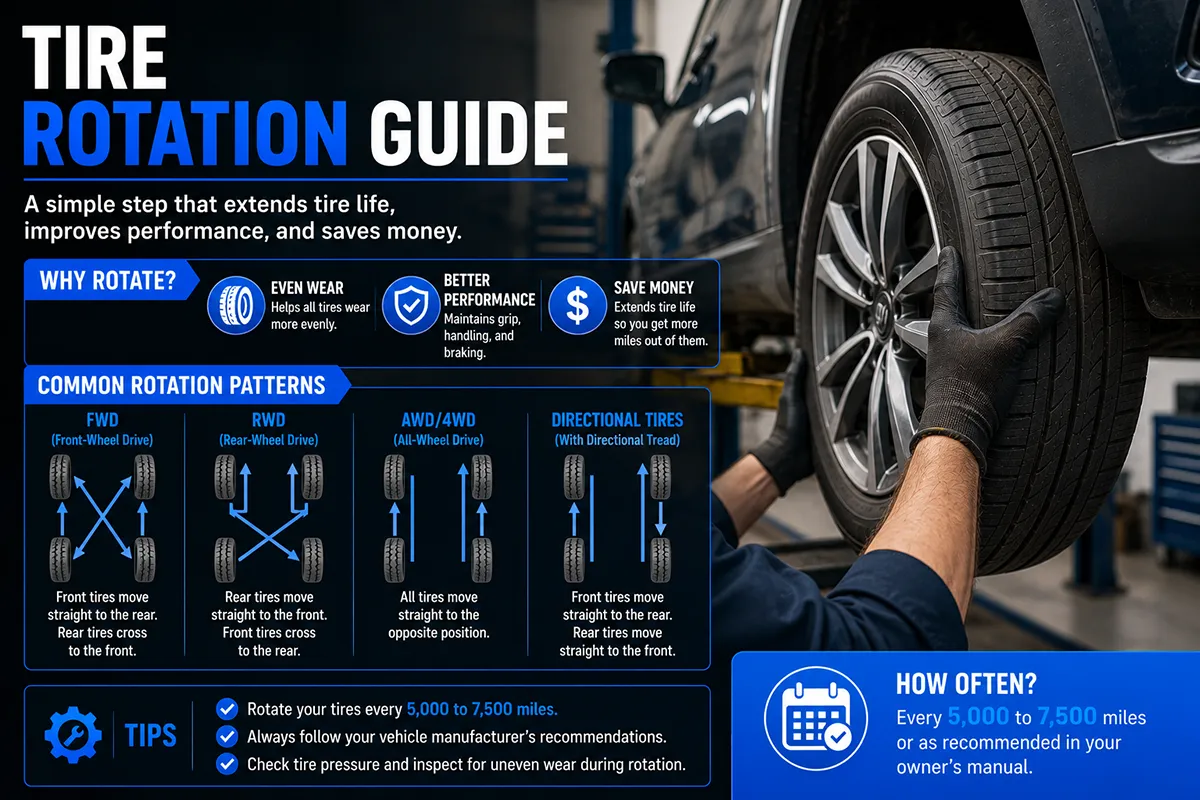
Front-Wheel Drive (FWD): Forward Cross Pattern
This is the pattern I use most often because FWD vehicles dominate the US market — think Honda Civic, Toyota Camry, Hyundai Elantra, and most crossover SUVs.
- The front tires move straight to the rear (left front → left rear, right front → right rear).
- The rear tires cross to the opposite front position (left rear → right front, right rear → left front).
I’ve used this pattern on dozens of FWD test vehicles, and it consistently produces the most even wear. The logic is simple: the front tires are doing the most work, so they get moved to the less demanding rear positions. The rears cross forward to share the workload.
Rear-Wheel Drive (RWD) and 4WD: Rearward Cross Pattern
For rear-drive vehicles like the Ford Mustang, Chevrolet Silverado (in 2WD mode), or BMW 3 Series, I use the rearward cross:
- The rear tires move straight to the front (left rear → left front, right rear → right front).
- The front tires cross to the opposite rear position (left front → right rear, right front → left rear).
This is essentially the mirror image of the forward cross. It prioritizes moving the harder-working rear tires to the front.
All-Wheel Drive (AWD): X-Pattern
For AWD vehicles — Subaru Outback, Toyota RAV4, Ford Escape with AWD — I typically recommend the X-pattern:
- Every tire crosses to the opposite corner (left front → right rear, right front → left rear, left rear → right front, right rear → left front).
This maximizes the redistribution of wear across all four positions. I’ve found it works exceptionally well on AWD crossovers that split power relatively evenly.
That said, some tire manufacturers and vehicle manufacturers recommend the forward cross or rearward cross even for AWD vehicles. I always check the owner’s manual first.
Directional Tires: Front-to-Rear Only
Directional tires have a specific tread pattern designed to channel water in one direction. You’ll see an arrow on the sidewall indicating the intended rotation direction. These tires can only be used on one side of the vehicle.
- Front tires move straight back (left front → left rear, right front → right rear).
- Rear tires move straight forward (left rear → left front, right rear → right front).
I encounter directional tires frequently when testing performance and winter tires. Brands like Michelin, Continental, and Bridgestone use directional designs on many of their high-performance and snow tire lines. If you cross these tires to the wrong side, the tread works against itself in wet conditions — something I’d never risk.
Staggered Fitments: Side-to-Side Only
Some performance vehicles — Chevrolet Camaro, Ford Mustang GT, many BMW and Mercedes models — come with wider tires in the rear than the front. These staggered setups can’t be rotated front-to-rear.
- The fronts swap with each other (left front ↔ right front).
- The rears swap with each other (left rear ↔ right rear).
Important caveat: this only works if the tires are NOT also directional. If you have staggered AND directional tires, rotation is essentially impossible without dismounting and remounting the tires on different wheels — which most shops charge extra for. In my experience with staggered directional setups, I recommend simply monitoring wear closely and replacing tires as needed.
Rotation Pattern Quick-Reference Table
| Drivetrain / Tire Type | Recommended Pattern | How It Works |
|---|---|---|
| Front-Wheel Drive (FWD) | Forward Cross | Fronts go straight back; rears cross to opposite front |
| Rear-Wheel Drive (RWD) / 4WD | Rearward Cross | Rears go straight forward; fronts cross to opposite rear |
| All-Wheel Drive (AWD) | X-Pattern | Every tire crosses to the diagonally opposite position |
| Directional Tires (any drivetrain) | Front-to-Rear | Tires swap front/rear on the same side only |
| Staggered Fitment (non-directional) | Side-to-Side | Fronts swap left/right; rears swap left/right |
| Staggered + Directional | Not possible without remounting | Requires dismounting tires from wheels — consult a shop |
How to Rotate Your Tires at Home: Step-by-Step
I rotate tires myself on most of my test vehicles. It saves money, takes about 20–30 minutes, and gives me a chance to inspect each tire up close. Here’s exactly how I do it.
What You’ll Need
- A hydraulic floor jack: I use a 3-ton floor jack. You can find reliable ones from brands like Pittsburgh (Harbor Freight) or Torin for $40–$80. Don’t use the scissor jack that came with your car — it’s designed for emergencies only.
- Four jack stands: Rated for your vehicle’s weight. A set of four 3-ton jack stands runs about $30–$60. I prefer Torin or ESCO.
- A torque wrench: Essential for tightening lug nuts to the manufacturer’s spec. A decent one costs $25–$50. I’ve used my Tekton half-inch drive torque wrench for years.
- A lug wrench or breaker bar: For loosening lug nuts before jacking.
- Wheel chocks: To prevent the vehicle from rolling.
- Chalk or a marker: I mark each tire’s current position (LF, RF, LR, RR) before starting so I don’t lose track.
Step 1: Prepare the Vehicle
Park on a flat, level surface — ideally a concrete garage floor. Engage the parking brake. Place wheel chocks behind the tires you’re not lifting first.
I always loosen the lug nuts slightly (about a quarter turn) while all four tires are still on the ground. This is much safer and easier than trying to break them loose when the wheel is in the air.
Step 2: Lift the Vehicle
Using your floor jack, lift one end of the vehicle and place jack stands under the recommended jack points (check your owner’s manual — these are usually along the frame rails or pinch welds). Then repeat for the other end.
I prefer to get all four wheels off the ground at once. It makes the swap process much faster and eliminates the need for a temporary “parking spot” for tires. If you only have two jack stands, you can do it in stages — just be methodical about which tires go where.
Safety warning: Never, ever work under a vehicle supported only by a floor jack. I cannot stress this enough. Jack stands save lives.
Step 3: Remove and Swap the Tires
Remove all four wheels. This is where your chalk marks come in handy. Following the appropriate rotation pattern for your vehicle, move each tire to its new position.
I lay the tires down flat next to their destination positions before mounting anything. This gives me a moment to double-check that I’ve got the pattern right.
Step 4: Mount the Wheels and Hand-Tighten
Place each wheel on its new hub and hand-thread the lug nuts. I always thread them by hand first to avoid cross-threading — a mistake that can damage the studs and cost you a lot more than a rotation is worth.
Snug the lug nuts with your lug wrench in a star or crisscross pattern. Don’t fully tighten yet.
Step 5: Lower the Vehicle and Torque to Spec
Carefully lower the vehicle off the jack stands. Once all four tires are on the ground and bearing the vehicle’s weight, use your torque wrench to tighten the lug nuts to the manufacturer’s specification.
For most passenger vehicles, this is between 80 and 100 ft-lbs. Trucks and SUVs often call for 100–140 ft-lbs. Your owner’s manual has the exact number. I always look it up — guessing is how wheels come loose.
Tighten in a star pattern: never go around the circle sequentially. This ensures even clamping force on the hub.
Step 6: Check Tire Pressures
After every rotation, I check and adjust all four tire pressures to the specification listed on the driver’s door jamb placard. Moving tires to different positions doesn’t change the required pressure, but it’s a perfect time to catch any slow leaks or valves that aren’t sealing properly.
Step 7: Record the Rotation
I keep a simple log — either in a notebook I keep in the glove box or in a notes app on my phone. I jot down the date, the odometer reading, and the pattern I used. This makes it easy to stay on schedule and provides documentation if I ever need to make a warranty claim.
What About the Spare Tire?
If your vehicle has a full-size matching spare (not a temporary “donut” spare), you can include it in the rotation to spread wear across five tires instead of four. This used to be common practice, and I still do it on trucks that carry a full-size spare.
The five-tire rotation pattern I use most often for RWD trucks:
- The spare goes to the right rear position.
- The right rear goes to the right front.
- The right front goes to the left rear.
- The left rear goes to the left front.
- The left front becomes the new spare.
This works best when all five tires are the same size, brand, and model. I don’t recommend it if the spare has been sitting unused for years — old rubber degrades, and mixing a weathered spare into regular rotation can introduce inconsistency.
Most modern cars come with either a compact spare or no spare at all (just an inflator kit), so this tip mainly applies to truck and SUV owners.
Professional Rotation vs. DIY: Which Should You Choose?
I do both, depending on the situation. Here’s my honest comparison:
DIY Rotation
- Cost: Free (after the initial tool investment of $100–$150).
- Time: About 20–30 minutes once you have a routine.
- Pros: No appointment needed, you get hands-on with your tires (I’ve caught nails, sidewall damage, and irregular wear during DIY rotations), and it’s oddly satisfying.
- Cons: Requires tools, a flat workspace, and physical effort. Not ideal if you have mobility limitations.
Professional Rotation
- Cost: $20–$50 at most independent shops. Many tire retailers like Discount Tire, Costco, Tire Rack (through their installer network), and America’s Tire offer free lifetime rotations when you buy tires from them.
- Time: 15–30 minutes at the shop, plus wait time.
- Pros: Fast, no effort on your part, and the technician may spot other issues (alignment, suspension wear, brake pad thickness).
- Cons: Requires an appointment or wait, and you’re trusting someone else to torque your lug nuts correctly (I always verify mine after leaving a shop — call me paranoid).
If you bought your tires from Costco or Discount Tire, take advantage of the free rotation. It’s one of the best perks of buying from those retailers, and I always factor that value into my tire-buying recommendations.
Common Tire Rotation Mistakes I’ve Seen (and Made)
Even experienced car owners make mistakes with rotations. Here are the most common ones I’ve encountered over the years:
1. Using the Wrong Pattern
I once rotated directional tires in a cross pattern on a test vehicle without thinking. The tread arrows were pointing backward on two tires. I caught it during a wet-road test when the car felt squirrelly in standing water. Don’t make my mistake — always check for directional arrows on the sidewall before you start.
2. Forgetting to Torque the Lug Nuts
Hand-tight is not tight enough. And impact-gun-blasted-to-the-moon is too tight (and can warp brake rotors). Use a torque wrench. Every time. No exceptions.
3. Ignoring TPMS Sensors
If your vehicle has a tire pressure monitoring system (TPMS) — and most US cars built after 2007 do — rotating tires may require a TPMS relearn procedure. Some vehicles automatically detect the new sensor positions after a few minutes of driving. Others require a manual reset using a TPMS tool or a specific procedure outlined in the owner’s manual.
I’ve had dashboard TPMS warning lights stay on for days after a rotation because I skipped the relearn. It’s not dangerous, but it’s annoying and defeats the purpose of having a pressure monitoring system.
4. Rotating Tires That Need Replacing
Rotation isn’t a fix for tires that are already worn out. If any tire is at or near 2/32″ of tread depth, it’s time for replacement — not rotation. I use a tread depth gauge (they’re about $5) to check before every rotation.
5. Not Checking Alignment
Rotation compensates for normal uneven wear, but it can’t fix wear caused by a bad alignment. If I notice one tire wearing on the inner or outer edge significantly more than the others, I get an alignment check before rotating. Otherwise, I’m just moving the problem to a different corner of the car.
Tire Rotation and Your Tread-Life Warranty
This is a detail most people miss, and it can cost you real money. Nearly every major tire manufacturer — Michelin, Goodyear, Bridgestone, Continental, Cooper, Pirelli, and others — includes a tread-life warranty (also called a mileage warranty) with their tires. But there’s a catch.
To make a warranty claim, you typically need to prove that you rotated your tires at the recommended intervals. That means keeping receipts from a tire shop or maintaining a written log of your DIY rotations.
I’ve seen warranty claims denied because the owner couldn’t provide rotation records. On a set of tires with a 70,000-mile warranty, that’s potentially hundreds of dollars in prorated replacement value lost.
Save your receipts. Keep your log. It takes 30 seconds and could save you a fortune.
How Rotation Fits Into Your Overall Tire Maintenance Routine
I treat tire rotation as one piece of a broader maintenance picture. Here’s the simple routine I follow and recommend:
- Monthly: Check tire pressures (including the spare) with a quality gauge. I do this on the first of every month — it’s easy to remember.
- Every six months: Rotate tires. I combine this with oil changes whenever the schedule lines up.
- Annually: Get a professional alignment check, especially if I’ve hit any significant potholes or curbs. In states with rough winter roads — I’m thinking Michigan, Pennsylvania, the Northeast — I’d even recommend twice a year.
- Every rotation: Visually inspect all four tires for damage, irregular wear patterns, sidewall cracking, and embedded objects. Measure tread depth at multiple points across each tire.
This routine adds maybe two hours of effort across an entire year. In my experience, it consistently adds significant life to every set of tires I run. The math is simple: a little time now saves a lot of money later.
Special Situations: Winter Tires, All-Terrains, and More
Seasonal Tire Swaps
If you run dedicated winter tires (which I strongly recommend for anyone in the snow belt), the seasonal swap is your built-in rotation opportunity. When I mount winter tires in late fall, I note which position each tire was in and rotate them to a new position for the next season.
The same goes for the all-seasons when they go back on in spring. This way, each set gets rotated twice a year without any extra effort.
All-Terrain and Mud-Terrain Truck Tires
Aggressive truck tires from brands like BFGoodrich, Falken, Nitto, and Toyo tend to wear faster and less evenly than highway tires, especially if you actually use them off-road. I rotate these more frequently and pay extra attention to cupping and edge wear during inspections.
Performance Summer Tires
High-performance summer tires — Michelin Pilot Sport 4S, Continental ExtremeContact Sport, Bridgestone Potenza — often come in staggered fitments and/or directional tread patterns. Always check the specifics before assuming a standard rotation pattern applies. I’ve reviewed many performance tires where the only rotation option was side-to-side or not at all.
The Bottom Line: Just Do It
If you take only one thing from this entire guide, let it be this: rotating your tires regularly is the highest-ROI maintenance task you can perform. It costs nothing if you do it yourself, and almost nothing if you pay a shop. The payoff is even tread wear, better handling, a smoother ride, and significantly longer tire life.
I’ve been rotating tires on test vehicles for over a decade, and I have never once regretted doing it. I have, however, seen the consequences of skipping it — and they’re always expensive.
Set a reminder on your phone right now. Pick a day every six months. Make it a habit. Your tires — and your wallet — will thank you.
Frequently Asked Questions
How often should you rotate your tires on a daily driver?
Most tire manufacturers and mechanics recommend rotating your tires every 5,000 to 8,000 miles, which typically lines up with every other oil change. I follow the 6,000-mile rule personally, and it has helped me get even tread wear across all four tires. If you drive in harsh US weather conditions like snow, heavy rain, or extreme heat, you may want to rotate closer to the 5,000-mile mark to maximize tire life.
What is the correct tire rotation pattern for front-wheel drive vs. all-wheel drive vehicles?
For front-wheel drive cars, the standard rotation pattern moves the front tires straight to the rear and crosses the rear tires to the front. For all-wheel drive and four-wheel drive vehicles, the most common pattern is a rearward cross, where rear tires move straight to the front and front tires cross to the opposite rear positions. Always check your owner’s manual first, since some vehicles with directional or staggered tires require a specific pattern that overrides these general guidelines.
Can you rotate tires yourself at home, and what tools do you need?
Yes, you can absolutely rotate tires at home with a floor jack, two jack stands, a lug wrench or torque wrench, and wheel chocks. I recommend a decent hydraulic floor jack, which costs around $40 to $80 at stores like AutoZone or Harbor Freight, and a reliable set of jack stands rated for your vehicle’s weight. The whole process takes about 30 to 45 minutes once you know your rotation pattern, and you will save the $25 to $50 that most shops charge per rotation.
What happens if you never rotate your tires?
Skipping tire rotations leads to uneven tread wear, which means your front or rear tires will wear out significantly faster depending on your drivetrain. On a front-wheel drive car, for example, the front tires handle steering, braking, and power delivery, so they can wear twice as fast as the rears. This uneven wear reduces traction, compromises handling in wet or snowy conditions common across much of the US, and forces you to replace tires in pairs much sooner than necessary, costing you hundreds of extra dollars over time.
Does tire rotation affect your tire warranty or mileage guarantee?
Yes, most major US tire brands like Goodyear, Michelin, Bridgestone, and Cooper require proof of regular tire rotations to honor their treadwear mileage warranties. If you file a warranty claim for premature wear and cannot show rotation records at the recommended intervals, the manufacturer can deny your claim entirely. I always keep my service receipts or log rotations if I do them at home, because a 60,000-mile tire warranty is worthless without documentation.
Should you get a tire rotation when buying new replacement tires?
When you install a full set of four new replacement tires, you do not need an immediate rotation since all four tires have identical tread depth. However, you should schedule your first rotation at 5,000 miles to establish an even wear pattern from the start. If you are only replacing two tires, most shops will install the new tires on the rear axle for safety, and your first rotation interval becomes even more important to balance wear between the newer and older tires.
Is tire rotation worth it, or should you just buy new tires sooner?
Tire rotation is absolutely worth it because it can extend the life of a set of tires by 10,000 to 20,000 miles, saving you $400 to $800 on a premature replacement set depending on the brand and size. At roughly $25 to $50 per rotation at a shop, or free if you do it yourself, the return on investment is significant. Many tire retailers like Discount Tire, Costco, and America’s Tire even include free lifetime rotations when you purchase tires from them, so there is really no reason to skip this essential maintenance step.

