I got a nail in my tire last month while pulling out of a Costco parking lot, and the first thing I did was stare at the puncture and wonder — can I patch this, or am I buying a whole new tire?
It’s a question I’ve been asked hundreds of times over the years, and the answer isn’t as simple as “yes” or “no.” Where the damage is on your tire determines everything.
After spending over a decade reviewing tires, visiting dozens of tire shops, and personally dealing with more flats than I can count, I’ve learned that understanding the patchable zone of a tire can save you hundreds of dollars — or save your life if you avoid a dangerous repair.
- Only the tread area of a tire can be safely patched — specifically the center portion of the tread face.
- Sidewall damage is never patchable and always requires tire replacement.
- Punctures on the shoulder (where the tread meets the sidewall) are in a gray zone — most shops will refuse to repair them.
- The industry standard (USTMA guidelines) limits repairs to punctures no larger than 1/4 inch (6mm) in diameter.
- A combination plug-patch is the safest, most durable repair method.
- If in doubt, get a second opinion from a reputable tire shop — a bad patch can lead to a blowout at highway speeds.
Understanding the Anatomy of a Tire
Before I dive into which parts you can and can’t patch, it helps to understand what a tire actually looks like on the inside. Most people only ever see the outside tread pattern, but there’s a lot more engineering going on beneath the surface.
The Main Parts of a Tire
- Tread: The outermost rubber layer that contacts the road. This is where your grip comes from and where most punctures happen.
- Belts (Steel Belt Package): Layers of steel wire beneath the tread that provide structural rigidity and help the tire maintain its shape.
- Sidewall: The vertical rubber section between the tread and the bead. It flexes constantly as you drive and contains critical structural cords.
- Shoulder: The transitional zone where the tread curves down and meets the sidewall. It’s a high-stress area.
- Bead: The innermost edge of the tire that seats against the wheel rim. It’s reinforced with steel wire.
- Inner Liner: A layer of rubber on the inside of the tire that acts like a built-in tube, keeping air sealed in.
- Carcass Plies: Layers of fabric (usually polyester) that give the tire its shape and carry the load.
Each of these components plays a different structural role, and that’s exactly why some areas can handle a repair and others absolutely cannot.
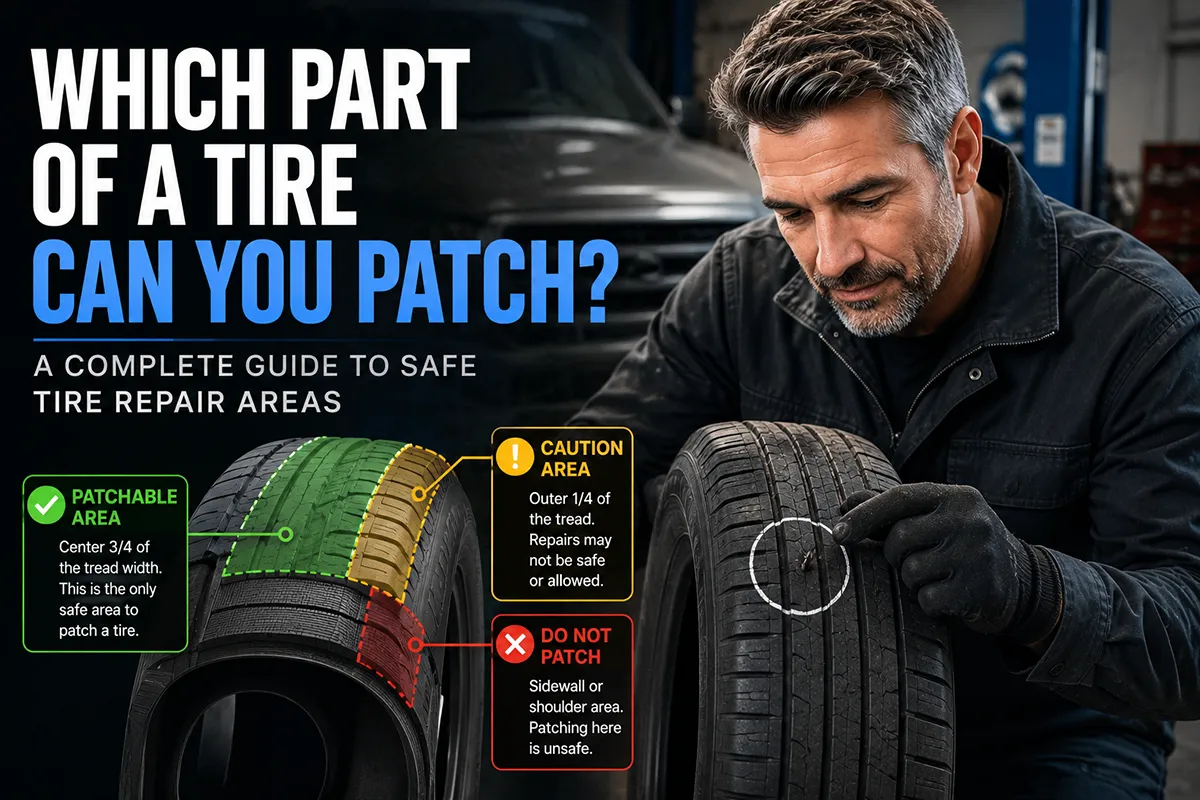
The Patchable Zone: Where You CAN Repair a Tire
Let me be crystal clear about this: the only part of a tire that can be safely patched is the tread area — and even then, only a specific portion of it.
The Crown Area (Center of the Tread)
The industry refers to the safe repair zone as the “crown” of the tire. This is the flat, central part of the tread that sits between the outermost major grooves on each side. In my experience, this covers roughly the middle three-quarters of the tread face width.
This zone is reinforced by the steel belt package underneath, which means a properly installed patch or plug-patch has a solid, stable structure to bond to. The belts help distribute stress evenly, and the area doesn’t flex as dramatically as other parts of the tire.
When I’ve had punctures repaired in this zone — and I’ve had plenty over the years — they’ve held up beautifully. I’ve driven on patched tires for the entire remaining life of the tread without a single issue.
What Size Puncture Can Be Patched?
According to the U.S. Tire Manufacturers Association (USTMA) — formerly the Rubber Manufacturers Association (RMA) — a tire puncture must be no larger than 1/4 inch (6mm) in diameter to be safely repaired.
That means a typical nail or screw is almost always within the repairable range. But a large bolt, a piece of rebar, or a gash from road debris? Those usually exceed the limit.
I’ve also seen cases where a small nail caused a much larger hole on the inside due to the tire being driven on while flat. That internal damage often makes an otherwise small puncture unrepairable, which is why I always recommend checking the inside of the tire — not just the outside.
The No-Patch Zones: Where You CANNOT Repair a Tire
This is where things get serious. Repairing a tire in the wrong zone isn’t just a bad idea — it’s genuinely dangerous. I’ve seen the aftermath of sidewall blowouts at highway speed, and trust me, it’s not something you want to experience.
The Sidewall
Never, ever patch a sidewall. I cannot stress this enough.
The sidewall is the part of the tire that flexes the most as you drive. Every time you hit a bump, turn a corner, or carry a heavy load, the sidewall is absorbing and distributing that force. It’s made up of thin rubber over carcass plies (usually polyester cords), and there are no steel belts here to provide structural reinforcement.
A patch on a sidewall simply cannot hold up to this constant flexing. Over time — sometimes in a matter of days — the repair will fail. And when a sidewall fails at speed, it doesn’t slowly deflate. It blows out violently.
I had a reader email me once who said a small shop patched his sidewall for $15. He thought he got a deal. A week later, he had a blowout on I-95 at 70 mph. He was lucky to walk away from it. That $15 “savings” could have cost him his life.
If you have a cut, puncture, bubble, or any visible damage on your sidewall, the tire must be replaced. No exceptions.
The Shoulder
The shoulder is the curved transition between the tread face and the sidewall. It’s a gray zone — literally and figuratively.
Some aggressive shops will patch a puncture that’s right at the edge of the tread, technically in the shoulder area. In my professional opinion, this is a risk that’s not worth taking. The shoulder experiences significant stress during cornering and carries a lot of the load transfer. It also lacks the full steel belt reinforcement that the center crown area has.
The USTMA guidelines explicitly exclude the shoulder from the repairable zone, and I side with them on this one. If the puncture is within about half an inch of where the tread starts to curve into the sidewall, I tell people to replace the tire.
The Bead Area
The bead is where the tire meets the rim. It’s reinforced with steel wire and is engineered to maintain an airtight seal under tremendous pressure. Any damage to the bead area — whether from a puncture, a curb strike, or improper mounting — compromises the tire’s ability to stay seated on the wheel.
I’ve never seen a bead repair that I’d trust. If the bead is damaged, the tire needs to go.
Patchable vs. Non-Patchable Zones: Quick Reference Table
| Tire Area | Can It Be Patched? | Why / Why Not |
|---|---|---|
| Center Tread (Crown) | ✅ Yes | Reinforced by steel belts; minimal flex; stable bonding surface |
| Outer Tread (near shoulder) | ⚠️ Risky | Less belt coverage; higher stress during cornering; most shops refuse |
| Shoulder | ❌ No | High-flex transition zone; no reliable belt reinforcement for bonding |
| Sidewall | ❌ No | Constant flexing; no steel belts; blowout risk is extremely high |
| Bead Area | ❌ No | Critical sealing surface; structural damage compromises rim seal |
Types of Tire Repairs: Plug vs. Patch vs. Plug-Patch Combo
Even if your puncture is in the safe zone, the type of repair matters enormously. Not all patches are created equal, and I’ve seen too many cheap fixes fail prematurely.
Tire Plug (External Only)
A tire plug is a sticky, rope-like piece of rubber that’s inserted into the puncture hole from the outside of the tire using a reaming tool. You’ve probably seen plug kits at Walmart or AutoZone for $8-$12.
I’ll be honest — I’ve used plug kits in emergencies, and they’ve gotten me to a tire shop. But I would never consider a plug a permanent repair. The plug doesn’t seal the inner liner, which means air can slowly migrate through the tire carcass and cause long-term damage you can’t see from the outside.
The USTMA does not consider a plug-only repair to be a proper fix. Neither do I.
Tire Patch (Internal Only)
A patch involves removing the tire from the wheel, cleaning and buffing the inner liner around the puncture, and then bonding a rubber patch over the hole from the inside. It creates a good seal on the inner liner.
However, a patch alone doesn’t fill the puncture channel through the tread. That channel can allow moisture to reach the steel belts, leading to corrosion and eventual belt separation. So while a patch is better than a plug, it’s still not the gold standard.
Combination Plug-Patch (The Right Way)
This is what I always recommend. A combination plug-patch — sometimes called a “mushroom patch” because of its shape — seals the inner liner AND fills the puncture hole through the tread. It’s a single unit that addresses both problems.
The tire has to be removed from the wheel to install a combo plug-patch, which means it takes a bit more time and typically costs between $25-$45 at most US tire shops. Places like Discount Tire, Tire Rack-affiliated shops, and Les Schwab often do plug-patch repairs for free if you bought the tire there.
In my experience, a properly installed plug-patch in the crown area is as reliable as the original tire. I’ve driven on them through harsh New England winters and scorching Texas summers without a single failure.
Situations Where Even a Tread Puncture Can’t Be Patched
Just because a nail is in the center of your tread doesn’t automatically mean the tire is repairable. I’ve dropped off tires at shops fully expecting a simple patch, only to be told the tire was toast. Here are the scenarios where even a tread puncture becomes unrepairable:
1. You Drove Too Long on a Flat
This is the most common deal-breaker I see. When you drive on a flat or severely underinflated tire, the sidewalls collapse and the tire essentially chews itself apart from the inside. Even if the original puncture was a tiny nail in the perfect spot, the internal damage from driving flat can destroy the inner liner, shred the carcass plies, and overheat the rubber.
I always tell people: if your TPMS light comes on, pull over as soon as it’s safe. Every extra quarter-mile you drive on a flat exponentially increases the damage.
2. Previous Repairs Too Close Together
Industry guidelines say that repairs should be at least 16 inches apart, and you shouldn’t have more than two puncture repairs on a single tire. If you already have a patch and you get another nail right next to it, you’re looking at a replacement.
I once reviewed a set of tires where the owner had three separate plug repairs within a few inches of each other. The inner liner looked like Swiss cheese. That tire was a ticking time bomb.
3. The Puncture Is at an Angle
A nail that enters straight in is much easier to repair than one that enters at a steep angle. Angled punctures create a longer channel through the tire body, and they’re harder to seal properly with a standard plug-patch. If the angle is too severe, a good technician will decline the repair.
4. The Tire Is Too Old or Too Worn
Even if the puncture is perfect for a patch, a tire that’s worn down to 2/32″ of tread depth or is past its recommended service life (generally 6-10 years from the manufacture date) isn’t worth repairing. You’d be spending money to patch a tire that needs to be replaced anyway.
I always check the DOT date code on the sidewall before recommending a repair. If the tire was manufactured more than six years ago, I lean toward replacement regardless of tread depth.
How a Proper Tire Patch Is Installed (Step by Step)
I think it helps to understand the repair process so you can evaluate whether your tire shop is doing it right. I’ve watched (and performed) this process many times, and there are clear signs of quality work versus a hack job.
Step 1: Remove the Tire from the Wheel
Any legitimate repair starts by demounting the tire. If a shop tells you they can patch your tire without taking it off the rim, walk away. You cannot properly inspect or repair a tire while it’s still mounted.
Step 2: Inspect the Interior
The technician should thoroughly inspect the entire inner surface of the tire. They’re looking for hidden damage, previous repairs, sidewall cracking, belt separation, and the extent of the puncture from the inside.
Step 3: Ream and Clean the Puncture
The puncture hole is reamed out to create a clean, uniform channel. Then the area around the puncture on the inner liner is buffed and cleaned to create a proper bonding surface.
Step 4: Apply Vulcanizing Cement
A chemical vulcanizing cement is applied to both the buffed area and the plug-patch. This creates a chemical bond — not just a sticky adhesive — that essentially fuses the patch material to the tire.
Step 5: Install the Plug-Patch
The plug portion is pulled through the puncture from inside to outside, and the patch portion is pressed firmly against the inner liner. A roller tool is used to ensure complete adhesion with no air bubbles.
Step 6: Trim and Remount
The excess plug material on the outside is trimmed flush with the tread surface. The tire is remounted, balanced, and inflated to the manufacturer’s recommended pressure.
The whole process takes about 30-45 minutes at a competent shop. It’s not a five-minute parking lot fix, and that’s a good thing.
The Real Cost of Tire Repair vs. Replacement
I get it — nobody wants to spend $150-$250 on a new tire when a $30 patch might solve the problem. But the economics only work in your favor when the repair is done correctly and in the right location.
Here’s how I think about it:
- Plug-patch repair in the crown area: $25-$45 at most shops (often free if you bought tires there). Absolutely worth it on a tire with good remaining tread life.
- Plug-only emergency repair (DIY kit): $8-$15 for the kit. Fine as a temporary measure to get you to a real shop. Not a permanent fix.
- New tire (passenger car, mid-range): $100-$200 per tire installed and balanced, depending on size and brand.
If your tire has plenty of tread left and the damage is in the patchable zone, the repair is a no-brainer. But if you’re patching a tire that’s already half-worn or several years old, you might be better off putting that $35 toward a new tire instead.
I also strongly recommend checking whether your tires came with a road hazard warranty. Many retailers like Discount Tire, Costco, and Tire Rack offer road hazard coverage that will either repair or replace your tire at no extra cost. I’ve saved hundreds of dollars over the years with these warranties.
Common Myths About Tire Patching
In my years of reviewing tires and talking to drivers, I’ve heard some persistent myths that need to be put to rest.
Myth #1: “You can patch a sidewall if the hole is small enough.”
False. The size of the hole isn’t the issue — it’s the location. Sidewall rubber flexes too much for any patch to maintain a reliable seal. Size doesn’t matter here; the structural dynamics do.
Myth #2: “Tire plugs are just as good as patches.”
False. A plug alone doesn’t seal the inner liner and leaves the tire body exposed to moisture infiltration. It’s a temporary fix at best. The combo plug-patch is the only repair I trust long-term.
Myth #3: “If the tire holds air after you plug it, it’s fine.”
Misleading. A tire can hold air initially after a plug repair but still have compromised structural integrity. Air retention doesn’t equal safety. Internal damage from driving on a flat, for example, won’t cause immediate air loss but can lead to a catastrophic failure later.
Myth #4: “Tire sealant (like Fix-a-Flat) is just as good as a patch.”
False. Tire sealants are emergency products designed to get you a few miles to a service station. They can also make the tire harder to properly repair later because the sealant coats the inner liner and contaminates the bonding surface. I keep a can in my trunk for emergencies but consider it a last resort.
Myth #5: “You can patch a tire as many times as you want.”
False. Industry guidelines limit repairs to two per tire, and those repairs must be at least 16 inches apart. Multiple repairs weaken the overall structure of the tire.
My Personal Rule of Thumb
After all the tires I’ve tested, reviewed, and replaced over the years, I’ve developed a simple rule of thumb that I follow every time I get a puncture:
If the damage is in the middle of the tread, the hole is smaller than a pencil, and the tire wasn’t driven flat — patch it with a combo plug-patch and move on.
If the damage is anywhere else, or if there’s any doubt at all — replace the tire.
Your tires are the only thing between your car and the road. They’re responsible for every bit of your braking, steering, and stability. I never gamble on a questionable repair, and I don’t think you should either.
The cost difference between a risky patch and a new tire is maybe $100-$150. The cost of a blowout at 70 mph on the highway? Potentially everything.
When to Get a Second Opinion
Not all tire shops have the same standards. I’ve been to places that refuse to patch anything that isn’t dead-center in the tread (overly cautious but safe), and I’ve been to places that will plug a sidewall for $10 (terrifyingly reckless).
If a shop tells you a tire can’t be repaired and you’re skeptical, take it to another reputable shop for a second opinion. Discount Tire, America’s Tire, and Les Schwab are generally consistent in following USTMA guidelines.
Conversely, if a shop offers to repair damage that’s in the shoulder or sidewall, I’d recommend politely declining and going elsewhere. That shop is either cutting corners or doesn’t know the safety standards — and neither of those is a shop I want working on my tires.
Final Thoughts: Be Smart About Tire Patches
Knowing which part of a tire can be patched is one of those things that seems simple on the surface but can have serious safety implications if you get it wrong. I’ve been reviewing and testing tires for years, and the guidelines haven’t changed much because the physics haven’t changed.
Patch the center tread. Replace everything else.
It’s a straightforward rule that’s kept me and my family safe on the road, and I’m confident it’ll do the same for you. If you’re ever unsure, err on the side of caution. A new tire is always cheaper than an accident.
Stay safe out there, and as always, I’ll be here testing and reviewing tires so you can make the best decision for your vehicle and your budget.
Frequently Asked Questions
What part of a tire can you safely patch?
You can safely patch only the tread area of a tire, which is the flat surface that makes direct contact with the road. Most tire repair shops in the US will only patch punctures that fall within the central tread zone, roughly the middle three-quarters of the tire’s width. Any damage outside this area, such as on the sidewall or shoulder, is considered unsafe to repair and means you’ll need a replacement tire.
Can you patch a tire on the sidewall?
No, you should never patch a tire on the sidewall. The sidewall flexes constantly while driving and cannot hold a patch securely, which creates a serious blowout risk at highway speeds. If your tire has sidewall damage from hitting a curb or pothole, the only safe option is to replace the tire entirely, which typically costs between $100 and $250 depending on the brand and size.
How close to the sidewall can a tire be patched?
A tire puncture must be at least one inch away from the sidewall to be safely patched. Most US tire shops follow the RMA (Rubber Manufacturers Association) guidelines, which define the repairable area as the tread face between the outermost major grooves. If the damage falls in the shoulder area, which is the curved transition between the tread and sidewall, it cannot be reliably repaired.
How big of a hole can you patch on a tire?
Most tire professionals will only patch punctures that are 1/4 inch (6mm) in diameter or smaller. Anything larger than that compromises the tire’s structural integrity and cannot be safely sealed with a standard plug-patch combination. If you’ve run over a large bolt or piece of debris that left an oversized hole in your tread, you’ll need to budget for a new tire rather than a $25–$45 patch repair.
Is it better to patch or plug a tire puncture?
The safest and most reliable method is a combination plug-patch repair, which seals the puncture from both the inside and outside of the tire. A plug alone can work as a temporary fix to get you to a shop, but it doesn’t seal the inner liner and can allow air to migrate into the tire body. Most reputable US tire shops like Discount Tire, Firestone, and Les Schwab use the plug-patch combo method, and some even offer free repairs if you purchased your tires from them.
Can you patch a tire more than once in the same area?
You can patch a tire more than once, but the punctures must be at least 16 inches apart and both must be within the repairable tread area. Overlapping patches weaken the tire’s internal structure and create a potential failure point, especially during high-speed driving on US interstates. If your tire has two punctures close together, most technicians will recommend replacing it rather than risking an unsafe repair.
How long does a tire patch last compared to buying a new tire?
A properly applied plug-patch repair on the tread area can last the remaining life of the tire, often 30,000 to 50,000 miles or more. I’ve personally driven on patched tires for years without any issues, as long as the repair was done correctly by a certified technician. That said, if your tread is already worn close to the 2/32-inch legal minimum, it makes more financial sense to skip the $25–$45 patch and invest in a new tire instead.

