I stared at my alloy wheels last month and genuinely felt embarrassed. Brake dust, road grime, and what I think was tree sap had turned my once-shiny rims into something that looked like they belonged on a neglected barn find.
I’d heard for years that WD-40 could clean alloy wheels, but I was skeptical. So I grabbed a can from my garage shelf and decided to put it to the test — properly, methodically, and with a camera nearby to document the whole process.
What I found surprised me. WD-40 genuinely works for cleaning alloy wheels, but only if you use it the right way. And there are a few critical mistakes that can actually damage your rims if you’re not careful.
- WD-40 effectively removes brake dust, road grime, tar, and light oxidation from alloy wheels
- It works best as a pre-treatment or spot cleaner — not as your only wheel cleaning product
- Always rinse wheels with water first, apply WD-40, let it sit 3-5 minutes, then scrub and rinse thoroughly
- You MUST wash off all WD-40 residue with soap and water afterward to prevent attracting more dirt
- Don’t use WD-40 on freshly painted, powder-coated, or matte-finish wheels without testing a hidden spot first
- Total cost for a full cleaning: under $10 if you already own basic supplies
Why WD-40 Works on Alloy Wheels (The Science Behind It)
Before I walk you through the process, let me explain why this actually works — because understanding the chemistry helps you get better results and avoid mistakes.
WD-40 is primarily a solvent-based formula. Its main active ingredients include mineral spirits and petroleum-based oils that are extremely effective at dissolving grease, tar, adhesive residue, and the metallic compounds found in brake dust.
Brake dust is the main enemy of alloy wheels. Every time you press your brake pedal, tiny particles of iron, carbon, and metallic fibers shear off your brake pads and rotors. These superheated particles bond to your wheel’s surface and, over time, can actually etch into the clear coat if left untreated.
WD-40’s solvent action breaks down that bond. It penetrates beneath the brake dust layer, loosens it from the wheel surface, and allows you to wipe or scrub it away with significantly less effort than water alone.
I’ve tested dedicated wheel cleaners from brands like Meguiar’s, Sonax, and Chemical Guys. WD-40 isn’t quite as powerful as a purpose-built acid-based wheel cleaner — but it’s surprisingly close for light to moderate contamination, and it’s something most of us already have in the garage.
What You’ll Need: My Recommended Supply List
Here’s exactly what I gathered before starting. You probably own most of this already.
- WD-40 Multi-Use Product — the classic blue and yellow can with the red straw (around $5-$7 at Walmart, Home Depot, or AutoZone)
- A garden hose with a spray nozzle — or a pressure washer on a low/medium setting
- A bucket of warm water with car wash soap — I use Meguiar’s Gold Class, but any automotive soap works
- A soft-bristle wheel brush — I like the Chemical Guys Sticky Gel wheel brush ($12 on Amazon)
- An old toothbrush or detailing brush — for lug nut recesses and tight spoke areas
- Microfiber towels — at least 3-4 clean ones
- Nitrile gloves — WD-40 can dry out your skin with prolonged contact
Optional but helpful: a can of WD-40 Specialist Degreaser if your wheels are heavily contaminated, and a wheel sealant or wax for after you’re done.
Step-by-Step: How I Clean Alloy Wheels With WD-40
I’ve refined this process over several cleaning sessions. Here’s the method that gives me the best results consistently.
Step 1: Pre-Rinse the Wheels With Water
This is the step most people skip, and it’s a mistake. You need to rinse off loose dirt, sand, and debris before applying anything to your wheels.
If you skip this step, those abrasive particles act like sandpaper when you start scrubbing. I’ve seen micro-scratches on clear-coated alloy wheels caused by exactly this kind of impatience.
I use a garden hose with a standard spray nozzle set to a medium-pressure fan pattern. Spray each wheel thoroughly from top to bottom, paying extra attention to the inner barrel and behind the spokes where grit accumulates.
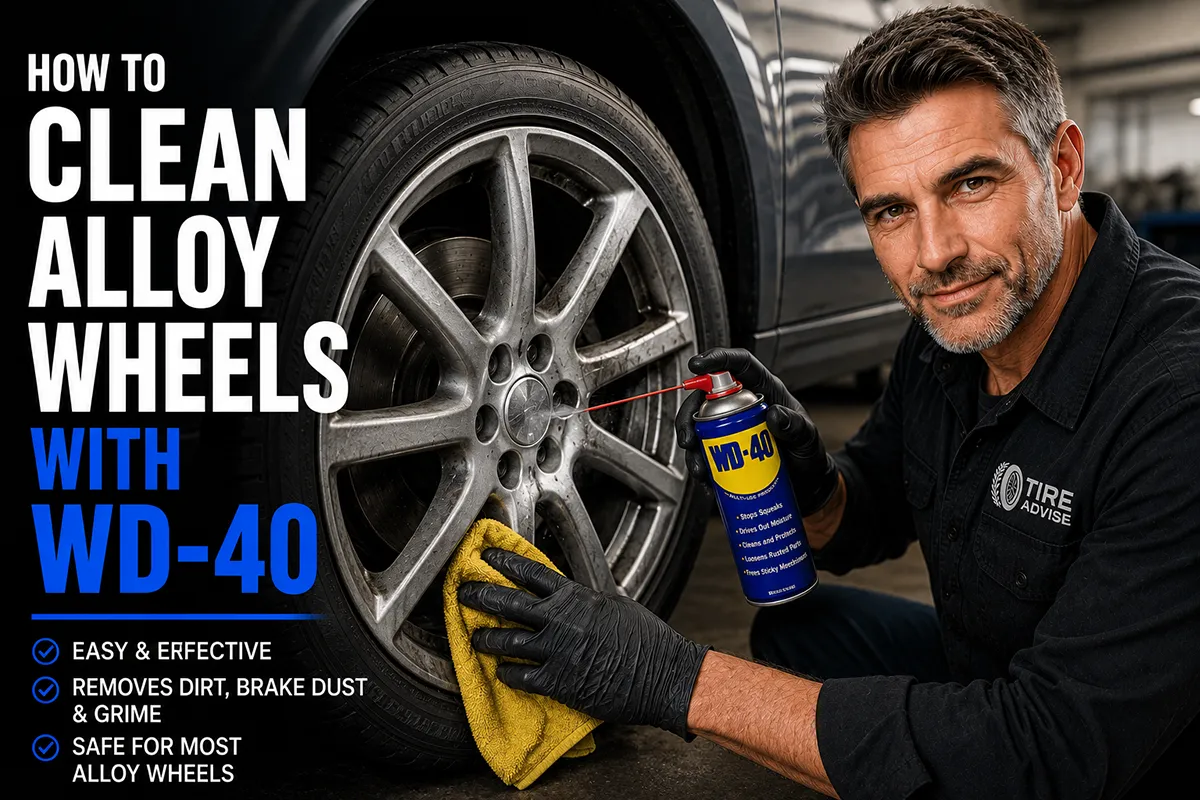
Step 2: Apply WD-40 Generously
Shake the can well, attach the red straw for precision, and spray WD-40 directly onto the wheel surface. I work in sections — top half first, then bottom half — to ensure even coverage.
Don’t be shy with the product. You want a visible wet coating across the entire face of the wheel. Pay special attention to areas with heavy brake dust buildup, which is usually concentrated on the front wheels and the lower spokes closest to the brake caliper.
I also spray into the lug nut recesses, around the center cap, and along the inner lip of the wheel where road tar tends to accumulate. The straw attachment is perfect for directing product into these tight spots.
Step 3: Let It Sit for 3-5 Minutes
This is where the magic happens. WD-40 needs dwell time to break down contamination. I set a timer on my phone for 4 minutes and move on to pre-rinsing the next wheel while I wait.
Don’t let it sit for more than 10 minutes, especially in direct sunlight. The solvents can start to dry and leave a sticky residue that’s harder to remove. If it’s a hot day (above 85°F), I work in the shade or reduce dwell time to 2-3 minutes.
Step 4: Scrub With a Soft-Bristle Brush
After the dwell time, grab your wheel brush and work the WD-40 into the surface using circular motions. You’ll notice the brake dust starting to lift almost immediately — the runoff will be dark brown or black.
For stubborn spots, I apply a bit more WD-40 directly to the brush and scrub with slightly more pressure. But let me be clear: you should never use a stiff wire brush or abrasive pad on alloy wheels. You’ll destroy the clear coat.
Use your old toothbrush or detailing brush for lug nut holes, between tight spokes, and around the valve stem. These areas trap grime that a larger brush can’t reach effectively.
Step 5: Rinse Thoroughly With Water
Rinse the entire wheel with your hose, washing away the dissolved brake dust and WD-40 solution. Inspect the wheel carefully — if you see remaining contamination, repeat steps 2-4 on those specific areas.
In my experience, one application handles about 80% of typical brake dust and road grime. Heavily neglected wheels might need two passes.
Step 6: Wash With Soap and Water (CRITICAL)
This is the step that separates a proper cleaning from a half-done job. WD-40 leaves an oily residue on the wheel surface. If you leave it there, it will attract dirt and dust like a magnet, and your wheels will look dirty again within days.
Fill your bucket with warm water and a few capfuls of car wash soap. Using a clean microfiber towel or your wheel brush, wash each wheel thoroughly to strip away all WD-40 residue. Then do a final rinse with clean water.
I cannot stress this enough — this soap wash is non-negotiable. Every person I’ve seen complain that “WD-40 made my wheels dirtier” skipped this step.
Step 7: Dry and Protect
Dry each wheel with a clean microfiber towel. Water spots on alloy wheels are almost as annoying as brake dust, so don’t let them air dry.
For extra protection, I apply a thin layer of wheel wax or sealant. Meguiar’s Ultimate Wheel Wax (around $12 at AutoZone) is my go-to. It creates a barrier that makes future cleaning dramatically easier — brake dust washes off with just water for the next few weeks.
My Real Results: Before and After
I tested this method on my daily driver, which had been accumulating brake dust for several weeks during my normal commute through a mix of highway and stop-and-go suburban driving.
The front wheels were significantly worse than the rears — which makes sense because front brakes do the majority of the stopping work and generate far more brake dust. The front driver’s side wheel was my worst offender, with a thick, dark layer of baked-on brake dust that had been building up during a period of heavy city driving.
After one complete pass of the WD-40 method, I’d estimate 90% of the contamination was gone. A quick second application on two particularly stubborn spots near the lower spokes brought the wheel to about 98% clean. The remaining 2%? Deep pitting in the clear coat where brake dust had been allowed to etch over a long period — that’s permanent damage that no cleaner can reverse.
The rear wheels cleaned up almost effortlessly with a single pass. Light brake dust and road grime came off with minimal scrubbing.
WD-40 vs. Dedicated Wheel Cleaners: Honest Comparison
I wouldn’t be giving you the full picture if I didn’t compare WD-40 to purpose-built wheel cleaning products. So I cleaned one wheel with WD-40 and the opposite wheel with Sonax Full Effect Wheel Cleaner — one of the most popular dedicated products on the US market.
| Criteria | WD-40 Multi-Use | Sonax Full Effect |
|---|---|---|
| Price | $5-$7 per can | $15-$19 per bottle |
| Brake Dust Removal | Very Good (with scrubbing) | Excellent (minimal scrubbing) |
| Road Tar Removal | Excellent | Good |
| Dwell Time Required | 3-5 minutes | 2-3 minutes |
| Scrubbing Effort | Moderate | Light |
| Requires Soap Wash After? | Yes (mandatory) | No (rinse only) |
| Safe for All Finishes? | Test first on coated/matte | Yes (pH-neutral formula) |
| Multi-Purpose Use | Yes (hundreds of uses) | No (wheel cleaning only) |
| Overall Result (1-10) | 7.5/10 | 9/10 |
The Sonax won on pure cleaning performance — it required less scrubbing and didn’t need a follow-up soap wash. But WD-40 held its own impressively, especially considering it costs a third of the price and can be used for a thousand other things around your house and garage.
My honest take: if you’re buying a product specifically for wheel cleaning and you do it regularly, invest in a dedicated wheel cleaner. But if you need to clean your wheels right now, today, and you already have a can of WD-40 in the garage? It absolutely gets the job done.
What WD-40 Is Great At (And What It’s Not)
After testing this method multiple times across different levels of contamination, I’ve learned where WD-40 shines and where it falls short.
WD-40 Excels At:
- Brake dust removal — This is its sweet spot. The solvents dissolve metallic brake dust effectively.
- Road tar and adhesive removal — WD-40 is actually better than many dedicated wheel cleaners at dissolving tar spots and sticky residue like old wheel weight adhesive.
- Bug splatter on wheel faces — Especially common in southern US states during summer. WD-40 dissolves dried bug residue quickly.
- Light oxidation on bare aluminum — If you have wheels with exposed machined aluminum surfaces, WD-40 can remove light surface oxidation and restore some luster.
- Quick touch-up cleaning — When you don’t have time for a full detail but want your wheels to look presentable for a weekend trip.
WD-40 Struggles With:
- Heavily baked-on brake dust — If brake dust has been sitting for months and has chemically bonded with the clear coat, WD-40 alone won’t cut it. You’ll need a stronger acid-based or iron-dissolving wheel cleaner.
- Curb rash and deep scratches — WD-40 is a cleaner, not a repair product. Cosmetic wheel damage requires refinishing.
- Wheel discoloration from heat — Bronze or yellow discoloration on wheels from extreme brake heat is a structural change in the metal or coating. No cleaner will fix this.
- Salt and winter road treatment residue — If you’re in the northern US dealing with road salt, WD-40 helps but a proper alkaline wheel cleaner works better for heavy salt deposits.
Important Warnings: Mistakes I’ve Seen People Make
Let me save you from the mistakes I’ve seen (and a couple I’ve made myself) when using WD-40 on wheels.
1. Not Testing on Matte or Powder-Coated Finishes First
Standard glossy clear-coated alloy wheels handle WD-40 just fine. But if you have matte, satin, or certain powder-coated finishes, the solvents in WD-40 can potentially alter the appearance or leave shiny spots.
Always test on a small, hidden area first — like the inner barrel behind a spoke where nobody will see it. Wait a few minutes, wipe it off, and check for any change in the finish before committing to the whole wheel.
2. Using WD-40 on Hot Wheels
Never apply WD-40 to wheels that are hot from driving or sitting in direct sunlight. The solvents will flash off too quickly, leaving behind a gummy residue that’s actually harder to clean than the original brake dust.
I always let my car sit for at least 30 minutes after driving before I start cleaning. If the wheels are cool to the touch, you’re good to go. Working in the shade is ideal.
3. Forgetting to Protect Your Tires
WD-40 overspray on your tire sidewalls won’t cause structural damage, but it can strip existing tire dressing and leave a blotchy, uneven appearance. It can also make the tire surface slippery, which is a safety concern if it gets on the tread.
I try to aim carefully and keep the straw directed at the wheel face. If overspray hits the tire, I clean it off during the soap wash step. After everything is dry, I apply a fresh coat of tire dressing to restore a uniform look.
4. Skipping the Soap Wash
I mentioned this in the step-by-step, but it deserves its own warning because it’s the most common mistake. WD-40 leaves an oily film. That film attracts dirt. If you don’t wash it off with soap and water, your wheels will look dirty again within a couple of days and you’ll blame the product instead of the process.
5. Using Wire Brushes or Steel Wool
I’ve seen forum posts where people recommend using fine steel wool with WD-40 on alloy wheels. Do not do this unless you’re working on a raw, uncoated aluminum surface. On clear-coated alloy wheels — which is what the vast majority of modern cars come with — steel wool and wire brushes will scratch through the clear coat and create permanent damage.
How Often Should You Clean Your Alloy Wheels?
Based on my experience, here’s what I recommend for typical US driving conditions:
- Light cleaning (soap and water): Every time you wash your car — ideally every 1-2 weeks
- Deep cleaning (with WD-40 or a dedicated wheel cleaner): Once a month, or whenever you notice visible brake dust buildup
- Wax/sealant application: Every 4-6 weeks, or after every deep cleaning session
If you live in an area with harsh winters — think Minnesota, Wisconsin, Michigan, or the Northeast — increase your cleaning frequency during salt season. Road salt is incredibly corrosive to alloy wheels and can cause permanent pitting if left on the surface.
Conversely, if you live in a dry climate like Arizona or Nevada, your wheels will stay cleaner longer between washes since there’s less road moisture to help brake dust bond to the surface.
A Note on Wheel Care and Tire Shopping
Since you’re here on TireAdvise, there’s a good chance you’re thinking about new tires soon. Here’s something I want to mention from my experience: when you’re having new tires mounted, that’s the perfect time to do a thorough wheel cleaning.
With the tires off the wheels (which they will be during mounting), you have full access to the inner barrel, the back face, and every spoke surface that’s normally hidden. I always bring a can of WD-40 and some microfiber towels when I’m getting tires installed. Most tire shops won’t mind if you clean your wheels while they work — just ask first and stay out of their way.
This is also a great time to inspect your wheels for cracks, bends, and corrosion that could affect how your new tires seal and perform. I’ve caught hairline cracks during routine cleanings that I never would have noticed otherwise.
Alternative Uses: WD-40 for Other Wheel and Tire Tasks
While I had the can out during testing, I explored a few other wheel-related applications for WD-40.
Removing Wheel Weight Adhesive
When old stick-on wheel weights are removed during tire balancing, they often leave behind a stubborn adhesive residue. WD-40 dissolves this adhesive beautifully. Spray it on, wait two minutes, and it wipes right off with a microfiber towel.
Loosening Stuck Lug Nuts
If you’re dealing with seized or overtightened lug nuts (common after dealership service), a shot of WD-40 on the threads can help. Let it penetrate for five minutes before attempting to loosen. This has saved me from rounding off lug nuts more than once during roadside tire changes.
Cleaning Tire Lettering
If you have tires with raised white lettering or white wall sections, WD-40 can help clean staining from the white rubber. Apply a small amount to a microfiber towel and gently rub the white areas. Follow up with soap and water immediately.
My Final Verdict: Is WD-40 Worth Using on Alloy Wheels?
After testing this method thoroughly across multiple cleaning sessions, here’s my honest assessment.
WD-40 is a genuinely effective alloy wheel cleaner for everyday brake dust and road grime. It’s not going to replace a premium dedicated wheel cleaner for severely neglected wheels, but for regular maintenance cleaning, it’s surprisingly capable.
The biggest advantages are convenience and cost. Most American households already have a can of WD-40 somewhere. At $5-$7 per can, you can do dozens of wheel cleanings before you need a new one. And unlike many wheel cleaning products, WD-40 doubles as a tar remover, adhesive dissolver, and general-purpose degreaser — so you’re getting multi-use value.
The biggest downsides are the mandatory soap wash afterward and the moderate scrubbing effort required compared to spray-and-rinse dedicated products. It’s an extra step, and if you’re someone who values speed and convenience above all else, a product like Sonax or Adam’s Wheel Cleaner might be worth the higher price.
For me personally, WD-40 has earned a permanent spot in my wheel cleaning rotation. I use it for quick touch-ups between major washes, for tar removal after road trips, and as my go-to wheel cleaner when I’m doing casual weekend maintenance. For deep quarterly cleanings, I still reach for a dedicated iron-dissolving wheel cleaner.
If you try this method, follow every step — especially the pre-rinse and the soap wash. Do it right, and I think you’ll be pleasantly surprised at how well that humble blue and yellow can can make your alloy wheels shine.
Frequently Asked Questions
Can you really clean alloy wheels with WD-40?
Yes, WD-40 works surprisingly well for cleaning alloy wheels because its solvent properties break down brake dust, road grime, and tar deposits that accumulate during normal US highway and city driving. I spray it directly onto the wheel surface, let it sit for 2-3 minutes, then wipe it off with a microfiber cloth. It’s not a replacement for dedicated wheel cleaner for heavy buildup, but it’s an effective quick-clean solution that most drivers already have in the garage.
How do you clean brake dust off alloy wheels with WD-40 step by step?
Start by rinsing your alloy wheels with water to remove loose dirt and debris. Then spray WD-40 generously over the entire wheel surface, focusing on areas with heavy brake dust buildup, and let it penetrate for 2-3 minutes. Use a soft-bristle wheel brush or microfiber cloth to scrub the surface, rinse thoroughly with clean water, and dry with a separate microfiber towel to prevent water spots.
Will WD-40 damage the finish on my alloy wheels?
WD-40 is generally safe on factory-finished and clear-coated alloy wheels, which covers most OEM wheels on popular US vehicles like Ford, Chevy, and Toyota models. However, I’d avoid using it on bare polished aluminum or anodized finishes, as the solvents can dull or discolor these surfaces over time. Always test a small, inconspicuous area first and rinse it off completely rather than letting it sit for extended periods.
Is WD-40 better than dedicated alloy wheel cleaner for brake dust removal?
Dedicated alloy wheel cleaners from brands like Sonax, Meguiar’s, or Adam’s Polishes are specifically formulated to dissolve brake dust and are generally more effective for deep cleaning. WD-40 is better suited as a quick maintenance cleaner between thorough washes or for tackling stubborn tar and road grime spots. For US drivers dealing with heavy brake dust from aggressive driving or performance brake pads, I recommend a pH-balanced wheel cleaner for regular use and WD-40 as a supplemental spot treatment.
How often should I clean my alloy wheels with WD-40 to prevent corrosion?
I recommend a quick WD-40 wipe-down every 2-3 weeks if you’re driving in areas with road salt, which is critical for drivers in northern US states during winter months. In milder climates, a monthly cleaning is usually sufficient to prevent brake dust from etching into the clear coat. Keep in mind that WD-40 leaves a light oily residue that can actually provide short-term protection against moisture, but it’s no substitute for a proper wheel sealant or wax for long-term corrosion prevention.
Can I use WD-40 to clean curb rash or scratches on alloy wheels?
WD-40 can clean dirt out of minor curb rash and make scratches temporarily less visible by filling them with a thin oily film, but it won’t actually repair the damage. For cosmetic curb rash on alloy wheels, you’ll need a wheel repair kit ($15-$40 at most US auto parts stores) or professional refinishing, which typically costs $75-$150 per wheel. If your wheels have significant curb damage that’s causing vibration, it may be more cost-effective to shop for replacement alloy wheels, especially when bundled with new tires.
What should I avoid when using WD-40 to clean alloy wheels near my tires?
Be very careful not to spray WD-40 directly onto your tire sidewalls or tread, as the petroleum-based solvents can degrade rubber compounds over time and make tire surfaces dangerously slick. If overspray gets on your tires, wash it off immediately with soap and water before driving. I also recommend avoiding WD-40 near your brake rotors and calipers, since any oily residue on braking surfaces can seriously reduce stopping performance — a safety issue no matter what road conditions you’re driving in.

