I stared at the curb rash on my daily driver’s alloy wheels for months before I finally decided to do something about it. The quotes from local wheel refinishing shops ranged from $125 to $200 per wheel — that’s potentially $800 for a set that wasn’t even worth that much.
So I grabbed a few cans of spray paint, watched some videos, and did it myself. That was several years ago, and I’ve since painted wheels on multiple vehicles for myself, family members, and friends. Some of those jobs are still holding up beautifully today.
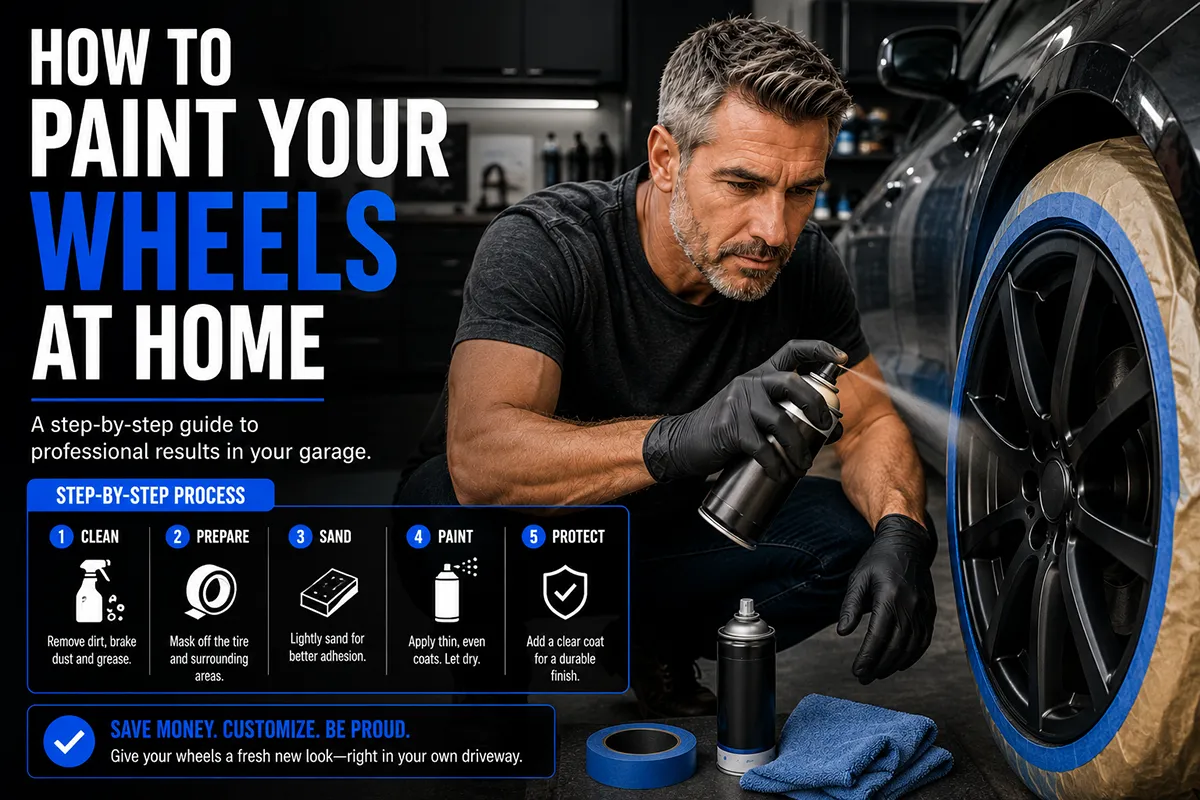
- You can paint your wheels at home for $30–$50 using spray cans, or $50–$100 with a spray gun setup
- Preparation is 80% of the job — sanding, cleaning, and priming properly determines your final result
- Always remove wheels from the vehicle for the best finish (don’t skip this step)
- Use self-etching primer, then wheel-specific or automotive-grade paint, then a clear coat
- Allow a full 24–48 hours of cure time before remounting and driving
- The whole project takes one weekend if you plan properly
Why I Started Painting My Own Wheels
Let me be real with you — I’m a tire guy. I spend my days testing tires, reviewing them, and helping everyday drivers make smart purchasing decisions. But nothing ruins the look of a fresh set of tires faster than beat-up, faded, or curb-rashed wheels underneath them.
I’ve seen it countless times: someone invests $600 or more in a quality set of tires, only to mount them on wheels that look like they’ve been dragged behind a truck. The contrast actually makes the wheels look worse than before.
That’s what got me into wheel painting. I realized that for the cost of a single professional refinish on one wheel, I could do all four myself and get results that genuinely impressed people.
Should You Paint Your Wheels at Home? Honest Assessment
Before I walk you through the process, I want to be straight with you about whether this is the right move for your situation. Not every wheel is a good candidate for a DIY paint job.
This Project Is Perfect For You If:
- Your wheels are structurally sound but cosmetically damaged (curb rash, fading, peeling clear coat)
- You’re comfortable with basic DIY tasks and have a clean workspace
- You’re painting standard alloy or steel wheels
- You want to change the color of your wheels (gloss black is the most popular, and for good reason)
- Your budget is limited but you still want a clean look
You Might Want to Go Professional If:
- Your wheels have structural damage like cracks or significant bends
- You want a chrome, hyper-silver, or color-shifting finish (these require specialized equipment)
- You’re working on high-end forged wheels where the investment justifies professional refinishing
- You don’t have access to a covered, dust-free workspace
In my experience, about 90% of the wheels I see on everyday vehicles are perfect candidates for a home paint job. The most common factory alloy wheels on Hondas, Toyotas, Fords, and Chevys are incredibly forgiving to work with.
What You’ll Need: Complete Supply List with Real Costs
I’ve refined my supply list over multiple projects, and here’s exactly what I use. I’m including actual prices I’ve paid at stores like AutoZone, O’Reilly, Home Depot, and Amazon.
Essential Supplies
- Sandpaper assortment — 220, 400, and 800 grit (about $8–$12 for a variety pack)
- Self-etching primer — Rust-Oleum or Dupli-Color, 2 cans ($6–$8 each)
- Wheel paint or automotive paint — Dupli-Color Wheel Coating or VHT Wheel Paint, 3 cans ($7–$10 each)
- Automotive clear coat — Dupli-Color or Rust-Oleum 2X, 2 cans ($7–$9 each)
- Wax and grease remover — 3M General Purpose Adhesive Remover or dedicated prep solvent ($8–$12)
- Masking tape and newspaper/plastic sheeting — ($5–$8)
- Tire shine or tire dressing — to protect your tires during painting ($5–$7)
- Index cards or playing cards — for masking the tire bead area (free or $1)
- Clean microfiber towels — at least 4–5 ($5–$8 for a pack)
- Rubbing alcohol or denatured alcohol — for final wipe-down ($4–$6)
Helpful But Optional
- Sanding block or sanding sponge — makes hand sanding more consistent ($3–$5)
- Bondo or automotive filler — for deep curb rash repair ($8–$12)
- Wheel brush and degreaser — for initial deep cleaning ($6–$10)
- Spray can trigger handle — dramatically reduces finger fatigue and improves control ($3–$5)
- Respirator mask — much better than a paper dust mask for paint fumes ($15–$25)
- Nitrile gloves — keep chemicals off your hands ($6–$8 for a box)
**My total cost for a four-wheel project typically runs $40–$60 using spray cans.** Compare that to $500–$800 at a shop, and you’ll see why I keep doing this myself.
Step 1: Remove the Wheels (Don’t Skip This)
I know, I know. You’ve seen tutorials where people mask off the tire and paint the wheel while it’s still on the car. I’ve tried it that way. I’ve also done it the right way. The difference in quality is night and day.
When you remove the wheels, you can access every surface — the spokes, the inner barrel, the lug holes, and the edges near the tire bead. You also eliminate the risk of overspray on your fenders, brake calipers, and rotors.
Here’s my process for removal:
- Loosen all lug nuts slightly before jacking up the vehicle
- Use jack stands — never work under a vehicle supported only by a jack
- Remove one axle at a time so you can put the car back on stands with the remaining wheels
- If you don’t have a spare set of wheels to keep the car mobile, plan to have the car parked for the full weekend
I typically use a basic hydraulic floor jack and a set of jack stands from Harbor Freight. The whole setup costs about $60 if you don’t already own one, and you’ll use it for tire rotations and brake jobs for years.
Do You Need to Remove the Tires from the Wheels?
In most cases, no. I leave the tires mounted and simply mask them off. Removing and remounting tires adds cost (usually $15–$25 per tire at a shop) and hassle that isn’t necessary for a solid paint job.
The only time I recommend dismounting the tires is if you’re repairing extensive curb rash around the entire bead area or want to paint the inner barrel for a show-car level finish.
Step 2: Deep Clean Every Surface
This is where most DIY wheel paint jobs start to go wrong. People give the wheel a quick rinse and start sanding. That’s a recipe for paint that peels within weeks.
Here’s my cleaning protocol, developed through trial and error:
- Initial wash: Hit the wheel with a pressure washer or strong hose to remove loose dirt and brake dust. Use a wheel-specific cleaner like Meguiar’s Hot Rims or Sonax Wheel Cleaner.
- Scrub every surface: Use a stiff wheel brush to get into every spoke, every lug hole, and the entire barrel. Brake dust contains metallic particles that bond to the surface — you need mechanical agitation to remove them.
- Degrease: Spray the entire wheel with a degreaser and let it sit for a few minutes before rinsing. This removes any remaining oils, road film, and tire dressing that may have migrated onto the wheel face.
- Dry thoroughly: Use a clean microfiber towel and let the wheel air dry completely. Any trapped moisture will cause problems under the paint.
I cannot stress this enough — a perfectly clean surface is the foundation of a lasting paint job. I’ve seen the difference firsthand between wheels I cleaned thoroughly and one time I rushed. The rushed wheel started showing tiny bubbles after just a couple of weeks.
Step 3: Sand and Repair
Sanding is where the real work happens. It’s also the step that separates a paint job that lasts from one that doesn’t.
For Wheels in Decent Shape (Light Scratches, Fading)
Start with 400-grit sandpaper and scuff the entire surface of the wheel. You’re not trying to remove all the existing paint — you’re creating a rough surface (called a “tooth”) for the new primer to grab onto.
Sand in consistent, overlapping strokes. Hit every surface that will be visible — the face, the spokes, the edges, and as far into the barrel as you can reach.
After scuffing with 400-grit, wipe the wheel down with a tack cloth or a microfiber dampened with rubbing alcohol.
For Wheels with Curb Rash or Deep Scratches
This requires more aggressive work. Here’s my approach:
- Start with 220-grit sandpaper on the damaged areas to smooth out the gouges and rough edges
- For deep rash, apply automotive filler (Bondo) in thin layers, letting each layer dry before sanding smooth
- Feather the repaired areas into the surrounding surface so there’s no visible edge or ridge
- Step up to 400-grit across the entire wheel, then finish the repaired areas with 800-grit for extra smoothness
I’ve repaired wheels with curb rash so deep you could feel it with your eyes closed. After proper filler work and sanding, the finished paint job was completely smooth to the touch. Patience here pays off enormously.
**Pro tip from my experience:** Sand in one direction rather than in circles. Circular sanding patterns can create visible swirl marks under the paint, especially in gloss finishes.
Step 4: Final Surface Prep
After sanding, there’s one more critical step before you touch a paint can. You need to remove every particle of dust, oil from your fingers, and any remaining contaminants.
Here’s my final prep sequence:
- Blow off the wheel with compressed air if you have it, or use a clean, dry brush to remove all sanding dust
- Wipe the entire wheel with wax and grease remover on a clean microfiber towel
- Follow immediately with a dry microfiber to remove any residue
- Do one final wipe with rubbing alcohol or denatured alcohol
- Let it air dry for 10–15 minutes
- From this point forward, do NOT touch the wheel surface with bare hands — wear nitrile gloves
This is also when I mask off the tires. I tuck index cards or playing cards between the tire bead and the wheel lip, overlapping them all the way around. Then I cover the rest of the tire face with newspaper and masking tape.
Some people use tire shine as a masking agent — spray a heavy coat on the tire, and any overspray wipes right off. I’ve tried this and it works, but I still prefer physical masking for a cleaner edge.
Step 5: Prime the Wheels
Primer is not optional. I repeat — primer is not optional. Skipping primer is the single most common mistake I see in DIY wheel painting.
Why Self-Etching Primer Specifically?
Self-etching primer contains an acid that creates a chemical bond with bare metal and aluminum. Standard primers just sit on the surface. On alloy wheels, this chemical bond is what keeps your entire paint job attached through heat cycles, road impacts, and brake dust exposure.
I use Rust-Oleum Self-Etching Primer or Dupli-Color Self-Etching Primer. Both are widely available at any auto parts store in the US for $6–$8 per can.
How to Apply Primer
- Shake the can vigorously for a full 60 seconds after the mixing ball starts rattling
- Hold the can 8–12 inches from the surface
- Apply the first coat in a light, sweeping motion — you should barely see coverage. This is your “tack coat”
- Wait 10–15 minutes
- Apply the second coat slightly heavier, using overlapping horizontal strokes
- Wait 10–15 minutes
- Apply the third coat — aim for full, even coverage with no bare spots
- Let the primer cure for at least 30 minutes to an hour before moving on (check the can’s directions for specific times)
**The number one rule of spray painting:** Multiple light coats always beat one heavy coat. A heavy coat runs, sags, and takes forever to dry. Light coats build up to a smooth, even surface.
After the primer is fully cured, I do a light scuff with 800-grit sandpaper. This knocks down any texture or small imperfections in the primer and gives the color coat something to grip. Wipe down with alcohol one more time after scuffing.
Step 6: Apply the Color Coat
This is the satisfying part — where you actually see your wheels transform. But don’t let the excitement make you rush.
Choosing Your Paint
I’ve used several products over the years, and here’s my honest ranking:
| Product | Price Per Can | Durability | Finish Quality | My Rating |
|---|---|---|---|---|
| Dupli-Color Wheel Coating | $7–$9 | Excellent | Very Good | ⭐⭐⭐⭐⭐ |
| VHT Wheel Paint | $8–$10 | Excellent | Good | ⭐⭐⭐⭐ |
| Rust-Oleum Automotive | $5–$7 | Good | Good | ⭐⭐⭐⭐ |
| Plasti Dip (peelable) | $6–$8 | Moderate | Moderate | ⭐⭐⭐ |
| Generic Spray Paint | $3–$5 | Poor | Poor | ⭐⭐ |
My go-to is Dupli-Color Wheel Coating in Gloss Black. I’ve used it on at least eight sets of wheels, and it consistently delivers a factory-quality look. The paint is formulated specifically for the heat and chemical exposure that wheels endure.
**Do NOT use generic craft spray paint.** I learned this the hard way on my first attempt years ago. Regular spray paint can’t handle brake heat, and it starts flaking within days of driving. Spend the extra $2–$3 per can and get automotive-grade paint.
Application Technique
- Shake the can for 60 seconds — seriously, time it
- Test spray on a piece of cardboard first to check the spray pattern and make sure the nozzle isn’t clogged
- Apply the first coat very lightly — this is another tack coat. You’ll still see primer through it. That’s fine.
- Wait 10–15 minutes between coats
- Apply 3–4 additional coats, each one slightly heavier than the last
- On the final coat, use slow, deliberate passes for a smooth, wet-look finish (but don’t go so heavy that it runs)
Here’s a technique I’ve developed that makes a big difference: rotate the wheel between coats. I prop the wheel on a lazy Susan or a bucket, and I rotate it 90 degrees for each coat. This ensures even coverage from every angle.
Work in a well-ventilated area — a garage with the door open is ideal. Temperature matters too. I’ve had the best results painting when it’s between 60°F and 85°F with low humidity. If you’re in a humid climate, paint in the morning before the dew point rises.
Step 7: Apply Clear Coat
Clear coat is your armor layer. It protects the color coat from UV rays, brake dust, road chemicals, and physical abrasion. Without it, your paint will dull and wear within weeks.
I apply clear coat the same way I apply color — multiple light coats with 10–15 minutes between each one. I usually do 3–4 coats of clear.
The first coat should be a light mist. The final coat can be slightly heavier for maximum gloss. But again, if it runs, you’ve gone too heavy.
**Critical timing note:** Apply your clear coat within the recoat window specified on your color paint can. This is usually within 30 minutes to an hour of the last color coat. If you wait too long (typically more than 24 hours), you’ll need to lightly scuff the color coat with 800-grit before clear coating so the clear has something to bond to.
I missed this window once on a set of wheels. I applied the clear coat about two days after the color coat without scuffing. The clear eventually peeled off in sheets. Lesson learned.
Step 8: Cure, Reassemble, and Admire
Patience during curing is just as important as everything that came before. I know you’re excited to bolt those wheels back on and go for a drive, but rushing this step can ruin hours of careful work.
My Curing Schedule
- After final clear coat: Let the wheels sit undisturbed for at least 2–4 hours
- Before handling: Wait a full 24 hours. The paint may feel dry to the touch much sooner, but it’s still soft underneath
- Before mounting tires and driving: I recommend 48 hours of cure time if possible
- Full hardness: Most automotive spray paints reach full hardness after about a week. Be extra careful during this period — avoid automatic car washes, harsh chemicals, and aggressive brake dust cleaners
When removing the masking tape and cards, pull slowly at a low angle. Yanking tape quickly can pull up the paint edge and create a ragged line.
After everything is cured and remounted, I apply a coat of wheel-specific wax or sealant. This adds another layer of protection and makes future cleaning much easier. Meguiar’s Hot Rims Wheel Protectant is a good budget option.
Common Mistakes I’ve Made (So You Don’t Have To)
I’m not going to pretend every wheel I’ve painted came out perfect. Here are the mistakes I’ve made over the years, ranked by how painful they were:
1. Painting in Direct Sunlight
The paint dries before it can level out, leaving a rough, orange-peel texture. Always paint in shade or inside a garage.
2. Not Cleaning Thoroughly Enough
Even a tiny film of brake dust or oil will cause adhesion failure. If you think the wheel is clean enough, clean it one more time.
3. Applying Coats Too Heavy
Runs and sags are incredibly difficult to fix without starting over. Light coats. Every time. No exceptions.
4. Skipping Primer
On my very first wheel painting attempt, I thought I could just spray black paint directly onto the existing silver paint. It looked great for about a week before chips started appearing everywhere.
5. Painting in Cold Weather
I once tried to paint wheels in my garage during a November cold snap when it was about 45°F. The paint went on grainy and never fully smoothed out. Keep your workspace above 60°F.
6. Rushing the Cure
I mounted a set of wheels after only about 12 hours once. The tire mounting machine left marks in the fresh paint around the bead area. The paint was dry to the touch but still soft enough to be damaged by pressure.
Plasti Dip vs. Traditional Paint: My Take
I get asked about Plasti Dip constantly, so let me give you my honest assessment after using both.
Plasti Dip is a rubberized coating that’s designed to be peelable. It’s appealing because if you don’t like the result or want to go back to your original wheel color, you can peel it off.
I’ve used Plasti Dip on two vehicles. Here’s what I found:
- It’s easier to apply because overspray peels off tires and other surfaces
- The matte finish looks decent but doesn’t compare to a gloss paint job
- Durability is significantly lower — I noticed wear on the high points of the spokes after just a few weeks of daily driving
- It attracts brake dust more than painted surfaces, and cleaning is trickier because aggressive scrubbing can lift the edges
- It’s a great option if you want a temporary change or if you’re not confident in your painting skills yet
For a long-lasting, professional-looking result, I recommend traditional automotive paint every time. The extra effort in prep and application is worth it for a finish that holds up over many months of daily driving.
Powder Coating at Home: Is It Worth It?
I’ve experimented with a basic home powder coating setup, and while I think it’s beyond the scope of a typical weekend DIY project, it deserves a mention.
A home powder coating kit (like the Eastwood HotCoat system) runs about $150–$200, plus you need a large enough oven to cure the wheels — which means most household ovens are too small. Some people use modified toaster ovens or build custom curing ovens, but at that point, you’re looking at a significant investment of both money and space.
If you plan to paint multiple sets of wheels over time, or if you do other automotive metalwork, a powder coating setup can pay for itself. But for a one-time project on your daily driver, spray paint gives you excellent results at a fraction of the cost and complexity.
How to Maintain Your Freshly Painted Wheels
Getting the paint job right is only half the battle. How you care for the wheels afterward determines whether your work lasts months or years.
My Wheel Maintenance Routine
- Weekly wash: I spray my wheels with a pH-neutral wheel cleaner during every car wash. Avoid acidic or highly alkaline cleaners, especially during the first month
- Monthly sealant: I apply a spray wheel sealant once a month. This takes about 5 minutes per wheel and dramatically reduces brake dust adhesion
- Touch-ups: I keep a small bottle of matching touch-up paint for inevitable rock chips. Catching chips early prevents them from spreading
- Avoid automatic car washes: The harsh brushes and chemicals in many drive-through car washes can damage painted wheels. Touchless washes are fine
With proper maintenance, a well-prepped and properly applied spray paint job on wheels can last well over a year of daily driving, even through harsh winters with road salt. I’ve had some of my best jobs last several years before needing a touch-up or refresh.
Estimated Budget Breakdown for a Four-Wheel Project
Here’s what you can realistically expect to spend:
| Item | Quantity | Cost |
|---|---|---|
| Self-Etching Primer | 2 cans | $12–$16 |
| Wheel Paint (Dupli-Color) | 3 cans | $21–$30 |
| Clear Coat | 2 cans | $14–$18 |
| Sandpaper Assortment | 1 pack | $8–$12 |
| Prep Solvent / Alcohol | 1 bottle | $4–$8 |
| Masking Supplies | — | $ |
Frequently Asked Questions
What kind of paint should I use to paint my car wheels at home?
For the best results, I recommend using a high-temperature wheel-specific spray paint like Dupli-Color Wheel Coating or VHT Wheel Paint, both widely available at AutoZone, O’Reilly, and Walmart for around $6–$12 per can. These paints are formulated to resist brake dust, road salt, and the heat generated by braking, which regular spray paint simply cannot handle. You’ll typically need 2–3 cans per set of four wheels, plus a can of self-etching primer and a clear coat for durability.
How much does it cost to paint your wheels at home vs. professional refinishing?
Painting your wheels at home typically costs between $30 and $75 for all four wheels, covering primer, paint, clear coat, sandpaper, and masking tape. Professional wheel refinishing or powder coating usually runs $75–$150 per wheel, meaning $300–$600 for a full set. DIY is a great budget-friendly option if you’re patient with prep work, though professional results will generally last longer and provide a more factory-like finish.
Do I need to remove my tires before painting my wheels?
You don’t technically have to remove the tires, but removing the wheels from the vehicle is essential for thorough coverage and a clean finish. If you leave the tires mounted, use index cards or playing cards wedged between the tire bead and rim lip along with painter’s tape to mask off the rubber. Removing the tires completely gives you the cleanest result, especially around the bead area, but most DIY painters get great results with careful masking.
How do I prep my wheels before painting them at home?
Proper wheel prep is honestly 80% of the job. Start by washing the wheels thoroughly with a degreaser or dish soap to remove brake dust, road grime, and any wax or tire shine products. Then sand the entire surface with 300–400 grit sandpaper to scuff the existing finish and give the primer something to grip, followed by wiping everything down with rubbing alcohol or a wax-and-grease remover. Skipping the prep stage is the number one reason DIY wheel paint peels or chips within weeks.
How long does DIY wheel paint last before it chips or fades?
With proper surface preparation, a quality self-etching primer, and a UV-resistant clear coat, a DIY wheel paint job can last 1–3 years under normal US driving conditions. Factors like harsh winters with heavy road salt, frequent pothole impacts, and automatic car washes with abrasive brushes will shorten that lifespan considerably. I recommend reapplying clear coat annually and using a pH-neutral wheel cleaner instead of harsh acid-based products to maximize durability.
Can I paint my wheels without sanding or priming first?
I strongly advise against skipping sanding and priming, even though some spray paints claim to be all-in-one or no-prep products. Without sanding, the paint has no mechanical bond to the wheel surface and will peel off in sheets, especially in hot summer temperatures or when exposed to brake heat. A quick scuff with 400-grit sandpaper and one coat of self-etching primer adds maybe 30 minutes to the job but is the difference between a paint job that lasts years and one that fails in weeks.
Is it better to use spray paint or plasti dip to change my wheel color?
Plasti Dip is a great option if you want a temporary, peelable wheel color change that costs around $30–$50 for four wheels and requires less surface prep than traditional paint. However, standard spray paint with primer and clear coat provides a harder, more durable finish that looks closer to a factory powder coat and holds up better against brake dust and road debris. If you’re still deciding on a final wheel color or plan to sell the car, go with Plasti Dip for its reversibility; if you want a long-lasting transformation, commit to proper spray paint with full prep work.

