I spent an entire Saturday staring at a network of fine scratches on my car’s hood, wondering how a vehicle I take such good care of could look so neglected.
Then a fellow detailing enthusiast handed me a bottle of rubbing compound and said, “Twenty minutes and this will look like new.” He was right — but only because he also taught me the technique. Without proper technique, rubbing compound can make things significantly worse.
After years of using rubbing compounds on my own vehicles and helping friends restore theirs, I’ve learned exactly what works, what doesn’t, and what mistakes will cost you a trip to the body shop. This guide is everything I wish someone had told me the first time I picked up a bottle.
- Rubbing compound is an abrasive paste that removes a thin layer of clear coat to eliminate scratches, oxidation, and paint imperfections.
- Always wash and clay bar your car before applying rubbing compound to avoid grinding dirt into the paint.
- Work in small 2×2 foot sections using moderate pressure and overlapping passes.
- You MUST follow up with polishing compound and wax/sealant — rubbing compound alone leaves the surface vulnerable.
- For beginners, hand application is safer than a machine; a dual-action polisher is the best power tool option.
- Popular US brands like Meguiar’s, 3M, and Turtle Wax offer reliable rubbing compounds ranging from $8–$25.
What Exactly Is Rubbing Compound and What Does It Do?
Rubbing compound is essentially a liquid or paste filled with abrasive particles. Think of it like very fine sandpaper in liquid form — it physically removes a microscopic layer of your car’s clear coat to level out imperfections.
When your car gets scratched, the damage usually exists in the clear coat, which is the transparent protective layer on top of the actual paint. Rubbing compound shaves down the clear coat around the scratch so that it becomes level with the bottom of the scratch, effectively making it disappear.
This is fundamentally different from scratch-hiding products that just fill in the scratch with wax or silicone. Those are temporary fixes. Rubbing compound is a permanent correction because it’s actually removing material.
I want to be very clear about something: rubbing compound removes clear coat, and your car only has a finite amount of it. This is why technique matters so much. Used correctly, it’s a miracle worker. Used incorrectly, you can burn through the clear coat entirely and create a problem that only a professional repaint can fix.
Rubbing Compound vs. Polishing Compound: Know the Difference
This is the single most common source of confusion I encounter, and I completely understand why. The products look almost identical on the shelf, and their names are used interchangeably by people who don’t know the difference. But they are NOT the same thing.
| Feature | Rubbing Compound | Polishing Compound |
|---|---|---|
| Abrasive Level | Aggressive (coarse particles) | Mild (fine particles) |
| Purpose | Remove scratches, oxidation, heavy imperfections | Remove haze, light swirls, refine surface |
| When to Use | First step in paint correction | Second step, after rubbing compound |
| Surface After Use | Hazy, micro-scratched | Smooth, glossy |
| Can It Be Used Alone? | No — must be followed by polish | Yes, for minor imperfections |
| Typical US Price Range | $8–$25 | $8–$20 |
Here’s the simplest way I explain it to people: rubbing compound is the heavy lifter that does the corrective work, and polishing compound is the finisher that makes everything look beautiful. You almost always need both, used in that order.
If you use polishing compound on deep scratches, it won’t be aggressive enough to remove them. If you use rubbing compound and stop there, your paint will look hazy and dull. The two products are designed to work as a team.
When Should You Use Rubbing Compound?
Not every paint problem requires rubbing compound. In my experience, here are the situations where it’s the right tool for the job:
- Clear coat scratches: Light to moderate scratches that you can feel with your fingernail but haven’t penetrated to the base coat.
- Oxidation: That chalky, faded look you see on cars that have been parked outdoors in the sun for years, especially common in the southern US states.
- Paint transfer: When another car’s paint has rubbed onto yours in a parking lot bump.
- Water spots that won’t come off: Mineral deposits that have etched into the clear coat.
- Swirl marks: Those spiderweb-like circular scratches you see under direct sunlight, often caused by improper washing.
And here are situations where rubbing compound is NOT the answer:
- Deep scratches down to the primer or metal: If you can see white primer or bare metal, rubbing compound can’t help. You need touch-up paint or professional repair.
- Large dents with paint damage: Bodywork comes first.
- Peeling clear coat: If the clear coat is flaking off, you need a respray, not a compound.
The Fingernail Test
I use this quick test every time: run your fingernail perpendicular across the scratch. If your nail catches in it significantly, the scratch may be too deep for rubbing compound alone. If your nail glides over it with just a slight catch, rubbing compound should handle it. If you can’t feel it at all, you probably only need polishing compound.
What You’ll Need: Complete Supply List
Before you start, gather everything. I’ve learned the hard way that stopping mid-process to run to AutoZone is frustrating and can cause issues if the compound dries on the surface. Here’s my complete list:
- Rubbing compound — I’ve had great results with Meguiar’s Mirror Glaze Ultra-Cut Compound, 3M Rubbing Compound, and Turtle Wax Rubbing Compound. For beginners, I recommend Meguiar’s Ultimate Compound (around $12 at most US auto parts stores) because it’s very forgiving.
- Polishing compound — Meguiar’s Ultimate Polish is my go-to for the follow-up step.
- Foam applicator pads — At least 3-4 of them. They’re cheap and you should switch to a fresh one when the current one gets loaded with compound residue.
- Microfiber towels — I use a minimum of 6 clean ones. Get the ones labeled for detailing, not the cheap hardware store variety. The Chemical Guys and Kirkland (Costco) microfiber towels are both excellent.
- Clay bar kit — For surface prep. Meguiar’s Smooth Surface Clay Kit is widely available and works well.
- Car wash soap — NOT dish soap. A proper pH-balanced car wash soap.
- Wax or paint sealant — For protection after correction. I like Collinite 845 Insulator Wax for long-lasting protection.
- Masking tape — Painter’s tape to protect rubber trim, plastic trim, and badges.
- Spray bottle with water — For lubrication if needed.
- Optional: Dual-action polisher — A Harbor Freight or Griots Garage DA polisher ($60–$150) makes the job faster and more consistent, but is not required.
Step-by-Step Guide: How to Use Rubbing Compound Properly
Now let’s get into the actual process. I’m going to walk you through this exactly the way I do it, step by step.
Step 1: Wash Your Car Thoroughly
I cannot overstate how important this step is. Any dirt, dust, or debris left on the surface will be picked up by your applicator pad and ground into the paint. You’ll create new scratches while trying to remove old ones.
Use the two-bucket wash method: one bucket with soapy water, one with clean rinse water. Wash from top to bottom, rinsing your mitt in the clean bucket before reloading it with soap. Pay extra attention to the areas you plan to compound.
After washing, dry the car completely with clean microfiber towels. I use a waffle-weave drying towel because it absorbs an incredible amount of water without dragging across the paint.
Step 2: Clay Bar the Surface
Even after washing, your paint has invisible contaminants bonded to it — industrial fallout, tree sap residue, brake dust, and rail dust. These need to come off before you compound.
Spray the clay bar lubricant on a small section, then gently glide the clay bar back and forth. You’ll feel the resistance decrease as contaminants are removed. When the clay gets dirty, fold it over to expose a clean surface.
I like to do the “baggie test” after claying — put your hand in a thin plastic sandwich bag and run it over the paint. The surface should feel as smooth as glass. If it doesn’t, clay that area again.
Step 3: Tape Off Sensitive Areas
Use painter’s tape to mask off any rubber trim, plastic trim, emblems, and edges where panels meet. Rubbing compound can stain black plastic trim white, and it’s a nightmare to get off. It can also build up in crevices around badges and panel gaps.
I’ve seen people skip this step to save five minutes and then spend an hour trying to clean compound residue out of their door handle recesses. Trust me — tape it off.
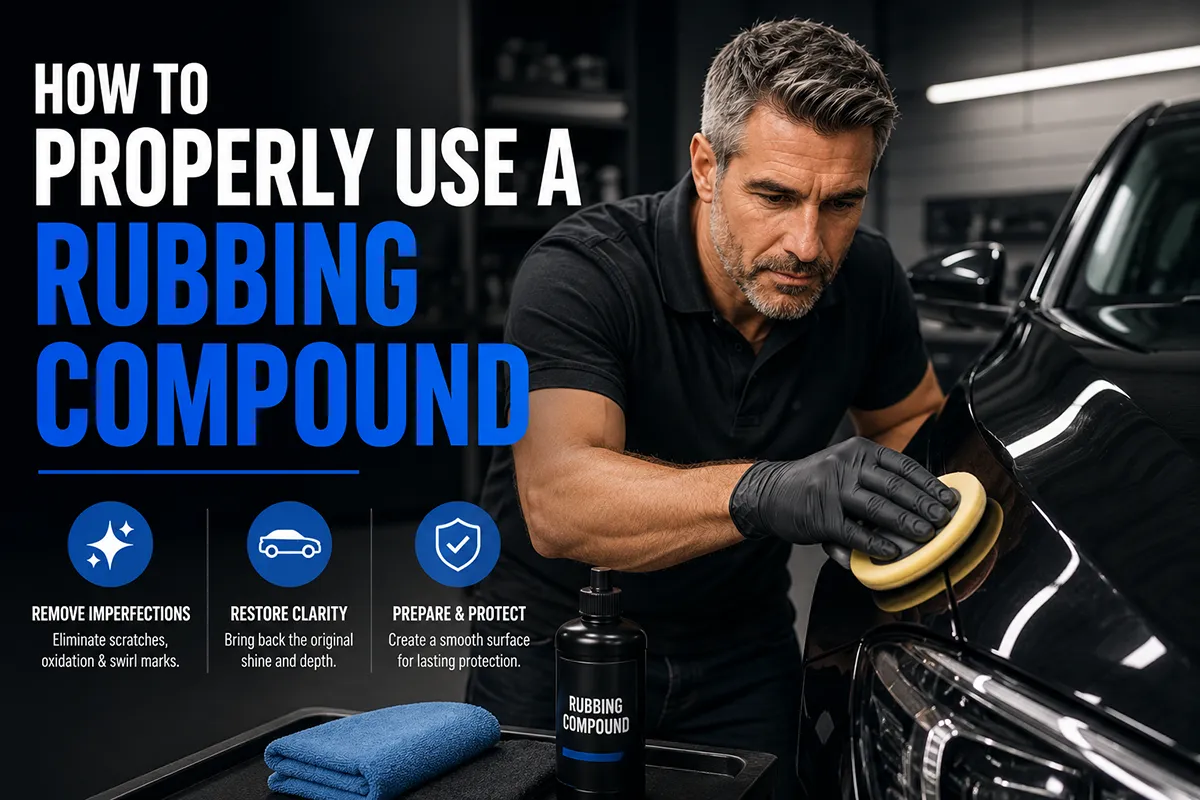
Step 4: Apply Rubbing Compound (Hand Method)
Here’s where the actual magic happens. Let me walk you through the hand application method first, since it’s what I recommend for beginners.
Dab, don’t pour. Put three to four pea-sized dots of rubbing compound onto your foam applicator pad. You need far less than you think. A common beginner mistake is using too much product, which makes it harder to work and harder to remove.
Work in small sections. I work in roughly 2-foot by 2-foot sections. This keeps the compound from drying out before you can work it in and wipe it off.
Use the right motion. This is critical. Work in straight, overlapping back-and-forth passes — NOT circles. I know the circular motion is what you see in movies and car wash scenes, but circular motions create swirl marks. Use straight lines, alternating between horizontal and vertical passes across the section.
Apply moderate pressure. You’re not trying to push through the paint, but you’re not just lightly brushing the surface either. Think about the pressure you’d use to scrub a stubborn spot on a kitchen countertop. Firm but controlled.
Make multiple passes. I typically make 4-6 passes over each section. After the first couple passes, you’ll notice the compound starting to become less visible as it breaks down. This is normal and means the abrasive particles are doing their job.
Wipe off residue. After working the compound into a section, use a clean microfiber towel to wipe away the residue. Use a gentle, lifting motion rather than a hard wipe. Flip the towel frequently to always use a clean side.
Inspect your work. Look at the section from multiple angles, especially in direct sunlight if possible. If the scratches are still visible, you can repeat the process on that section. But don’t go overboard — I give any area a maximum of three rounds of compound before stopping.
Step 5: Apply Rubbing Compound (Machine Method)
If you’re comfortable with a dual-action (DA) polisher, the process is similar but faster and more consistent. Here’s my approach:
Choose the right pad. For rubbing compound, use a cutting pad (typically orange or yellow, depending on the brand). Avoid using a wool pad unless you have experience — they’re very aggressive.
Apply compound to the pad. I put four small dots in an X pattern across the face of the pad, plus one in the center.
Spread first, then work. Before turning on the polisher, press the pad against the paint and move it around to spread the compound. This prevents the machine from flinging compound everywhere when you turn it on.
Speed setting. I start at speed 3-4 on most DA polishers (out of a typical 1-6 range). This gives you enough action to cut without being overly aggressive. Speed 5-6 is for experienced users only.
Keep it moving. Never let the polisher sit in one spot. Move it slowly — about one inch per second — in overlapping passes. Cover each section methodically.
Don’t press down. Let the weight of the polisher do the work. Adding heavy downward pressure with a DA polisher can cause it to bog down and stop oscillating, which defeats the purpose.
After several days of testing different machines and techniques on my own vehicles and practice panels, I can confidently say that the DA polisher gives better results than hand application in about half the time. But hand application is absolutely fine for localized scratch removal.
Step 6: Follow Up with Polishing Compound
This step is NOT optional. After rubbing compound, your paint will look better than before, but it won’t be glossy. There will be a slight haze from the micro-scratches the rubbing compound itself creates. This is completely normal.
Switch to a clean applicator pad (or a polishing pad if using a machine) and apply polishing compound in the same method as above. Polishing compound has much finer abrasives that smooth out the micro-scratches left by the rubbing compound.
After polishing, the surface should look noticeably glossy and smooth. This is the step that makes people say “wow.”
Step 7: Protect with Wax or Sealant
You’ve just removed a thin layer of clear coat and exposed a fresh surface. That surface is now completely unprotected from UV rays, rain, bird droppings, and everything else the world throws at your car.
Apply a quality wax or paint sealant within a day of compounding. I typically apply it the same session. This seals in your work and protects the fresh surface.
In my experience, a synthetic paint sealant lasts longer than traditional carnauba wax, especially if you’re dealing with harsh sun in states like Arizona, Texas, or Florida. But carnauba wax gives a warmer, deeper look that some people prefer.
Common Mistakes I’ve Seen (and Made) with Rubbing Compound
Over the years, I’ve made my share of mistakes and watched others make theirs. Here are the most common pitfalls:
Using Rubbing Compound in Direct Sunlight
The compound dries out way too fast in the sun. It becomes impossible to work and difficult to remove. I always work in a garage or at minimum under a carport in the shade. The ideal temperature range is between 60°F and 80°F.
Skipping the Wash and Clay Bar
I once watched a friend apply rubbing compound to a car he’d only rinsed with a hose. He ground fine dust particles into the clear coat and created a mess of new scratches. Fifteen minutes of proper washing would have saved him hours of additional correction work.
Working in Circles
Circular motions create circular scratches — swirl marks. They’re not always visible in shade but show up glaringly in direct sunlight. Straight back-and-forth passes, alternating direction, minimize this issue dramatically.
Using Too Much Compound
More product does not mean more correction. Excess compound just creates a thick, gummy mess that’s hard to wipe off and doesn’t break down properly. A little goes a long way.
Not Changing Pads or Towels
A loaded-up pad becomes less effective and can redistribute the removed clear coat material back onto the surface. I switch pads every 3-4 sections and use fresh microfiber towels constantly.
Compounding Too Many Times in One Area
If three passes of rubbing compound didn’t remove the scratch, a fourth and fifth pass won’t either. The scratch is likely too deep for compound alone. Stop, accept the limitation, and look into touch-up paint or professional repair. Continuing will only thin the clear coat dangerously.
Best Rubbing Compounds Available in the US
I’ve personally used many rubbing compounds over the years. Here are my top recommendations based on real-world results:
Meguiar’s Ultimate Compound (~$12)
This is my top pick for beginners and intermediate users. It’s a diminishing abrasive compound, meaning the particles break down as you work them, reducing the risk of over-correction. It’s available at virtually every Walmart, AutoZone, O’Reilly, and Amazon in the US. I’ve used it on black, white, silver, and red paint with consistently excellent results.
3M Rubbing Compound (~$10)
A solid workhorse compound that’s been around for decades. It’s a bit more aggressive than the Meguiar’s, so it cuts faster but requires more care. I reach for this when dealing with heavy oxidation on older vehicles that have been sitting outside in the southern sun.
Turtle Wax Premium Rubbing Compound (~$8)
The most budget-friendly option that still delivers real results. It’s not as refined as Meguiar’s or 3M, but for occasional use on light scratches, it gets the job done. Widely available at gas stations and dollar stores, which makes it the most accessible option.
Griot’s Garage Complete Compound (~$16)
A favorite among enthusiasts. It has excellent cutting power with minimal dust and easy wipe-off. It’s especially great with a DA polisher. You’ll typically find it at auto detailing specialty shops or online.
Chemical Guys V-Line Compound (~$20)
Professional-grade performance in a consumer-friendly package. This is what I use when I want maximum correction on heavily damaged clear coat. It requires a polishing step afterward, but the cut level is impressive.
Special Considerations for Different Paint Colors
I want to address something that took me a while to learn: rubbing compound behaves differently depending on your car’s paint color, and the results are easier or harder to evaluate depending on the shade.
Black and dark colors show every single imperfection. Swirl marks, haze, and uneven compounding are glaringly obvious on black paint under sunlight. If your car is black, take extra care with your technique, use a finer compound, and be meticulous with your polishing step. I spend roughly twice as long polishing a black car as I do a white one.
White and light colors are much more forgiving. Swirl marks are far less visible, and the overall result tends to look great even with less-than-perfect technique. That said, don’t get lazy — the imperfections are still there even if you can’t see them easily.
Red and vibrant colors can leave residue on your applicator pads and towels that looks alarming. Don’t panic — in most cases, this is clear coat residue mixed with compound, not actual paint. If you see vivid red color on your towel, check the area carefully to make sure you haven’t burned through to bare paint.
Metallic and pearl paints generally respond well to rubbing compound, but the metallic flakes in the paint can sometimes make scratches harder to evaluate. Work under good lighting and inspect from multiple angles.
How Often Can You Use Rubbing Compound?
This is a question I get asked all the time, and the answer matters a lot. Rubbing compound is not a regular maintenance product. It’s a corrective treatment.
Your car’s clear coat is typically about 1.5 to 2 mils thick (a mil is one thousandth of an inch). Each application of rubbing compound removes approximately 0.1 to 0.5 mils of clear coat, depending on the aggressiveness of the compound, the pad, and the pressure used.
That means you have a limited number of corrections before the clear coat is too thin to protect the paint. In my practice, I limit full-panel compounding to no more than 2-3 times over the lifetime of a vehicle’s original paint. Spot treatments on individual scratches are less of a concern since you’re only working on a small area.
If you find yourself wanting to use rubbing compound frequently, the root cause is likely in your washing and drying technique. Switching to proper wash mitts, grit guards, and quality microfiber drying towels will dramatically reduce the scratches and swirls that send you reaching for the compound in the first place.
Hand Application vs. Machine: Which Should You Choose?
I’ve done it both ways many times, and here’s my honest assessment:
Hand application is best for: beginners, small areas, spot treatments, people who don’t want to invest in a polisher, and anyone who’s nervous about causing damage. The downside is that it’s slower, more physically tiring, and the results are slightly less consistent.
Dual-action polisher is best for: full-panel or full-car corrections, heavy oxidation, anyone doing this more than once a year, and anyone who wants professional-level results. The learning curve is gentle with a DA polisher (much safer than a rotary), and a decent one costs around $60-$150.
I would NOT recommend a rotary polisher for anyone who isn’t trained or highly experienced. Rotary polishers spin in a fixed circle and can burn through clear coat in seconds if you make a mistake. DA polishers oscillate randomly, which is inherently safer.
After testing both approaches on the same vehicle — hand-compounding one side and machine-compounding the other — the machine side looked noticeably better with a more uniform finish. But the hand-applied side was still a dramatic improvement over the uncorrected paint.
What About Rubbing Compound on Non-Paint Surfaces?
I’ve been asked about using rubbing compound on headlights, windshields, and chrome, so let me address those quickly.
Headlights: Yes, rubbing compound works excellently on oxidized, yellowed headlights. In fact, many headlight restoration kits are essentially wet sanding followed by rubbing compound and polishing compound. I’ve restored multiple sets of headlights this way with impressive results. Just make sure to tape off the surrounding paint and seal the headlight with a UV-protective spray afterward.
Glass: Rubbing compound is generally too coarse for glass. It can scratch it. For water spots on windshields, use a dedicated glass polish like cerium oxide.
Chrome: Use only compounds specifically formulated for chrome. Standard rubbing compound can be too aggressive and create a dull, scratched appearance on chrome surfaces.
Gel coat (boats, RVs): Rubbing compound works well on gel coat surfaces, which is why many boat owners use the same products. The technique is identical.
My Recommended Process Timeline
Here’s the complete timeline I follow when I do a full paint correction on a vehicle. This assumes you’re working on the full car in a single session:
- Wash and dry: 30–45 minutes
- Clay bar treatment: 30–45 minutes
- Masking and taping: 15–20 minutes
- Rubbing compound (hand): 2–3 hours for a full sedan / (machine): 1–1.5 hours
- Polishing compound: 1–2 hours (hand) / 45 minutes–1 hour (machine)
- Wax or sealant application: 30–45 minutes
- Final wipe-down and inspection: 15–20 minutes
Total time: roughly 5-8 hours for a full correction by hand, 3-5 hours with a machine. Yes, it’s a full day project. But the results are genuinely transformative, and the satisfaction of seeing your car look better than it has in years is worth every minute.
Final Thoughts: Respect the Process
Rubbing compound is one of the most powerful tools in a car owner’s arsenal, but it demands respect. You’re literally removing part of your car’s protective coating to achieve a better appearance. Done right, the results are stunning. Done wrong, you’re creating problems that cost hundreds or thousands of dollars to fix.
If I could leave you with just three pieces of advice, they’d be these: always prep the surface properly, work in small sections with moderate pressure and straight-line motions, and never skip the polish and wax steps afterward.
I’ve watched people take a dull, scratched, neglected car and make it look showroom-fresh in a single afternoon using nothing more than the products and techniques in this guide. There’s no reason you can’t do the same.
Take your time, trust the process, and enjoy the results. Your car’s paint will thank you.
Frequently Asked Questions
What is a rubbing compound and when should I use it on my car?
A rubbing compound is a mildly abrasive paste or liquid that removes a thin layer of clear coat to eliminate surface scratches, oxidation, and paint imperfections. I recommend using it when you notice swirl marks, light scratches from road debris, or dull spots on your vehicle’s paint that regular washing won’t fix. It’s especially useful after long drives on US highways where gravel and tar can leave marks on your lower panels and fenders near the tire wells.
How do I properly apply rubbing compound by hand step by step?
Start by thoroughly washing and drying your car to remove dirt that could cause additional scratches during the process. Apply a small, quarter-sized amount of rubbing compound to a foam or microfiber applicator pad, then work it into the affected area using firm, overlapping circular motions in a 2×2 foot section at a time. Wipe off the residue with a clean microfiber towel and inspect the area before moving on — I usually repeat the process once or twice on deeper scratches before seeing full results.
Can I use a rubbing compound on scratches near my wheel wells and tire rims?
Yes, rubbing compound works well on paint scratches near wheel wells and fender areas where curb rash, gravel chips, and road salt damage are common, especially in northern US states with harsh winters. Be careful to avoid getting the compound on unpainted plastic trim or rubber tire surfaces, as it can leave white residue that’s tough to remove. I always tape off adjacent trim and tires before working close to the wheel area for a cleaner result.
What is the difference between rubbing compound and polishing compound?
Rubbing compound is more abrasive and is designed to remove deeper scratches, heavy oxidation, and noticeable paint defects, while polishing compound is finer and meant for removing light swirl marks and restoring shine. Think of rubbing compound as the heavy-lifting first step and polish as the finishing touch. For most US drivers dealing with everyday highway wear, I start with a rubbing compound like Meguiar’s Ultimate Compound (around $10–$15) and follow up with a polish to restore a smooth, glossy finish.
Will rubbing compound damage my car’s clear coat if I use it incorrectly?
Yes, using too much pressure, working on the same spot excessively, or using a rubbing compound that’s too aggressive can burn through your clear coat and expose the base paint underneath. This is especially risky on newer vehicles with thinner factory clear coats. I always recommend starting with the least abrasive compound that gets the job done, testing on an inconspicuous area first, and never applying rubbing compound to a hot surface or in direct sunlight.
Should I use a dual-action polisher or apply rubbing compound by hand?
For beginners, I strongly recommend applying rubbing compound by hand with a foam applicator pad because it gives you more control and greatly reduces the risk of burning through the clear coat. A dual-action (DA) polisher like the Porter-Cable 7424XP (around $100–$130) is ideal for intermediate users who want faster, more uniform results on larger panels. If you use a DA polisher, keep it at a low speed setting (around 3–4) and let the machine do the work rather than pressing down hard.
Do I need to wax my car after using rubbing compound?
Absolutely — rubbing compound strips away a layer of clear coat along with the imperfections, leaving the paint unprotected and vulnerable to UV rays, road salt, and environmental contaminants common across US driving conditions. After compounding and polishing, I always apply a quality carnauba wax or synthetic sealant to restore that protective barrier and lock in the shine. Products like Turtle Wax ICE or Chemical Guys Butter Wet Wax, both available for under $15 at most auto parts stores, work great as a final step.

