There’s nothing quite like the sinking feeling of looking down at a tire that’s come off the bead — whether it happened during an off-road adventure, after a slow leak went too far, or because you’re trying to swap tires at home to save on shop fees.
Most people assume remounting a tire on a rim is something only a tire shop can handle. I used to think that too, until I found myself in my garage on a Sunday evening with a dismounted tire, no open shops nearby, and a Monday morning commute staring me in the face.
I’ve since remounted tires on rims more times than I can count — on passenger cars, light trucks, and even a trailer wheel that popped its bead on a gravel road. In this guide, I’m going to walk you through exactly how I do it, what tools you actually need, and the critical safety steps that most YouTube tutorials gloss over.
- Remounting a tire on a rim at home is doable with basic tools, tire lubricant, and patience — but it requires respect for safety, especially during inflation.
- You’ll need tire irons (or pry bars), a bead breaker or DIY alternative, soapy water or tire lube, and an air compressor capable of high-volume output.
- The hardest part isn’t getting the tire on — it’s seating the bead safely. I cover multiple methods including the ratchet strap trick and the fire method (with serious caveats).
- If your rim is bent, cracked, or the tire is damaged, skip the DIY route and head to a shop — this guide is for sound tires and rims only.
- Total cost for a basic home setup is around $50–$120, compared to $20–$40 per tire at a shop.
Why Would You Need to Put a Tire Back on a Rim?
Before diving into the how-to, let me address the why — because understanding the situation helps you decide whether this is a DIY job or a “drive to Discount Tire” job.
Common Scenarios I’ve Encountered
The bead popped off during low-pressure driving. This happened to me when I aired down for a sandy trail and went a little too aggressive on a turn. The sidewall folded, the bead broke free, and I was stuck with a floppy tire hanging off the rim.
Swapping tires between seasonal sets. If you’ve got a set of winter tires on separate rims, you might not need this guide. But if you’re trying to swap rubber on the same set of wheels, you’ll need to dismount and remount.
Fixing a slow leak at the bead. I’ve dealt with corroded rims — especially steel wheels — where the bead seat gets crusty and allows air to slowly seep out. Sometimes the fix is as simple as cleaning the rim and reseating the tire.
Buying used tires and mounting them yourself. With used tire prices ranging from $30 to $80 per tire for common passenger sizes, the savings are real — if you can do the mounting yourself.
Can You Actually Do This at Home? My Honest Take
Yes, but with caveats. I want to be upfront: this is one of those jobs where confidence matters, but overconfidence can get you hurt.
Tires hold a significant amount of air pressure — typically 30 to 50 PSI for passenger vehicles. During the bead-seating process, there’s a moment where the tire suddenly snaps into place with a loud pop. If your fingers, face, or anything else is in the wrong spot, you could be seriously injured.
I’ve done this safely dozens of times, but I always treat the inflation step with the same respect I’d give a loaded firearm. Wear safety glasses. Keep your face away from the tire. And if something feels wrong, stop and reassess.
That said, if you’re working with standard passenger car tires (not run-flats, not low-profile performance tires with stiff sidewalls), the process is very manageable for a handy person with the right tools.
Tools and Materials You’ll Need
Here’s my tried-and-true tool list. I’ve refined this over the years after dealing with improvised setups that wasted my time.
Essential Tools
- Tire irons or tire spoons — A set of 3 costs about $20–$35 on Amazon. I use the 16-inch curved spoons from Ken-Tool. They give you enough leverage without being unwieldy.
- Bead breaker — A manual bead breaker runs $30–$60. If you don’t have one, I’ll show you a workaround using a jack and a board, but a proper bead breaker makes life significantly easier.
- Tire lubricant — Commercial tire mounting paste (like RuGlyde) is ideal. In a pinch, I’ve used a mixture of dish soap and water in a spray bottle. It works, just not as slippery.
- Air compressor — This is the one tool you really can’t skip or fake. You need a compressor that can deliver a high volume of air quickly to seat the bead. A small pancake compressor might work for smaller tires, but I recommend at least a 6-gallon tank with 3+ CFM at 40 PSI.
- Valve core removal tool — Costs about $3. Removing the valve core during inflation allows air to flow in much faster, which is critical for seating the bead.
- Ratchet strap — A standard 1.5-inch ratchet strap is incredibly useful for compressing the tire’s tread to help the beads push outward toward the rim. This is one of the best tricks I’ve learned.
- Safety glasses and gloves — Non-negotiable.
Nice-to-Have but Not Required
- Rim protectors — Plastic clips that slide onto the rim edge to prevent tire iron scratches. Essential if you’re working on alloy wheels.
- Portable tire cage — For inflation safety, though this is more of a shop item.
- Torque wrench — For when you remount the wheel on the vehicle. I always torque to spec.
Tools Comparison: DIY Setup vs. Shop Service
| Factor | DIY at Home | Tire Shop Service |
|---|---|---|
| Cost (per tire) | $0 after initial tool investment | $20–$40 per tire (mount + balance) |
| Initial Tool Investment | $50–$120 (excluding compressor) | $0 |
| Time per Tire | 15–45 minutes (with experience) | 10–15 minutes (machine-assisted) |
| Balancing Included? | No (requires separate equipment) | Yes, typically included |
| Risk of Rim Damage | Moderate (higher on alloy wheels) | Low (machine has guides) |
| Skill Required | Moderate — patience is key | None — they handle everything |
| Best For | Emergency repairs, off-road situations, budget builds | Daily drivers, new tire installs, alloy wheels |
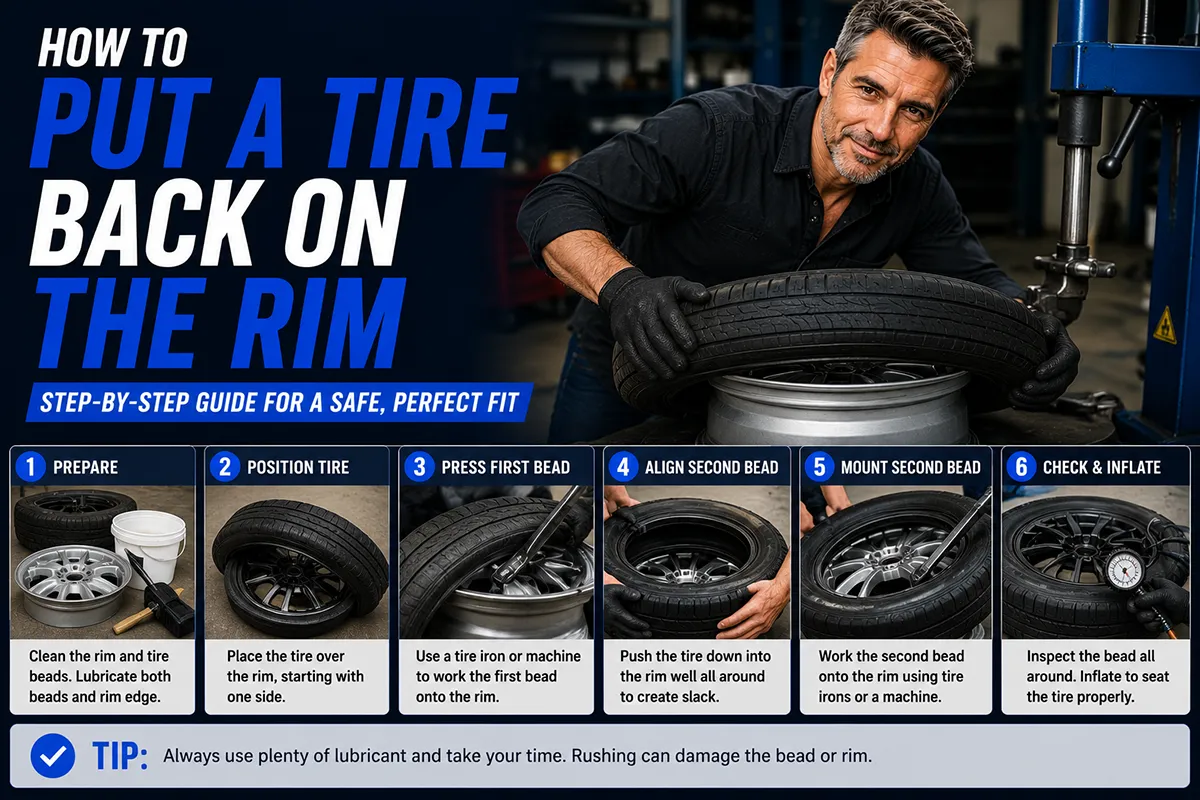
Step-by-Step: How to Put a Tire Back on the Rim
Alright, let’s get into it. I’m going to assume you have a tire that’s already off the rim (or at least off the bead) and you need to get it back on and inflated. If the tire is still fully mounted and you need to remove it first, I’ll cover that briefly too.
Step 1: Inspect Everything Before You Start
This is the step most people skip, and it’s the one that bites you later. Before I do anything, I inspect both the tire and the rim carefully.
On the tire: Look for cracks in the sidewall, exposed cords, punctures, or any sign of dry rot. Run your hand along the inside of the tire to feel for nails, glass, or debris. If the tire is damaged beyond a simple puncture repair, don’t remount it — replace it.
On the rim: Check for bends, cracks, or heavy corrosion on the bead seat. Steel wheels are notorious for developing a rust layer right where the bead sits, which causes slow leaks. I use a wire brush or sandpaper (80-grit works well) to clean the bead seat until I see bare metal. On alloy wheels, corrosion is less common but still possible.
Step 2: Lubricate the Bead and Rim
This step is critical. Without proper lubrication, you’ll fight the tire the entire time, and you risk damaging both the bead and the rim.
I apply a generous coat of tire mounting lubricant (or my soapy water mix) to the entire bead area of the tire — both beads if I’m mounting from scratch. I also coat the rim’s bead seat and the rim flanges.
Don’t be stingy here. The rubber needs to slide smoothly over the metal. In my experience, about 80% of the struggle people have with tire mounting comes from insufficient lubrication.
Step 3: Position the Tire on the Rim
Lay the rim flat on the ground (or on a sturdy surface — I use an old tire laid flat as a cushion to protect the rim face). Place the tire on top of the rim at an angle.
The key concept to understand here is the drop center. Every rim has a recessed channel running around the center — it’s the lowest point of the rim. When you push one side of the bead over the rim flange, the opposite side of the bead needs to drop down into this center channel. That’s what gives you the slack to lever the tire over the edge.
Start by pushing the bottom bead over the rim by hand. On most passenger car tires, you can get about half of the first bead over the rim using just body weight and hand pressure. Push down firmly on the tire, angling it so one edge drops below the rim flange.
Step 4: Use Tire Irons for the First Bead
Once you can’t push any more of the bead over by hand, it’s time for tire irons. Here’s my technique:
- Make sure the section of bead you’ve already pushed over is sitting in the drop center of the rim. This gives maximum slack on the opposite side.
- Insert a tire iron between the tire bead and the rim flange, hooking the bead.
- Lever the iron downward, pulling the bead up and over the rim edge.
- While holding that iron in place (or having a helper hold it), insert a second iron about 4–6 inches away and repeat.
- Work your way around the rim. The last section will be the tightest — make sure the opposite side is fully seated in the drop center.
Pro tip from my experience: If you’re working on alloy wheels, place rim protectors on the edge before using tire irons. I learned this the hard way when I gouged a nice set of Sport Edition wheels. Those scratches still haunt me.
Step 5: Mount the Second Bead
With the first bead over the rim, you now need to get the second bead over. This is the harder part, because the first bead is already taking up space inside the rim.
The process is similar: start by pushing the second bead over the rim by hand, working from one point and moving around. Keep the portion you’ve already pushed over seated in the drop center.
When hand pressure isn’t enough anymore, go back to the tire irons. This bead will require more force, so take your time. I usually need all three tire spoons for this part — two to hold progress and one to actively lever.
Important: Be very careful not to pinch the inner tube if you’re working on a tube-type tire (common on older trucks, trailers, and some off-road setups). If it’s a tubeless tire on a modern passenger car, this isn’t a concern, but you still don’t want to gouge the inner liner.
Step 6: Seat the Bead — The Critical Step
Both beads are now inside the rim, but they’re sitting loose in the drop center — not seated against the rim flanges where they need to be. This is where many DIYers get stuck.
Here’s what needs to happen: You need to push enough air volume into the tire quickly enough that the beads expand outward and snap onto the rim flanges. That “snap” is what you’ll hear — a loud pop (sometimes two, one for each bead) that tells you the tire is seated.
Method 1: The Ratchet Strap Trick (My Preferred Method)
This is the method I use most often, and I recommend it for anyone doing this at home.
- Wrap a ratchet strap around the circumference of the tire tread.
- Tighten the ratchet strap. As you tighten, the tread compresses inward, which forces the sidewalls — and the beads — outward toward the rim flanges.
- Remove the valve core from the valve stem. This allows maximum airflow.
- Connect your air compressor and begin inflating.
- As the tire starts to take shape and the beads begin to seat, you’ll hear the first pop. Keep inflating until you hear the second pop.
- Once both beads are seated, stop inflating, reinstall the valve core, and then inflate to the proper pressure (check the placard on your driver’s door jamb for the correct PSI).
- Remove the ratchet strap.
The ratchet strap method works brilliantly because it bridges the gap between the loose bead and the rim, creating enough of a seal for air pressure to build up.
Method 2: The Starting Fluid / Fire Method (Use With Extreme Caution)
I have to address this because you’ll see it all over the internet, and I’ve used it myself in emergency off-road situations. But I want to be absolutely clear: this method involves igniting flammable gas inside the tire and carries real risk of injury, fire, or tire damage.
The concept: you spray a small amount of starting fluid (ether) or another flammable aerosol inside the tire, then ignite it. The rapid combustion creates a burst of expanding gas that seats the beads instantly.
I’ve used this method exactly twice — both times on the trail, both times with steel wheels, and both times because I had no compressor with me. It worked. But I also burned the hair off my forearm the first time because I used too much starting fluid.
My honest recommendation: Don’t use this method unless you’re in a genuine emergency with no other options. The ratchet strap + compressor method is safer, more controlled, and works just as reliably.
Method 3: Cheetah / Bead Blaster (Shop-Level Tool)
If you’re doing this regularly, a bead blaster (sometimes called a “cheetah”) is worth the $80–$150 investment. It’s a portable air tank that you pressurize, then release all at once through a wide nozzle directed at the tire bead. The sudden blast of air seats the bead almost instantly.
I bought one after my fifth or sixth tire mounting session, and it cut my bead-seating time from “several frustrating minutes” to “about three seconds.” Worth every penny if this becomes a recurring task for you.
What to Do After the Beads Are Seated
Check the Bead Seating Line
Every tire has a thin molded line running around the sidewall just above the bead — it’s called the bead seating indicator or bead reference line. After inflation, I check that this line is evenly spaced from the rim all the way around on both sides.
If the line dips closer to the rim in one spot, the bead isn’t fully seated there. Deflate the tire, re-lubricate that section, and re-inflate. Don’t drive on a tire with an unevenly seated bead.
Inflate to Proper Pressure
Once both beads are confirmed seated, inflate to the vehicle manufacturer’s recommended pressure. For most passenger cars in the US, this is between 32 and 36 PSI. Don’t go by the “max pressure” number on the tire sidewall — that’s the maximum the tire can handle, not the recommended operating pressure.
Consider Balancing
Here’s the honest truth about DIY tire mounting: you can mount the tire at home, but balancing requires a machine. An unbalanced tire will cause vibration, uneven wear, and an unpleasant driving experience — especially at highway speeds.
After I mount tires at home, I drive to a local shop and ask for balance-only service. Most places charge $10–$15 per tire for balancing without mounting. It’s a worthwhile compromise.
If you’re remounting a tire that was previously balanced and hasn’t been changed (like reseating a bead that popped off), you may be fine without rebalancing. After several days of driving, if I don’t feel any vibration, I leave it alone.
When NOT to DIY — Know Your Limits
I’m a big advocate for learning practical skills, but I also believe in knowing when to call in the professionals. Here are situations where I always go to a shop:
- Low-profile tires (50 series or lower) — The stiff sidewalls make manual mounting extremely difficult, and the risk of rim damage on alloy wheels is high.
- Run-flat tires — The reinforced sidewalls are brutally hard to work with by hand. I tried once. Once.
- TPMS sensors — Many modern vehicles have tire pressure monitoring sensors mounted inside the wheel. It’s easy to damage these with tire irons. If your vehicle has TPMS, be very aware of the sensor location, or let a shop handle it.
- Damaged rims — If the rim is bent or cracked, no amount of DIY skill will create a safe seal. Replace the rim.
- Tires with visible damage — Sidewall bubbles, exposed belts, deep cuts, or significant dry rot mean the tire needs to be replaced, not remounted.
My Real-World Experience: Lessons Learned the Hard Way
Let me share a few moments from my tire-mounting journey that taught me valuable lessons.
The Time I Cracked a Bead
Early on, I was too aggressive with a tire iron on an older tire that had been sitting in a garage for years. The rubber at the bead had hardened, and when I levered too hard, the bead cracked. That tire went straight to the recycler, and I learned to inspect rubber condition before applying force.
The Corroded Rim That Wouldn’t Seal
I spent the better part of an afternoon trying to seat a tire on a steel truck wheel that had heavy corrosion on the bead seat. No matter how much air I pumped in, it leaked out around the bead. The fix was removing the tire, wire-brushing the rim aggressively, applying a thin layer of bead sealant, and remounting. It held perfectly after that.
The Pancake Compressor That Couldn’t Keep Up
My first attempt at bead seating was with a small 3-gallon pancake compressor. It simply couldn’t deliver enough air volume fast enough. The air leaked out of the loose bead faster than the compressor could push it in. After that experience, I upgraded to a 10-gallon portable compressor, and the difference was night and day.
Tips That Actually Make a Difference
After doing this many times, here are the small things that make the biggest impact:
- Warm rubber is easier to work with. If it’s cold outside, bring the tire into your garage and let it warm up for a while. Cold rubber is stiff and uncooperative.
- Always remove the valve core during bead seating. This single tip probably saves me more time and frustration than anything else. The unrestricted airflow makes a huge difference.
- Use a proper tire lube, not WD-40 or petroleum-based products. Petroleum products can degrade rubber. Stick with soapy water or commercial tire paste.
- Work the bead into the drop center constantly. Every time you lever a new section over, check that the opposite side hasn’t popped out of the center channel. This is the number one reason people struggle.
- A second pair of hands helps enormously. The first bead is a solo job, but the second bead is significantly easier with a helper holding tire irons in place.
- Don’t exceed 40 PSI during bead seating. If the bead hasn’t seated by 40 PSI, something is wrong. Deflate, re-lubricate, reposition, and try again. Never keep adding pressure hoping it’ll pop — that’s how tires explode.
Cost Breakdown: Is DIY Tire Mounting Worth It?
Let me lay out the real math, because I think this helps put the decision in perspective.
Shop cost for mounting and balancing 4 tires: Typically $80–$160 total ($20–$40 per tire) at places like Discount Tire, Walmart Auto Center, or a local independent shop.
DIY tool investment:
- Tire spoon set: $25–$35
- Manual bead breaker: $30–$60
- Tire lube / soapy water: $5–$10
- Valve core tool: $3–$5
- Ratchet strap (if you don’t have one): $8–$12
- Rim protectors: $5–$10
Total initial investment: roughly $75–$130 (assuming you already have a compressor).
So if you’re doing this once, the shop is the better deal. But if you’re mounting tires multiple times — seasonal swaps, used tire purchases, off-road repairs — the tools pay for themselves after the second or third set.
For me, the real value isn’t just financial. It’s the ability to handle a tire emergency on my own schedule, in my own garage, without waiting for a shop appointment. That independence is worth a lot.
A Note on Tire Safety and Legal Considerations
I want to end the practical portion of this guide with an important reminder. Tires are the only part of your vehicle that touches the road. They are your braking, your steering, and your grip in rain, snow, and emergency maneuvers.
If you mount a tire incorrectly — if the bead isn’t seated, if the tire is damaged, if the rim is compromised — you’re putting yourself and everyone on the road at risk. I take this seriously, and I encourage you to do the same.
Always verify proper bead seating before driving. Always inflate to the correct pressure. Always inspect for damage. And if you’re unsure about anything, take it to a professional. A $30 mount-and-balance is cheap insurance compared to a blowout at highway speed.
Final Thoughts: You Can Do This
Putting a tire back on a rim is one of those skills that seems intimidating until you’ve done it once. After my first successful remount, I remember standing back and thinking, “That’s it? That’s what shops charge $40 for?”
It’s not magic. It’s leverage, lubrication, and air pressure — combined with patience and respect for the forces involved.
If you’re comfortable working on your own vehicle, you already have the mechanical aptitude for this. Start with a steel wheel and an older tire to practice. Get a feel for the tire irons, learn how the drop center works, and build your confidence before tackling your daily driver’s alloy wheels.
In my experience, this is one of the most satisfying automotive DIY skills you can learn. It saves money, builds self-reliance, and might just save you from being stranded on a trail or in a parking lot someday.
Stay safe, lubricate generously, and don’t forget to put that valve core back in before you hit the road.
Frequently Asked Questions
Can I put a tire back on the rim myself at home?
Yes, you can remount a tire on a rim at home, but it requires the right tools and technique. You’ll need tire irons or spoons, a bead breaker (or a ratchet strap workaround), soapy water for lubrication, and an air compressor to reseat the bead. For most US drivers, I’d recommend this only for smaller tires like lawn equipment or spare donut tires — full-size passenger tires are much easier and safer to mount with a professional tire machine.
How much does it cost to have a tire mounted back on a rim at a shop?
Most tire shops in the US charge between $15 and $45 per tire for mounting and balancing, with national chains like Discount Tire, Walmart Auto Care, and Firestone often on the lower end. If you purchased your tires at the same shop, mounting is sometimes included for free or at a reduced rate. I always recommend getting the tire balanced at the same time, since an unbalanced tire can cause vibration and uneven tread wear on US highways.
What tools do I need to put a tire back on a rim without a tire machine?
At a minimum, you’ll need two or three tire spoons or tire irons, a generous amount of soapy water or tire mounting lubricant, a valve core removal tool, and an air compressor capable of delivering at least 30-40 PSI quickly. A manual bead breaker helps enormously, though some DIYers use a ratchet strap cinched around the tread to push the bead outward for seating. I’d also recommend having a rubber mallet on hand to help guide the bead over the rim without damaging either surface.
How do you reseat a tire bead that popped off the rim?
Start by cleaning both the rim flange and the tire bead area, then apply a liberal coat of soapy water or bead sealer to help create an airtight seal. Wrap a ratchet strap around the circumference of the tread and tighten it to push the sidewalls outward, forcing the beads closer to the rim flanges. Then use an air compressor to rapidly inflate the tire — you should hear two distinct pops as the front and rear beads seat against the rim. Once seated, remove the strap, set the tire to the manufacturer’s recommended PSI on the door jamb sticker, and check for leaks.
Is it safe to drive on a tire that came off the rim?
No, you should never drive on a tire that has separated from the rim, even at low speeds. Driving on a dismounted or partially seated tire can destroy the tire’s sidewall and bead, damage the rim, and cause a dangerous loss of vehicle control — especially at US highway speeds of 65-75 mph. If your tire comes off the rim while driving, pull over immediately, use your spare, and have the original tire inspected by a professional before remounting it.
Why does my tire keep coming off the rim?
A tire that repeatedly unseats from the rim usually points to a corroded or bent rim, a damaged tire bead, or chronic underinflation. Corrosion is especially common on steel and older alloy wheels in US states that use road salt during winter, as rust builds up on the bead seat and breaks the air seal. I recommend having a tire technician inspect the rim for damage and clean any corrosion, then apply bead sealer during remounting to ensure a lasting airtight fit.
Can you put a tire back on a rim after using tire sealant like Fix-a-Flat?
Yes, but the rim and tire interior need to be thoroughly cleaned before remounting, because dried sealant residue can prevent the bead from seating properly and throw off wheel balance. Most tire shops in the US will charge a small cleaning fee — typically $10 to $20 extra per tire — to remove Fix-a-Flat or similar emergency sealants. I recommend using sealant only as a true roadside emergency fix and getting to a shop as soon as possible so a technician can properly repair or replace the tire and clean the rim.

