That little tire pressure warning light on your dashboard just came on again — but this time, all four tires are perfectly inflated. You checked them twice with a gauge, and everything reads fine.
If this sounds familiar, there’s a good chance your tire pressure monitoring system (TPMS) sensor battery is dying. I’ve dealt with this exact scenario on three different vehicles over the years, and I know how frustrating it can be when the light won’t go away no matter what you do.
The good news? In many cases, you can replace the battery yourself and save a significant amount of money. I’ve done it, and I’m going to walk you through the entire process based on my hands-on experience.
- Most TPMS sensors use a CR1632 or CR2032 lithium battery that lasts 5–10 years.
- Not all TPMS sensors have replaceable batteries — some are sealed units that must be fully replaced.
- If your sensor has a replaceable battery, the job takes about 15–30 minutes per sensor once the tire is dismounted.
- DIY battery replacement costs $2–$5 per sensor vs. $50–$250+ per sensor at a dealer or shop.
- You’ll need to remove the tire from the rim to access the sensor in most cases — a tire shop can help with this for $15–$25 per tire.
- After replacement, the sensors usually need to be reprogrammed using a TPMS relearn tool ($20–$50) or a dealer visit.
What Is a TPMS Sensor and Why Does It Have a Battery?
Before I get into the replacement process, let me quickly explain what we’re dealing with. Every vehicle sold in the United States since 2007 is required by federal law (the TREAD Act) to have a tire pressure monitoring system. This system uses small sensors mounted inside each tire to wirelessly transmit pressure and temperature data to your vehicle’s computer.
These sensors need power to function, and that power comes from a tiny lithium coin-cell battery sealed inside each sensor unit. The battery is always active — it transmits data even when the car is parked — which is why it eventually dies.
In my experience, most TPMS batteries last somewhere between 5 and 10 years depending on the brand, how often you drive, and environmental conditions. Extreme temperatures — both the brutal cold of Minnesota winters and the scorching heat of Arizona summers — can shorten battery life significantly.
How to Tell If Your TPMS Battery Is Dead
This is the first question I always get asked, and it’s an important one. A TPMS warning light can mean several different things, and you want to make sure the battery is actually the problem before you start tearing sensors apart.
Warning Light Behavior Matters
Here’s the key distinction I’ve learned over the years. If your TPMS light comes on and stays solid, it usually means one or more tires actually have low pressure. Check your pressures first with a reliable gauge.
If the TPMS light flashes for about 60–90 seconds when you start the car and then stays on solid, that typically indicates a system malfunction — and a dead or dying sensor battery is one of the most common causes.
Other Symptoms I’ve Noticed
- Intermittent warnings: The light comes and goes randomly, often triggered by cold weather when the battery is weakest.
- One tire reading missing: If your vehicle displays individual tire pressures and one position consistently shows dashes or no reading, that sensor’s battery is likely dead.
- Multiple sensor failures around the same time: If your car is 7+ years old and you start losing sensors one by one over a few months, the batteries are all reaching end of life.
- False pressure readings: A dying battery can cause erratic or inaccurate pressure readings before it fully dies.
I recommend having the system scanned with a TPMS diagnostic tool before assuming it’s a battery issue. Many auto parts stores like AutoZone or O’Reilly will scan your TPMS codes for free, and this can confirm exactly which sensor is failing and why.
Can You Actually Replace the Battery? It Depends on the Sensor
Here’s the honest truth that a lot of online guides gloss over: not all TPMS sensors have user-replaceable batteries. In fact, many OEM (original equipment manufacturer) sensors are completely sealed units designed to be replaced entirely when the battery dies.
Sealed vs. Serviceable Sensors
I’ve worked with both types, and the difference is significant. Sealed sensors have the battery potted or permanently bonded inside the housing with epoxy or resin. You can technically crack these open and replace the battery, but it requires careful work and there’s a real risk of damaging the sensor beyond repair.
Serviceable sensors have a battery compartment or a housing that can be opened with basic tools. Some aftermarket TPMS sensors are specifically designed with replaceable batteries, which is one reason I often recommend them over OEM units when it’s time for new sensors.
Common Sensor Types and Battery Replaceability
| Sensor Brand/Type | Battery Type | Replaceable? | Difficulty | Estimated Cost (Battery Only) |
|---|---|---|---|---|
| OEM Sensors (most brands) | CR1632 / CR2032 | Often sealed — difficult | Hard | $2–$4 |
| Schrader (common OEM supplier) | CR1632 | Some models, yes | Moderate | $2–$3 |
| Continental/VDO | CR2032 / CR1632 | Sealed — very difficult | Hard | $2–$4 |
| ATEQ / Autel Aftermarket | CR1632 / CR2032 | Yes — designed for it | Easy | $2–$5 |
| NAPA / Dorman Aftermarket | Varies | Some models, yes | Moderate | $2–$4 |
If you’re unsure which type of sensor you have, the easiest way to find out is to look up your vehicle’s year, make, and model on a TPMS parts database. Websites like OReillysAuto.com or the ATEQ TPMS lookup tool can help identify your exact sensor.
Tools and Materials You’ll Need
Before I walk you through the actual process, let me lay out everything you need. I always gather all my tools before starting because there’s nothing worse than having a tire off the rim and realizing you’re missing something.
Essential Tools
- Replacement battery: Usually a CR1632 or CR2032 — check your sensor model first. I buy name-brand batteries like Energizer or Duracell for this. A 2-pack runs about $3–$5 at Walmart or Amazon.
- Small precision screwdriver set: For opening the sensor housing.
- Soldering iron and solder (for sealed sensors only): If the battery is spot-welded with tabs, you’ll need to solder the new one in place.
- Battery tab strips (for sealed sensors only): Nickel strips that allow you to solder a new battery in place. About $5–$8 for a pack on Amazon.
- O-ring or gasket (recommended): Replace the sensor’s rubber seal while you have it apart. Available in TPMS service kits for $2–$5.
- Needle-nose pliers: Helpful for removing old batteries and handling small components.
- Rubbing alcohol and a small brush: For cleaning contacts and the housing.
- TPMS relearn/programming tool: You’ll need this after the battery swap. The Autel MaxiTPMS TS401 is the one I use and it runs about $40–$50. Alternatively, some vehicles support a manual relearn procedure that requires no tool.
What About Getting the Tire Off the Rim?
This is the part most people don’t think about. TPMS sensors sit inside the tire, mounted to the wheel rim near the valve stem. To physically access the sensor, the tire needs to come off the rim.
Unless you own a tire mounting/dismounting machine (most home mechanics don’t), you’ll need to visit a tire shop for this step. I typically go to a local independent tire shop or even Discount Tire and ask them to break the bead and dismount the tire. Most shops charge $10–$25 per tire for this service, and they’ll remount and balance it when you’re done.
I recommend calling ahead and explaining what you’re doing. Most shops are happy to accommodate, and some will even let you work on the sensor right there in the bay.
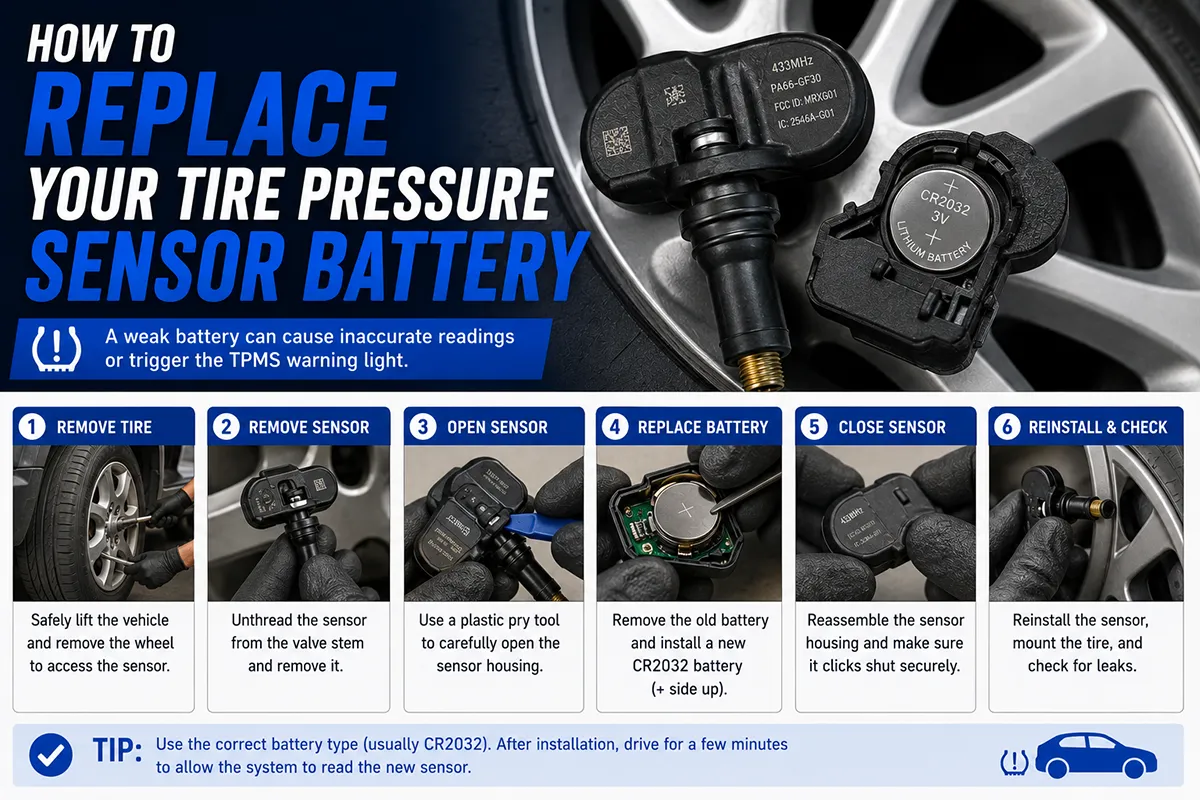
Step-by-Step: How to Replace a TPMS Sensor Battery
Alright, let’s get into the actual process. I’m going to cover both scenarios — serviceable sensors with a battery compartment, and sealed sensors that require a bit more surgery.
Step 1: Identify Your Sensor and Order the Correct Battery
Before you remove any tires, figure out exactly which sensor you have and which battery it uses. You can usually find this information by searching your vehicle’s year, make, and model along with “TPMS sensor part number.”
Once you have the battery type, order a few extras. Batteries are cheap, and if one sensor’s battery is dead, the others are likely close behind. I always replace all four at the same time to avoid doing this job again in six months.
Step 2: Remove the Wheel and Dismount the Tire
Jack up the vehicle safely using proper jack stands (never work under a car supported only by a jack), remove the lug nuts, and take the wheel off. Then bring the wheel to your tire shop or use a tire machine to break the bead and separate the tire from the rim.
Once the tire is off, you’ll see the TPMS sensor attached to the rim, typically secured with a nut on the valve stem that pokes through the wheel. Some sensors use a band clamp system instead.
Step 3: Remove the Sensor from the Rim
For valve-stem-mounted sensors (the most common type), use an appropriate wrench or socket to remove the retaining nut from the outside of the wheel. Then gently push the valve stem through from the outside and lift the sensor off the rim from the inside.
Be careful here. The sensors are somewhat fragile, and the rubber grommet/seal around the valve stem can tear if you’re too aggressive. I always keep replacement grommets and valve cores on hand — they’re dirt cheap and it’s smart to replace them while you have everything apart.
Step 4A: Replace the Battery (Serviceable Sensors)
If your sensor has a visible battery cover or compartment, this part is straightforward. Use a small precision screwdriver to open the battery compartment or remove the housing screws.
Carefully note the battery orientation before removing the old one — you need to insert the new battery the same way (positive side up or down, depending on the design). Remove the old battery, clean the contacts with rubbing alcohol if needed, and insert the new battery.
Close the housing, making sure any gaskets or O-rings are properly seated to maintain the waterproof seal. This is critical — these sensors live inside a tire that’s exposed to moisture, road grime, and temperature extremes.
Step 4B: Replace the Battery (Sealed Sensors)
This is the more involved process, and I want to be upfront: if you’re not comfortable with basic soldering or working with small electronics, consider just buying a new sensor instead. A sealed sensor battery replacement that goes wrong means you’re buying a new sensor anyway.
That said, here’s how I’ve done it successfully multiple times:
- Locate the seam: Most sealed sensors have a visible seam line where the two halves of the housing meet. Some are ultrasonically welded, while others use snap-fit clips with adhesive.
- Carefully pry the housing open: Use a thin flat-blade screwdriver or a plastic pry tool to gently separate the halves. Work slowly around the entire perimeter. If the housing is epoxied shut, you may need to use a Dremel or hobby knife to carefully cut along the seam.
- Identify the battery: Inside, you’ll see a small circuit board and the coin-cell battery. In most sealed sensors, the battery is spot-welded to the board using thin metal tabs — it doesn’t just pop out.
- Remove the old battery: Carefully cut or desolder the tab connections. I use a low-wattage soldering iron to melt the solder and lift the tabs off the battery. Do NOT pry aggressively — you can crack the circuit board.
- Prepare the new battery: You have two options here. You can buy pre-tabbed batteries (batteries with nickel strips already spot-welded on) or solder your own tabs onto a standard coin cell. I strongly prefer pre-tabbed batteries — they’re available on Amazon for about $3–$6 each and save a lot of hassle.
- Solder the new battery in place: Carefully solder the tabs of the new battery to the same connection points on the circuit board. Work quickly — excessive heat can damage both the battery and the board. I keep my soldering iron contact to under 2–3 seconds per joint.
- Reseal the housing: Once the new battery is in place, reassemble the sensor housing. I use a thin bead of RTV silicone sealant (the kind rated for automotive use) to reseal the halves. Clamp them together and let the sealant cure for at least 24 hours before reinstallation.
The waterproof seal is absolutely essential. If moisture gets into the sensor, it will corrode the circuit board and kill the sensor permanently. I learned this the hard way on my first attempt years ago — I was too hasty with the sealant, and the sensor failed within a few weeks.
Step 5: Reinstall the Sensor on the Rim
Once the battery is replaced and the housing is sealed, mount the sensor back onto the rim. Install a new rubber grommet/seal and valve core if needed. Hand-tighten the retaining nut, then snug it up with a wrench — don’t overtighten, as the sensor housing can crack.
Most manufacturers specify a torque of about 35–45 inch-pounds for the valve nut. If you have a small inch-pound torque wrench, use it. If not, just snug it up about a quarter turn past hand-tight.
Step 6: Remount and Balance the Tire
Bring the wheel back to your tire shop to have the tire mounted, inflated, and balanced. Make sure to tell them there’s a TPMS sensor installed so they position the tire bead carefully and don’t damage it during mounting.
I always ask the technician to use a TPMS-safe mounting procedure, which basically means they avoid using the clamp or lever arm near the sensor area. Any reputable shop knows how to do this.
Step 7: Reprogram/Relearn the Sensor
This is the step that catches a lot of people off guard. After replacing the battery, many TPMS sensors need to be reprogrammed or the vehicle’s computer needs to relearn the sensor IDs.
There are three common methods:
- Auto-relearn: Some vehicles (many Toyota, Lexus, and some GM models) will automatically pick up the sensor signals after driving for a few minutes. Just drive at highway speed for about 15–20 minutes and the system should reset.
- Manual relearn procedure: Many GM vehicles have a specific sequence involving the key, the info button, and a magnet or TPMS tool to put the system in learn mode. Check your owner’s manual for the exact procedure.
- TPMS programming tool: For vehicles that require electronic programming (most Ford, Chrysler, and many Asian makes), you’ll need a TPMS tool like the Autel TS401, TS508, or equivalent. These tools communicate with both the sensor and the vehicle to register the sensor ID.
I’ve had the best luck with the Autel MaxiTPMS TS401. It covers most US vehicles, and I’ve used mine dozens of times across different cars. It’s a worthwhile investment if you do your own tire work, and it pays for itself after a single use when you consider what a dealer charges for TPMS programming.
How Much Money Does DIY Battery Replacement Actually Save?
Let me break down the real-world costs based on what I’ve personally spent and what I’ve been quoted at shops.
Dealer/Shop Cost to Replace TPMS Sensors
When a TPMS sensor battery dies, most dealerships and tire shops will tell you the entire sensor needs to be replaced. And they’re not always wrong — for sealed OEM sensors, full replacement is the standard approach.
A single OEM TPMS sensor typically costs $40–$150 depending on the vehicle. Aftermarket sensors from brands like Dorman or NAPA run $20–$60 each. Then add $10–$25 for mounting and $25–$50 for programming.
For all four sensors at a dealer, you’re looking at $300–$800+ all in. Even at an independent shop with aftermarket sensors, it’s usually $150–$350.
DIY Battery Replacement Cost
When I did my last battery replacement on all four sensors, here’s what I spent:
- 4x CR1632 batteries: $6
- TPMS valve service kit (grommets, valve cores, caps): $8
- Tire dismount/remount and balance (4 tires at a local shop): $80
- RTV sealant (already had it): $0
- TPMS tool (already owned, but would be ~$45 if purchasing): $0
Total: $94 — compared to the $600+ the dealer quoted me. Even if you factor in buying the TPMS tool for the first time, it’s still a massive savings.
When You Should Just Replace the Whole Sensor Instead
I want to be honest here — battery replacement isn’t always the right call. There are situations where I’d recommend just buying a new sensor and skipping the battery swap entirely.
- The sensor is heavily corroded: If the housing, valve stem, or internal components show signs of corrosion, a new battery won’t save it.
- The sensor is physically damaged: Cracked housings, bent valve stems, or broken retaining hardware all mean it’s time for a new unit.
- You can’t confidently reseal the housing: If the waterproof integrity of the sensor is compromised, it will fail quickly. A new sensor is $20–$60 for aftermarket — not worth the risk of a botched reseal.
- Your vehicle is hard to program: Some newer vehicles (especially European makes) require expensive dealer-level tools to reprogram TPMS sensors. If battery replacement doesn’t maintain the existing sensor ID, reprogramming could cost more than a new pre-programmed sensor.
- Aftermarket programmable sensors are available: Brands like Autel MX-Sensor and Dorman offer universal programmable TPMS sensors for $15–$40 that can be cloned to your vehicle’s existing sensor IDs. In many cases, these are more practical than cracking open a sealed OEM sensor.
In my experience, the sweet spot for DIY battery replacement is when you have sensors that are in otherwise good physical condition, are a serviceable (non-sealed) design, and are on a vehicle that supports easy relearn procedures.
Tips I’ve Learned the Hard Way
After doing this job on several vehicles over the years, I’ve picked up some lessons that I wish someone had told me from the start.
Replace All Four at Once
TPMS sensor batteries are all the same age (assuming original equipment). If one dies, the others are close behind. I made the mistake once of replacing just one sensor’s battery, and sure enough, a second one died within a couple of months. Save yourself the repeated tire shop visits and do all four at the same time.
Take Photos Before Disassembly
I take photos of every step during disassembly. Battery orientation, wire routing, tab positions, housing alignment — all of it. It’s incredibly easy to forget which way something was oriented when you’re putting it back together, and a simple photo saves you from a frustrating mistake.
Work in a Clean, Well-Lit Area
These sensors are small, and the components inside are tiny. I use a well-lit workbench with a magnifying lamp. Working on a dark garage floor is a recipe for lost parts and poor solder joints.
Test Before Resealing
After installing the new battery but before sealing the housing, use your TPMS tool to verify the sensor is transmitting. This takes about 10 seconds and confirms the battery is working and properly connected. I’ve caught a bad solder joint this way and fixed it before sealing — which saved me from having to crack the sensor open a second time.
Don’t Cheap Out on Batteries
Use name-brand lithium coin cells from Energizer, Duracell, Panasonic, or Maxell. No-name batteries from questionable sellers may have lower capacity or inconsistent quality. The price difference is literally a dollar or two — it’s not worth the risk.
Consider the Age of Your Tires Too
If your tires are also due for replacement, the timing works out perfectly. When I bought new tires for my daily driver recently, I had the shop swap in new TPMS batteries at the same time since the tires were already being dismounted. This eliminated the separate dismount/remount cost entirely.
An Important Safety Note
I want to emphasize something that I feel strongly about: your TPMS system is a safety feature. Driving on significantly underinflated tires is dangerous — it can cause poor handling, increased stopping distances, tire blowouts, and reduced fuel economy.
If you replace the battery and the sensor doesn’t work properly, don’t just ignore the warning light and move on. Either troubleshoot further, replace the sensor entirely, or have a professional diagnose the issue. The TPMS light exists for a reason, and I’ve seen what can happen when people drive on severely underinflated tires.
Also, while the TPMS warning light is illuminated (whether due to a dead battery or actual low pressure), get in the habit of manually checking your tire pressures at least once a week with a quality gauge. I keep a digital gauge in my glove box at all times. It’s a $10 insurance policy.
What About External TPMS Sensors?
I should mention that there’s a completely different category of TPMS sensors that mount on the outside of the valve stem — you’ve probably seen them marketed on Amazon as aftermarket TPMS kits from brands like Tymate, GUTA, or B-Qtech.
These external sensors are not OEM equipment and don’t communicate with your vehicle’s factory TPMS system. They use their own display unit (usually mounted on the dashboard or windshield). However, they do have replaceable batteries, and swapping them is dead simple — usually just unscrewing the sensor cap and popping in a new CR1632 or similar cell.
If you’re considering external TPMS as a way to avoid dealing with internal sensor battery issues, just know that your factory TPMS warning light will still illuminate if the internal sensors are dead. You’d essentially be running two systems — one functional (external) and one in permanent fault mode (factory). Some states may fail your vehicle’s inspection if the TPMS light is on, so keep that in mind.
Final Thoughts: Is DIY TPMS Battery Replacement Worth It?
After doing this on multiple vehicles, here’s my honest assessment: it’s worth it if you enjoy hands-on work and your sensors are the serviceable type. The cost savings are substantial, and the satisfaction of fixing something that a dealer wanted hundreds of dollars for is genuinely rewarding.
If your sensors are the fully sealed type, it’s still doable, but the difficulty goes up and the risk of damaging the sensor is real. For sealed sensors, I’d recommend weighing the cost of a new aftermarket sensor (often just $20–$40) against the time and risk of a DIY battery swap.
Either way, understanding how your TPMS system works and what your options are puts you in a much better position when that little warning light inevitably pops on. You won’t be at the mercy of a dealer quoting you $800 for what might be a $6 fix.
I hope this guide helps you tackle the job with confidence. If you’ve done this before and have tips of your own, I’d love to hear about your experience in the comments below. And as always, drive safe and keep those tires properly inflated — your TPMS sensors are doing their best to help you do exactly that.
Frequently Asked Questions
Can you replace the battery in a tire pressure sensor yourself?
Yes, in many cases you can replace a TPMS sensor battery yourself if you have the right tools and a basic understanding of your vehicle’s sensor type. Most direct TPMS sensors use a small CR1632 or CR2032 lithium battery that’s either soldered or sealed inside the sensor housing. Keep in mind that some OEM sensors have batteries that are permanently sealed, meaning you’ll need to replace the entire sensor unit rather than just the battery. If you’re comfortable with small electronics and soldering, a DIY replacement can save you $30–$80 per sensor compared to buying new ones.
How much does it cost to replace a tire pressure sensor battery at a shop?
Having a shop replace a TPMS sensor battery typically costs between $20 and $50 per sensor for labor, plus $3–$10 for the battery itself. However, many tire shops in the US will recommend replacing the entire sensor instead, which runs $50–$150 per sensor including programming and installation. If you’re already having new tires mounted, ask your tire technician about TPMS sensor battery replacement or full sensor replacement at the same time to avoid paying a separate service fee.
How long do tire pressure sensor batteries last before they need replacing?
Most TPMS sensor batteries last between 5 and 10 years, depending on driving frequency, climate conditions, and how often the sensor transmits data. In extreme US climates—like harsh Midwest winters or Arizona summers—battery life can be shortened to as little as 4–5 years due to temperature stress on the lithium cell. When the battery starts dying, your TPMS warning light will typically flash for 60–90 seconds at startup before staying on, which is different from the solid light that indicates low tire pressure.
How do I know if my TPMS warning light means a dead sensor battery?
If your TPMS light blinks or flashes for about a minute when you start your vehicle and then stays illuminated, it usually signals a sensor malfunction rather than actual low tire pressure—this is the most common sign of a dying TPMS battery. A solid TPMS light, on the other hand, typically means one or more tires are actually underinflated. I recommend checking your tire pressures manually first with a gauge; if all tires are properly inflated to the spec on your door jamb sticker and the light persists, a dead sensor battery is the most likely culprit.
Do you have to reprogram the TPMS sensor after replacing the battery?
In most cases, yes—you’ll need to reprogram or relearn the TPMS sensor to your vehicle’s ECU after a battery replacement, because the sensor may broadcast a slightly different signal after being opened and reassembled. Many US vehicles from brands like Ford, GM, and Chrysler support a manual relearn procedure that you can do at home by following a specific ignition and button sequence outlined in your owner’s manual. For Toyota, Honda, and other brands that require an OBD-II TPMS programming tool, you can purchase one for $30–$150 or have a shop handle the reprogramming for around $20–$40.
Is it better to replace the TPMS sensor battery or buy a whole new sensor?
If your TPMS sensors are the sealed OEM type, buying a complete replacement sensor is often the more reliable long-term option since cracking open a sealed housing can compromise the sensor’s waterproofing and durability. However, if you have aftermarket or serviceable sensors with accessible battery compartments, swapping the battery for $3–$10 is far more economical than spending $50–$150 on a new unit. I’d recommend replacing the entire sensor if it’s more than 7–8 years old, since the internal components and valve stem seal are likely near the end of their service life anyway, especially if you’re already buying new tires.
What tools do I need to replace a tire pressure sensor battery at home?
For a DIY TPMS battery replacement, you’ll typically need a soldering iron with fine-tip solder, a small flat-head screwdriver or pry tool, the correct replacement battery (usually a CR1632 or CR2032—check your sensor’s specs), and a TPMS relearn tool or magnet if your vehicle requires reprogramming. You’ll also need to break the tire bead to access the sensor mounted inside the wheel, which requires either tire spoons or a trip to a tire shop for demounting—most shops charge $5–$15 per tire for this service. A multimeter is helpful for testing the new battery’s voltage before installation to ensure it’s putting out the full 3 volts.

