I was topping off my front driver-side tire at a gas station air pump when I noticed something frustrating — the pressure kept bleeding out the moment I removed the chuck. Air was hissing right from the base of the valve stem, not from the tire itself.
It took me a few confused minutes to realize the valve core inside the stem had loosened over time. It’s one of those tiny problems that most drivers never think about until they’re standing in a parking lot wondering why their tire won’t hold air.
After dealing with this issue on multiple vehicles over the years — and helping friends and family troubleshoot the same thing — I’ve learned that tightening a tire valve stem is one of the simplest DIY car maintenance tasks you can do. But there are a few details that matter more than you’d think.
- A loose valve stem or valve core is one of the most common causes of slow tire pressure loss.
- You can tighten the valve core in under 5 minutes using a valve core tool that costs about $3-$5.
- If the entire valve stem is loose (rubber snap-in type), it may need to be replaced — which typically requires tire removal.
- TPMS-equipped vehicles need extra care to avoid damaging the sensor.
- Always check valve stems during tire rotations, seasonal changes, and before long road trips.
- Carry a valve core tool and spare valve caps in your glove box — it’s cheap insurance against a flat surprise.
Why Does a Tire Valve Stem Come Loose in the First Place?
Before I walk you through the fix, let’s talk about why this happens. Understanding the cause helps you prevent it from recurring — and it’ll help you determine whether you need a quick tightening or a full replacement.
Vibration and Road Impact
Every pothole, expansion joint, and rough patch of asphalt sends vibrations through your wheels. Over weeks and months of driving, those micro-vibrations can gradually loosen the valve core — the tiny threaded insert inside the valve stem that controls airflow.
I’ve noticed this happens more frequently on vehicles that regularly drive on rougher roads. If you commute on poorly maintained city streets or unpaved rural roads here in the US, you might encounter this issue sooner than someone cruising smooth highways.
Temperature Cycling
Temperature swings are a big factor, especially in states that experience harsh winters and hot summers. Metal and rubber expand and contract at different rates, and over time, these repeated cycles can work a valve core loose.
I’ve personally seen this happen most often during the transition from fall to winter, when temperatures can swing 30-40°F within a single week. That’s also the time of year when you’re most likely to notice low tire pressure warnings lighting up on your dashboard.
Improper Installation or Low-Quality Components
Sometimes the valve core just wasn’t tightened properly during the last tire service. I’ve pulled brand-new tires off a shop rack and found valve cores that were barely finger-tight. It’s not necessarily negligence — it’s just a small detail that can get overlooked during a busy day at the tire shop.
Cheap aftermarket valve stems and cores can also be the culprit. Lower-quality brass or nickel-plated cores may not hold threads as well as OEM-spec components.
Corrosion and Age
Rubber snap-in valve stems degrade over time. Exposure to UV light, road salt, brake dust, and general weathering causes the rubber to crack and lose its seal against the wheel rim. I’ve seen valve stems that looked fine from the outside but were completely deteriorated at the base where they pass through the rim hole.
Metal clamp-in valve stems (common on TPMS-equipped vehicles and alloy wheels) can also corrode, especially where dissimilar metals meet. Galvanic corrosion between an aluminum wheel and a brass valve stem is surprisingly common.
Valve Core vs. Valve Stem: Know What You’re Tightening
This is a critical distinction that I see a lot of people miss, so I want to be crystal clear.
The Valve Core
The valve core is the tiny spring-loaded pin that sits inside the valve stem. It’s the part that the air pump chuck presses down on to allow air into the tire. When you hear “tighten the valve stem,” what most people actually need to do is tighten the valve core.
This is the easy fix. A valve core tool costs a few dollars, and the job takes literally less than a minute per tire.
The Valve Stem
The valve stem is the entire assembly — the tube that protrudes through the wheel rim. On most standard steel wheels, it’s a rubber snap-in stem. On alloy wheels with TPMS sensors, it’s usually a metal clamp-in stem secured by a nut on the inside of the rim.
If the valve stem itself is loose, cracked, or leaking at the base, tightening the valve core won’t solve anything. You’ll likely need to replace the entire stem, which usually requires removing the tire from the rim.
Tools You’ll Need
Here’s the good news: the tool list is incredibly short and cheap.
- Valve core tool (also called a valve core remover/installer): This is a small, usually 4-way tool that fits into the valve stem and engages the valve core threads. I keep one from Slime that cost me about $3 at Walmart. Milton, Schrader, and GODESON also make excellent versions in the $4-$8 range.
- Tire pressure gauge: Any decent digital or dial gauge will work. I use an Accutire digital gauge that I’ve had for years. You want to check pressure before and after the job.
- Portable tire inflator or access to an air compressor: You may lose a small amount of air during the process, so having a way to top off is important. I keep an AstroAI portable inflator in my trunk for exactly these situations.
- Replacement valve cores (optional but recommended): A pack of Schrader valve cores runs about $5-$8 for a set of 10-20. If your core is damaged or badly corroded, swapping it is easier than trying to save it.
- Valve caps: Always replace missing valve caps. They’re your first line of defense against dirt and moisture entering the valve. Metal caps with rubber seals are best; cheap plastic ones work in a pinch.
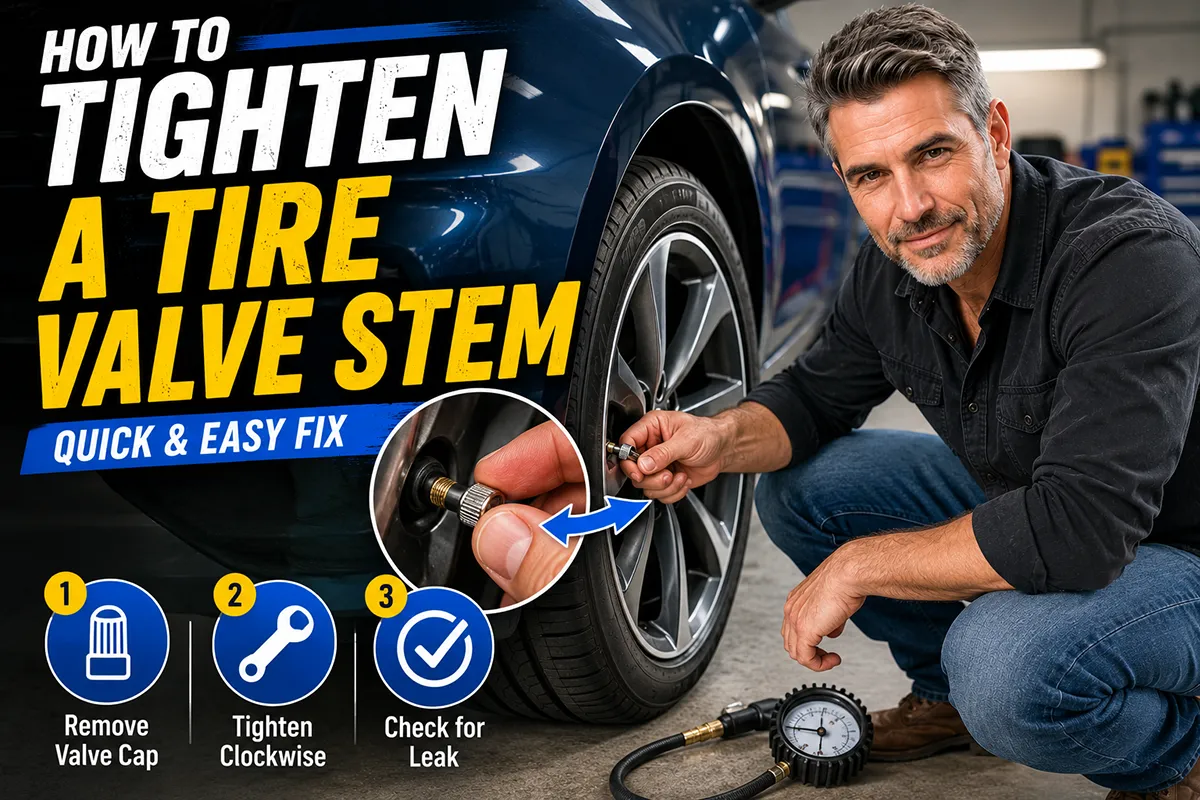
How to Tighten a Tire Valve Core: Step-by-Step
Alright, let’s get into the actual procedure. I’m going to walk you through this exactly the way I do it in my own garage.
Step 1: Check Your Current Tire Pressure
Before touching anything, use your tire pressure gauge to check the current PSI in the affected tire. Note it down. This gives you a baseline so you can confirm proper inflation after you’re done.
Also check the other three tires while you’re at it. In my experience, if one valve core has loosened, there’s a decent chance another one is on its way too.
Step 2: Remove the Valve Cap
Unscrew the valve cap counterclockwise and set it somewhere safe. If the cap is missing — which is the case about half the time when people come to me with slow leaks — that’s likely part of the problem. Dirt and moisture got into the valve core threads.
Take a quick look at the exposed valve core. If you see visible corrosion, green buildup, or the pin looks damaged, you’ll probably want to replace the core entirely rather than just tightening it.
Step 3: Insert the Valve Core Tool
Take your valve core tool and insert the forked or slotted end into the valve stem opening. The tool engages with the slotted top of the valve core. You’ll feel it seat into the grooves.
I recommend doing this gently. The valve core is a small, delicate component, and if you jam the tool in at an angle, you can damage the threads or the sealing surfaces.
Step 4: Turn Clockwise to Tighten
With the tool seated, turn it clockwise (to the right). You’ll feel the valve core snug up against its seat inside the valve stem.
Here’s the important part: do not overtighten. The valve core only needs to be snug — maybe a quarter turn past where you feel initial resistance. I’d describe the proper tightness as “firm finger-tight plus just a touch more.” Overtightening can deform the rubber seal inside the valve core, which actually makes the leak worse.
If the core spins freely and won’t tighten, the threads inside the valve stem may be stripped. In that case, you’re looking at a valve stem replacement.
Step 5: Check for Leaks
This is the step most people skip, and it’s the most important one. Mix a small amount of dish soap with water (I keep a spray bottle of soapy water in my garage for exactly this purpose) and spray or dab it over the valve stem.
Watch for bubbles. If you see bubbles forming around the valve core area, it’s still leaking. Try tightening another small increment. If bubbles are forming at the base of the valve stem (where it meets the rim), that’s a different problem — the stem itself is failing and needs replacement.
No bubbles? You’re good to go.
Step 6: Re-Inflate to the Correct PSI
Check the tire pressure again. You may have lost a pound or two during the process. Inflate back to the manufacturer-recommended PSI, which you’ll find on the placard inside the driver’s door jamb (not the number on the tire sidewall — that’s the maximum rated pressure).
For most passenger cars and crossovers in the US, this is typically somewhere between 30-36 PSI. Light trucks and SUVs may call for higher pressures depending on the load.
Step 7: Replace the Valve Cap
Screw the valve cap back on snugly. If your old cap is cracked, missing, or a cheap plastic one without a seal, I strongly recommend upgrading to metal valve caps with built-in rubber O-rings. A pack of four typically costs $5-$7 on Amazon.
I cannot overstate how important valve caps are. They keep out dirt, moisture, and road grime that can corrode the valve core over time. Think of them as the first seal — the valve core is the second.
What If the Entire Valve Stem Is Loose?
If you’ve tightened the valve core and you’re still losing air — or if the leak is clearly coming from the base of the valve stem — you’re dealing with a different problem.
Rubber Snap-In Valve Stems
These are the most common type on standard steel wheels. They’re one-piece rubber assemblies that snap into the rim hole from the inside. There’s no way to tighten them from the outside. If a rubber snap-in stem is leaking at the base, it needs to be replaced.
Replacement requires removing the tire from the rim, pulling out the old stem, and snapping in a new one. Most tire shops will do this for $5-$10 per stem, and many include free valve stem replacement when you purchase new tires.
I always recommend replacing all four valve stems whenever you get new tires mounted. It’s cheap insurance. A new rubber snap-in valve stem costs about $2-$3 in parts.
Metal Clamp-In Valve Stems (TPMS)
On most vehicles manufactured after 2007 (when TPMS became mandatory in the US), the valve stems are part of the tire pressure monitoring sensor assembly. These are metal stems secured by a hex nut on the inside of the rim.
Do not try to tighten a TPMS valve stem from the outside with pliers or a wrench. I’ve seen people try this, and it almost always results in a damaged or broken sensor — which can cost $50-$150+ to replace per wheel.
If a TPMS valve stem is leaking at the base, the O-ring seal or the entire TPMS service kit (which includes the grommet, nut, valve core, and cap) likely needs to be replaced. This is a job I recommend leaving to a tire shop, because the sensor has to be reprogrammed to your vehicle’s ECU after being disturbed on many makes and models.
Rubber Snap-In vs. Metal Clamp-In Valve Stems: Quick Comparison
| Feature | Rubber Snap-In | Metal Clamp-In (TPMS) |
|---|---|---|
| Typical Wheel Type | Steel wheels | Alloy wheels / TPMS-equipped |
| Material | Rubber with brass core | Aluminum or brass body |
| How It Seals | Rubber compression in rim hole | O-ring and hex nut |
| Can You Tighten From Outside? | No (must replace if leaking at base) | No (internal nut; requires tire removal) |
| Average Replacement Cost (per stem) | $2-$5 (parts) / $5-$10 (installed) | $5-$15 (service kit) / $10-$30 (installed) |
| TPMS Sensor Involvement | None | Sensor may need reprogramming |
| Typical Lifespan | Matches tire life (replace with new tires) | Service kit every tire change; sensor battery 5-10 years |
How to Tell If Your Valve Stem Is Leaking (The Soapy Water Test)
I mentioned this earlier, but let me break it down fully because it’s such a useful diagnostic technique.
You’ll need a small spray bottle with a mix of water and a few drops of dish soap. Dawn works perfectly. You want it sudsy enough to form visible bubbles, but not so thick that it obscures your view.
Here’s the method I use:
- Spray the soapy water directly onto the valve core opening (with the cap removed).
- Spray the entire length of the valve stem, including where it meets the rim.
- Watch each area for 15-30 seconds.
- Slow leaks produce tiny bubbles that form gradually. Fast leaks will produce obvious, rapidly growing bubbles.
If bubbles appear at the valve core, tightening or replacing the core should fix it. If bubbles appear at the stem base, you need a new valve stem. If no bubbles appear anywhere on the valve stem, your leak is somewhere else — possibly a bead leak, puncture, or cracked rim.
When to Replace vs. When to Tighten
Over the years, I’ve developed a simple decision framework that I follow:
Tighten the Valve Core When:
- The valve core is visibly loose (it wiggles or spins easily when touched with a tool).
- The soapy water test shows bubbles only at the valve core opening.
- The valve stem itself looks intact — no cracks, no corrosion at the base, no visible damage.
- Your tire has been losing a few PSI over a period of several days or weeks.
Replace the Valve Core When:
- The core is corroded, bent, or visibly damaged.
- Tightening doesn’t stop the leak.
- The core won’t thread properly (cross-threaded or stripped).
Replace the Entire Valve Stem When:
- Bubbles appear at the base of the stem where it meets the rim.
- The rubber stem is cracked, dry-rotted, or swollen.
- The metal stem shows corrosion, especially where it contacts the wheel.
- You’re already getting new tires mounted (always replace stems at this time).
Common Mistakes I See People Make
I’ve been around enough tire shops and DIY garages to see the same mistakes repeated. Here’s what to avoid:
Using Pliers on the Valve Stem
I’ve watched people grab the valve stem with pliers and try to twist or pull it tight. This does nothing for a rubber snap-in stem (you can’t tighten it that way) and can crack or damage a metal TPMS stem. Always use the correct valve core tool on the inside of the stem.
Overtightening the Valve Core
More is not better here. Cranking the valve core too tight deforms the internal rubber seal and can actually create a leak where there wasn’t one. Snug plus a fraction of a turn — that’s all you need.
Ignoring Missing Valve Caps
I can’t count how many times I’ve seen cars rolling around with one or more missing valve caps. People treat them like they’re optional. They’re not. Without caps, every rainstorm, car wash, and dusty road sends contaminants straight into the valve core mechanism.
Not Checking After the Fix
Tightening a valve core and calling it done without doing the soapy water test or rechecking pressure after a few days of driving is a gamble. I always recheck my tire pressures a couple of days after any valve work to confirm the fix held.
Preventive Maintenance: How to Avoid Valve Stem Issues
An ounce of prevention really is worth a pound of cure when it comes to valve stems. Here’s what I do on my own vehicles:
- Replace valve stems with every new tire set: This costs almost nothing and eliminates the risk of an aging stem failing on a brand-new tire.
- Use quality metal valve caps with rubber seals: Cheap plastic caps crack and fall off. Spend the extra couple of dollars.
- Check valve tightness during tire rotations: Every time I rotate my tires (which I do on a regular schedule), I give each valve core a quick check with my tool. It takes 30 seconds.
- Inspect valve stems during seasonal tire swaps: If you run separate winter and summer tires, inspect the stems on each set before mounting.
- Keep a valve core tool in your glove box: It weighs nothing, takes up no space, and can save you a roadside headache.
How This Relates to Your Tire Purchase
If you’re reading this blog, you’re probably in the market for new tires — or at least thinking about it. Here’s why valve stems should be part of that buying decision.
When you’re getting quotes from tire shops (Discount Tire, Tire Rack, Costco, etc.), ask whether new valve stems or TPMS service kits are included in the installation price. Many shops include basic rubber snap-in valve stems for free with a tire purchase. TPMS service kits (which include the valve core, cap, grommet, and retaining nut for metal stems) are sometimes an add-on charge of $3-$8 per wheel.
I always factor this into my total cost comparison when shopping for tires. A shop that charges $5 more per tire but includes TPMS service kits and new valve stems might actually be the better deal compared to a cheaper shop that charges these as extras.
At Discount Tire, for example, I’ve consistently had them replace the TPMS grommets and valve cores as part of their standard installation package. Costco also includes this in their installation fee. It varies by location, though, so always ask.
A Quick Word About Tire Pressure Monitoring Systems (TPMS)
Since TPMS has been federally mandated on all new passenger vehicles sold in the US since 2007, there’s a good chance your car has one. There are two types:
Direct TPMS uses a sensor mounted inside each wheel that measures actual tire pressure and transmits it to your dashboard. The valve stem is part of this sensor assembly on most designs.
Indirect TPMS uses your vehicle’s ABS wheel speed sensors to detect pressure differences based on wheel rotation speeds. These vehicles typically use standard valve stems without sensors.
If your TPMS light is on and you’ve ruled out an actual low tire, a faulty or leaking valve stem/sensor could be the cause. In my experience, TPMS sensor batteries last somewhere in the range of five to ten years, and when they die, the whole sensor (including the valve stem) usually needs to be replaced.
This is relevant because a loose valve core on a TPMS-equipped wheel is still an easy DIY fix. But if the metal stem itself or the sensor is the issue, that’s a shop job.
My Recommended Valve Stem Tools and Supplies
Here are the specific products I use and trust. These are all widely available at US retailers:
- Slime 4-Way Valve Tool (#20088): About $3-$4 at Walmart, AutoZone, and Amazon. It tightens, loosens, and removes valve cores, and has a thread restorer on one end. This is the tool I reach for 90% of the time.
- Milton S-441 Valve Core Tool: A heavier-duty option at about $5-$7. I use this in my home garage for more serious work.
- Schrader Valve Cores (standard): About $5-$8 for a pack. Schrader is essentially the OEM standard — they literally invented the valve design that’s still used today.
- GODESON Metal Valve Caps (4-pack): Around $6-$8 on Amazon. Nickel-plated with internal rubber seals. I’ve had a set on my daily driver for well over a year with no corrosion.
- AstroAI Portable Tire Inflator: About $30-$35. Plugs into your 12V outlet and inflates a standard passenger tire in a few minutes. Not strictly necessary for valve work, but invaluable to have in the trunk.
Final Thoughts: Don’t Overlook the Small Stuff
In all my years of testing, reviewing, and working with tires, I’ve learned that the small components matter just as much as the rubber itself. A $2 valve core or a $5 valve stem can be the difference between a tire that holds air perfectly and one that slowly goes flat in your driveway overnight.
Tightening a valve core is genuinely one of the easiest things you can do to maintain your tires. It requires minimal tools, minimal time, and minimal skill. But the payoff — avoiding unexpected low-pressure situations, extending tire life through proper inflation, and keeping your TPMS system happy — is significant.
If you take one thing away from this guide, let it be this: buy a $3 valve core tool, keep it in your glove box, and check your valve cores every time you check your tire pressure. It’s the kind of tiny habit that prevents big headaches down the road.
And if you’re shopping for new tires right now, make sure new valve stems are part of the package. Your future self, standing at a gas station air pump at 7 AM on a cold Monday morning, will thank you.
Frequently Asked Questions
How do I tighten a loose tire valve stem without special tools?
You can hand-tighten most rubber snap-in valve stems by gripping the base firmly and pushing it inward while twisting clockwise. For threaded metal valve stems, I recommend using a basic valve core tool, which costs under $5 at any AutoZone or O’Reilly Auto Parts. If the valve stem spins freely and won’t tighten, the rubber grommet may be worn out and you’ll need a full valve stem replacement.
What is a valve core tool and do I need one to tighten a tire valve stem?
A valve core tool is a small, inexpensive metal tool designed to thread into the valve stem opening so you can tighten or remove the valve core inside. I keep one in my glove box because it’s the fastest way to fix a slow leak caused by a loose valve core. You can pick one up for $2–$4 at Walmart, Harbor Freight, or most US auto parts stores, and it works on standard Schrader valves found on nearly every passenger tire.
Can a loose tire valve stem cause a slow air leak?
Yes, a loose valve stem or valve core is one of the most common causes of a slow tire air leak that drivers overlook. If your tire loses 3–5 PSI over a few days without any visible puncture, the valve stem is the first thing I’d check. Tightening the valve core with a valve core tool or replacing a cracked rubber valve stem usually solves the problem for under $10.
How do I know if my tire valve stem needs tightening or replacing?
Apply a small amount of soapy water around the valve stem while the tire is inflated — if you see bubbles forming, air is escaping and the stem or core is loose or damaged. If tightening the valve core with a valve core tool stops the bubbles, you’re good to go. However, if the rubber valve stem is cracked, dry-rotted, or the base wobbles where it meets the wheel rim, it’s time for a full replacement, which most tire shops include free when you buy new tires.
How much does it cost to replace a tire valve stem in the US?
A standard rubber snap-in valve stem replacement typically costs $5–$15 per tire at most US tire shops like Discount Tire, Tire Rack affiliated installers, or Costco Tire Center. Metal or TPMS-equipped valve stems run $20–$50 each because they include the tire pressure monitoring sensor. Many retailers replace all four valve stems for free or at a reduced price when you purchase a new set of tires, so it’s worth asking when you’re shopping for replacements.
Should I tighten the valve stem on a TPMS sensor myself?
I’d be cautious with TPMS valve stems because over-tightening or improperly handling them can crack the sensor housing or damage the seal, leading to a costly replacement of $40–$80 per sensor. If your TPMS valve stem feels loose, you can gently snug the external valve nut by hand or with a small wrench, but avoid using excessive force. For anything beyond a minor adjustment, I recommend having a tire shop with TPMS diagnostic equipment handle it to avoid triggering the TPMS warning light on your dashboard.
How tight should a tire valve core be when tightening it?
A tire valve core should be snugged firmly with a valve core tool until it feels seated and stops turning — typically just finger-tight plus about a quarter turn. Over-tightening can strip the tiny internal threads or deform the rubber seal inside the core, which actually creates a new leak. After tightening, I always recheck with soapy water and verify the tire holds proper PSI over 24 hours before driving on US highways at sustained speeds.

