Every year, the first hard freeze catches someone off guard — and that someone has been me more than once.
I’ve dealt with dead batteries in a grocery store parking lot, skidded through an intersection on bald all-season tires, and sat shivering in a car that took twenty minutes to produce warm air. All of it was preventable.
After years of learning the hard way — and spending the last decade reviewing tires and advising everyday drivers — I’ve built a winterization checklist that I personally follow every single fall. This guide is what I wish someone had handed me before my first real winter behind the wheel.
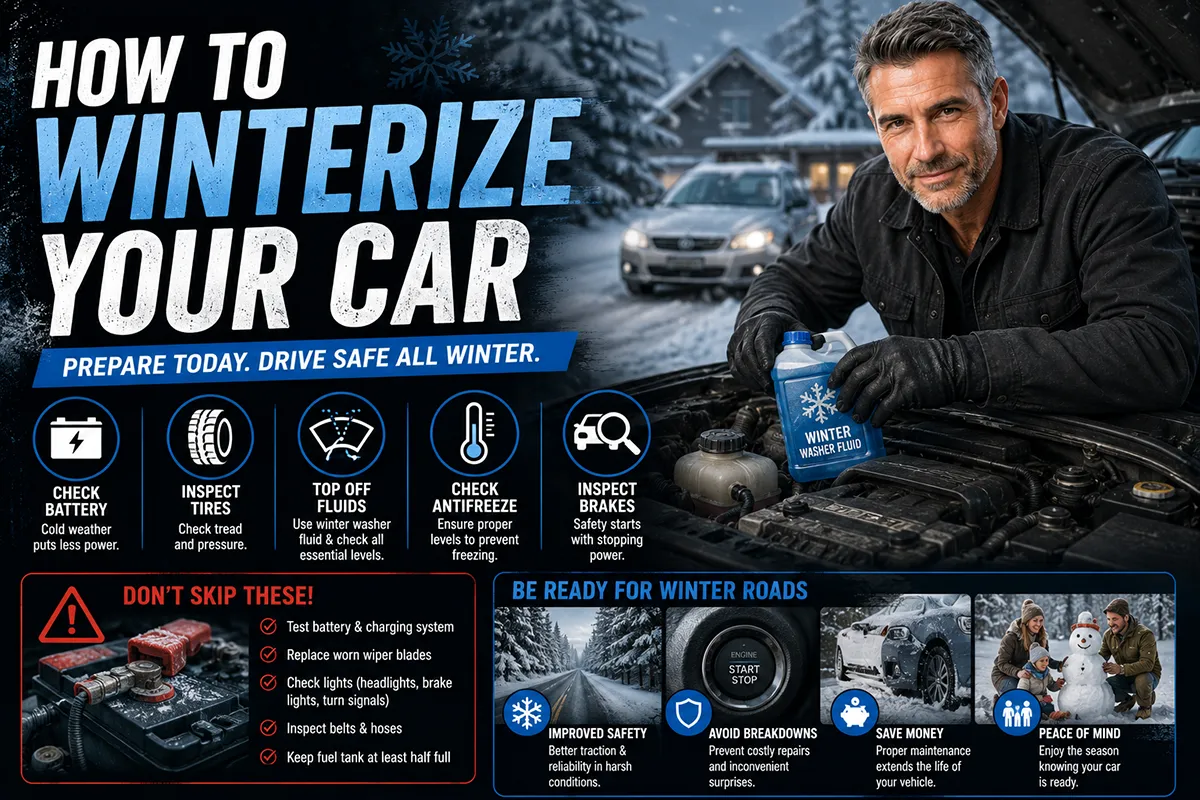
- Winterizing your car involves tires, battery, fluids, wipers, brakes, lights, and an emergency kit.
- Switching to winter tires is the single most impactful safety upgrade you can make for cold-weather driving.
- Check your battery, coolant, and wiper fluid before temperatures drop below 32°F consistently.
- A well-stocked emergency kit can be a lifesaver during unexpected breakdowns or storms.
- Most winterization tasks are DIY-friendly and cost less than a single tow truck call.
Why Winterizing Your Car Actually Matters
I know “winterize your car” sounds like something your dad nags you about. But after personally testing vehicles across snow-covered mountain passes, icy Midwest highways, and slushy Northeast city streets, I can tell you the difference between a prepared car and an unprepared one is genuinely life-or-death.
According to the Federal Highway Administration, over 156,000 crashes happen annually due to icy roads in the United States. Nearly 17% of all vehicle crashes occur during winter conditions. These aren’t freak accidents — they’re predictable events that proper preparation can help you avoid.
The good news? Winterizing your car doesn’t require a mechanic’s license or a huge budget. Most of the steps I’ll walk you through below cost nothing or very little, and many you can knock out in a single Saturday afternoon.
Step 1: Evaluate Your Tires — The Most Important Winter Upgrade
I’m going to spend the most time on this section because, in my experience reviewing and testing tires for years, nothing — and I mean nothing — improves your winter safety more than having the right rubber on your car.
Check Your Current Tire Tread Depth
Grab a quarter and insert it upside down into your tire’s tread groove with Washington’s head facing you. If you can see the top of his head, your tread is at or below 4/32″, and I strongly recommend replacing those tires before winter hits.
The legal minimum in most US states is 2/32″, but in my testing, tires at that depth are practically useless on wet or snowy roads. I’ve felt the difference firsthand — a tire at 5/32″ versus one at 2/32″ on a snowy parking lot braking test is shockingly dramatic.
Should You Switch to Winter Tires?
If you live anywhere that regularly sees temperatures below 45°F — even without snow — I recommend dedicated winter tires. Here’s why: the rubber compound in all-season tires starts to harden as temperatures drop, which reduces grip. Winter tires use a softer compound with higher silica content that stays pliable in the cold.
I’ve tested this back-to-back on the same vehicle. During one particularly memorable test period, I swapped between a set of popular all-season tires and a set of dedicated winter tires on the same SUV over several days of driving on packed snow and ice. The stopping distance difference was staggering — the winter tires stopped a full car-length shorter from 30 mph.
Winter Tires vs. All-Season vs. All-Weather: A Quick Comparison
I get this question constantly from readers, so here’s a straightforward comparison based on my real-world experience:
| Feature | All-Season Tires | All-Weather Tires | Winter Tires |
|---|---|---|---|
| Cold Weather Grip (below 45°F) | Fair | Good | Excellent |
| Snow Traction | Poor to Fair | Good | Excellent |
| Ice Braking | Poor | Fair to Good | Very Good |
| Year-Round Use | Yes | Yes | No (swap seasonally) |
| 3PMSF Snowflake Symbol | Rarely | Yes | Yes |
| Typical Price (per tire) | $80–$180 | $100–$200 | $90–$220 |
| Best For | Mild climates | Moderate winters, no swapping | Harsh winters, heavy snow/ice |
If you live in states like Minnesota, Wisconsin, Michigan, Colorado, or anywhere in New England, I truly believe dedicated winter tires are worth every penny. If you’re in a milder zone — say, Virginia, Tennessee, or the Pacific Northwest lowlands — a quality all-weather tire with the Three-Peak Mountain Snowflake (3PMSF) symbol can be a smart year-round compromise.
Don’t Forget Tire Pressure
Cold air causes tire pressure to drop — roughly 1 PSI for every 10°F decrease in temperature. I’ve seen tires that were properly inflated in October drop to dangerously low levels by December without anyone touching them.
I check my tire pressure at least once every two weeks during winter. Your correct PSI is listed on the driver’s side door jamb sticker, not on the tire sidewall. Running underinflated tires in winter reduces traction, increases stopping distances, and accelerates uneven wear.
Step 2: Test Your Battery Before It Fails
A dead battery is the number one reason AAA gets called during winter months. Cold temperatures reduce your battery’s cranking power significantly — a battery that works fine at 80°F loses about 35% of its strength at 32°F and up to 60% at 0°F.
I test my battery every fall using a simple battery tester I bought for about $30 on Amazon. If your battery is more than three years old, I’d recommend having it load-tested at AutoZone, O’Reilly, or any auto parts store — they’ll typically do it for free.
Signs Your Battery Is Failing
- Slow engine cranking when starting
- Dim headlights, especially at idle
- Dashboard warning light
- Needing a jump start more than once
- Visible corrosion on the battery terminals
If you spot white or greenish powder on your terminals, clean it off with a wire brush and a baking soda/water solution. I do this every fall, and it takes about five minutes. Good electrical contact means reliable starts on those brutal January mornings.
Step 3: Flush and Check Your Fluids
This step is one that I see people skip the most, and it can lead to expensive damage or a breakdown at the worst possible time.
Coolant / Antifreeze
Your engine’s coolant does double duty — it prevents overheating in summer and prevents freezing in winter. The typical recommended coolant mix is 50/50 antifreeze and water, which protects down to about -34°F.
I use an inexpensive antifreeze tester (a few dollars at any auto parts store) to check the freeze point of my coolant every fall. If it’s not protecting low enough for your region, flush and refill. A gallon of premixed coolant runs about $10–$15 at Walmart or AutoZone.
Windshield Washer Fluid
Never, ever run plain water in your washer reservoir during winter. It will freeze inside the lines and the reservoir, and I’ve seen it crack the reservoir on a friend’s car.
I exclusively use winter-rated washer fluid that’s good to at least -20°F. It typically costs $3–$5 per gallon. I also keep a spare gallon in the trunk because you’ll blow through washer fluid fast when road salt and grime coat your windshield daily.
Oil
Check your owner’s manual for the recommended winter oil viscosity. Many modern vehicles use synthetic oil that performs well across temperature ranges, but if you’re running conventional oil, switching to a lower-viscosity winter grade (like 5W-30 instead of 10W-30) helps your engine turn over more easily in extreme cold.
I always schedule my oil change in late October or early November so I’m heading into winter with fresh oil and a new filter.
Step 4: Inspect Your Wiper Blades and Defroster
Visibility is everything in winter driving. I’ve driven through whiteout conditions in upstate New York, and the difference between functional and worn wiper blades is the difference between seeing the road and guessing where it is.
Replace Your Wiper Blades
Wiper blades degrade from UV exposure and use. If yours streak, skip, or chatter, replace them now. I replace mine every fall regardless of condition — they’re cheap insurance at $15–$30 for a pair.
I specifically recommend winter or beam-style blades if you get heavy snow. Traditional bracket-style blades have exposed frames that ice up and lose contact with the windshield. Beam blades have a sleek profile that resists ice buildup. In my experience, Bosch ICON and Rain-X Latitude blades both perform well in winter conditions.
Test Your Defroster and Heater
Turn on your front and rear defrosters before you actually need them. Make sure warm air is blowing from the correct vents and that your rear defroster grid clears the glass.
I also check that my cabin air filter isn’t clogged. A dirty cabin filter restricts airflow, which means slower defrosting and a foggier windshield. Replacement filters cost $10–$20 and take about five minutes to swap on most vehicles.
Step 5: Check Your Brakes
Winter driving demands more from your brakes. Wet, icy, and slushy conditions require more frequent braking, and worn pads or rotors can make a dangerous situation worse.
I don’t do my own brake work, but I do a visual inspection every fall. If you can see your brake pads through the wheel spokes and they look thin (less than a quarter-inch of pad material remaining), it’s time to visit a shop.
Listen for squealing, grinding, or pulsation when you brake. Any of those symptoms mean you should get your brakes inspected immediately — don’t wait until January when shop wait times are longer.
Also, if your vehicle has ABS (anti-lock braking system), make sure the ABS warning light isn’t illuminated on your dashboard. ABS is critical for maintaining steering control during hard stops on slippery surfaces.
Step 6: Lights and Visibility
Winter means shorter days, more rain, snow, and fog. Your lights need to be in top shape.
Walk around your car and check every light — headlights (low and high beam), tail lights, brake lights, turn signals, reverse lights, and fog lights if equipped. I do this with a friend’s help or by backing up to a garage door where I can see the reflections.
If your headlight lenses are yellowed or hazy, pick up a headlight restoration kit for $10–$20. I’ve used the Sylvania and 3M kits with great results. The improvement in light output is dramatic and genuinely improves your ability to see the road.
Also consider upgrading to higher-output bulbs if your stock headlights feel dim. I’ve swapped in Sylvania SilverStar Ultra bulbs on a couple of test vehicles and noticed a meaningful improvement in nighttime visibility during winter driving.
Step 7: Build a Winter Emergency Kit
I carry a winter emergency kit in my trunk from November through March. It takes up minimal space, and I’ve needed it more than once — both for myself and to help stranded fellow drivers.
What I Keep in My Winter Emergency Kit
- Jumper cables or a portable jump starter — I prefer a lithium-ion jump pack like the NOCO Boost Plus GB40 ($100). It’s compact and has saved me from waiting for AAA on multiple occasions.
- Blanket or sleeping bag — If you’re stranded and the engine dies, a warm blanket is non-negotiable.
- Flashlight with extra batteries — LED flashlights last longer and are brighter.
- Ice scraper and snow brush — A sturdy, full-length snow brush makes a huge difference versus a cheap short one.
- Small shovel — A collapsible or folding shovel fits easily in the trunk.
- Bag of sand or cat litter — For traction if you’re stuck on ice.
- First-aid kit
- Non-perishable snacks and water
- Phone charger (car adapter or battery pack)
- Tow strap
- Road flares or reflective triangles
- Extra winter gloves, hat, and warm socks
I’ve spent about $150 total building my kit over the years, and I refresh the food, water, and batteries each fall. It’s the kind of thing you hope you never need — but if you do, you’ll be incredibly grateful it’s there.
Step 8: Protect Your Exterior
Road salt is brutal on your car’s paint and undercarriage. If you live in a state that salts roads heavily — like Ohio, Pennsylvania, Illinois, or the entire Rust Belt — protecting your exterior should be part of your winterization routine.
Wax or Seal Your Paint
I apply a quality paint sealant or ceramic spray coating in late fall. This creates a barrier between your clear coat and the salt, sand, and grime that will coat your car for the next four months.
Products like Meguiar’s Hybrid Ceramic Wax or Turtle Wax Hybrid Solutions Ceramic Spray are affordable (under $15) and easy to apply. I’ve used both, and they hold up well through several weeks of winter driving before needing reapplication.
Undercarriage Wash
I run my car through a touchless car wash with an undercarriage blast at least twice a month during winter. Salt accumulates underneath where you can’t see it, and it eats away at brake lines, exhaust components, and structural metal.
If you have access to a pressure washer, spray the wheel wells and undercarriage yourself. A few minutes of effort now can prevent hundreds or thousands of dollars in rust repair down the road.
Step 9: Check Your Belts and Hoses
Cold weather stresses rubber components. A serpentine belt that’s cracked or a radiator hose that’s soft and spongy is a breakdown waiting to happen.
I do a quick visual and squeeze test on my hoses every fall. Hoses should feel firm but flexible — not mushy, swollen, or cracked. Check near the clamp connections where hoses tend to fail first.
Serpentine belts should be free of cracks, fraying, or glazing. If your belt squeals on cold starts, it may be worn or the tensioner may be failing. Replacing a serpentine belt typically costs $25–$75 for the part and is a manageable DIY job on many vehicles.
Step 10: Review Your Heating and Climate System
Beyond the defroster I mentioned earlier, make sure your overall heating system is working efficiently. If your heater blows lukewarm air even after the engine has fully warmed up, you might have a low coolant level, a stuck thermostat, or a clogged heater core.
I’ve dealt with a failing thermostat during one particularly cold winter, and it was miserable. The engine wouldn’t fully warm up, which meant tepid cabin heat and a constantly fogging windshield. A thermostat replacement cost me about $20 in parts and an hour of my time.
If your car has heated seats, heated mirrors, or a heated steering wheel, test all of them before winter arrives. These features are genuinely helpful safety aids — not just luxury extras — because they keep you comfortable and focused on driving rather than shivering.
Step 11: Keep Your Gas Tank at Least Half Full
This is old-school advice that still holds true. A fuller tank reduces condensation inside the fuel system, which can cause fuel line freeze-up in extreme cold. It also ensures you won’t run out of gas if you’re stuck in traffic during a winter storm.
I make it a habit to fill up whenever I hit the half-tank mark during winter. It also gives me peace of mind knowing I have enough fuel if I need to idle the engine for warmth during an unexpected delay.
Step 12: Consider Your Driving Habits
Winterizing isn’t just about your car — it’s about how you drive it. I adjust my driving behavior significantly during winter months, and I think every driver should.
Key Winter Driving Adjustments
- Increase following distance — I leave at least 6-8 seconds of space between my car and the vehicle ahead on slippery roads, compared to the 3-second rule I use in dry conditions.
- Brake earlier and more gently — Even with winter tires, stopping distances are longer on snow and ice.
- Avoid cruise control on slippery surfaces — Cruise control can cause wheel spin if it tries to maintain speed when traction is suddenly lost.
- Know how to handle a skid — Look and steer where you want to go. Don’t panic-brake. This takes practice, and I’d recommend finding an empty, icy parking lot to get a feel for your car’s behavior.
- Clear ALL snow from your car — Not just the windshield. Clear the roof, hood, trunk, and lights. Flying snow from your roof is dangerous to drivers behind you, and it’s illegal in several states.
A Realistic Winter Budget Breakdown
I know cost matters, so here’s roughly what a thorough winterization costs if you’re doing most of the work yourself:
| Item | Estimated Cost | DIY or Shop? |
|---|---|---|
| Winter tires (set of 4, mounted/balanced) | $400–$900 | Shop |
| Battery test/replacement | $0 (test) / $100–$250 (replacement) | DIY or Shop |
| Coolant flush/top-off | $10–$30 (DIY) / $100–$150 (shop) | DIY or Shop |
| Winter washer fluid (2 gallons) | $6–$10 | DIY |
| Wiper blades (pair) | $15–$30 | DIY |
| Paint sealant/ceramic spray | $10–$15 | DIY |
| Emergency kit supplies | $75–$150 | DIY |
| Oil change | $30–$75 | DIY or Shop |
| Total (without new tires) | $150–$350 | |
| Total (with new winter tires) | $550–$1,250 |
Yes, winter tires are the biggest expense. But I think of them as an investment — they typically last three to four winter seasons if stored properly, and they reduce wear on your summer or all-season tires during the months you’re not using them. The net cost over time is much more reasonable than it looks upfront.
When Should You Start Winterizing?
I start my winterization process in mid-to-late October, regardless of whether it’s still 60°F outside. Here’s my reasoning: tire shops get slammed once the first snowfall hits. If you wait until November or December, you may face long wait times for winter tire installation and limited tire availability in your size.
Battery and fluid checks are quick and can be done on any dry weekend. The emergency kit is something you can build gradually — buy a few items each week if the upfront cost feels like too much at once.
The key is to be ready before the first real cold snap, not scrambling during it.
One Last Thing: Don’t Neglect Your AWD or 4WD
I hear this a lot: “I have all-wheel drive, so I don’t need winter tires.” In my experience, this is one of the most dangerous misconceptions among US drivers.
AWD and 4WD help you accelerate and maintain traction when driving forward. They do absolutely nothing to help you stop or turn. Your braking and cornering grip comes entirely from your tires’ contact with the road surface.
I’ve tested AWD vehicles on all-season tires versus front-wheel-drive vehicles on winter tires in snowy conditions. The FWD car with winter tires consistently outperformed the AWD car with all-seasons in braking and cornering. It wasn’t even close.
If you have AWD or 4WD, winter tires make your system even more effective. They don’t replace the need for proper rubber.
My Final Winterization Checklist
Here’s the condensed version I tape to my garage wall every fall. Feel free to save it or print it out:
- ☐ Check tire tread depth (quarter test)
- ☐ Install winter tires or verify all-weather/all-season condition
- ☐ Check and adjust tire pressure to door jamb specs
- ☐ Test battery (load test if over 3 years old)
- ☐ Clean battery terminals
- ☐ Check coolant freeze protection level
- ☐ Fill washer fluid with winter-rated formula
- ☐ Change oil (use manufacturer-recommended winter viscosity)
- ☐ Replace wiper blades
- ☐ Test defroster (front and rear)
- ☐ Test heater and climate controls
- ☐ Inspect brake pads and listen for issues
- ☐ Check all exterior lights
- ☐ Restore or clean headlight lenses if needed
- ☐ Inspect belts and hoses
- ☐ Apply paint sealant or wax
- ☐ Assemble or refresh winter emergency kit
- ☐ Keep gas tank at least half full
Winterizing your car isn’t glamorous, and it’s not the most exciting way to spend an October weekend. But every single time I’ve slid into a tight spot during winter — literally and figuratively — I’ve been grateful for the preparation.
The road doesn’t care whether you’re ready for winter. But you get to decide whether you are.
Stay safe out there, and if you need help choosing the right winter tires for your vehicle, check out our detailed winter tire reviews and buying guides here on TireAdvise.com. I test these tires in real-world conditions so you can make an informed decision before the snow starts flying.
Frequently Asked Questions
What does it mean to winterize your car and when should you start?
Winterizing your car means preparing every critical system—tires, battery, fluids, and wipers—to handle freezing temperatures, snow, and ice safely. I recommend starting the process in early to mid-October, before the first hard freeze hits, since tire shops and service centers get backed up once cold weather arrives. Waiting too long can leave you driving on summer or worn all-season tires in dangerous conditions.
Should I switch to winter tires or are all-season tires good enough for cold weather?
If you regularly drive in temperatures below 45°F or deal with snow and ice, dedicated winter tires like the Bridgestone Blizzak WS90 or Michelin X-Ice Snow will outperform all-season tires in braking and traction by a significant margin. All-season tires use a harder rubber compound that stiffens in the cold, reducing grip even on dry roads. A set of four winter tires typically costs $400–$800 depending on size, and I consider them the single most important winterization upgrade for drivers in the northern US.
How do I check and maintain proper tire pressure during winter months?
Tire pressure drops about 1 PSI for every 10°F decrease in temperature, so a tire inflated to 35 PSI in September could be sitting at 28 PSI by December. I check my tire pressure at least once a month during winter using a digital gauge and inflate to the manufacturer-recommended PSI listed on the driver’s side door jamb—not the number on the tire sidewall. Underinflated tires reduce traction on snow and ice and increase fuel consumption, so this is one of the easiest and cheapest winterization steps you can do.
What car fluids should I check or replace before winter?
Start with your coolant—make sure it’s a proper 50/50 mix of antifreeze and water that protects down to at least -34°F, which you can verify with a $5 antifreeze tester from any auto parts store. Switch to winter-grade windshield washer fluid rated to at least -20°F, and consider moving to a lower-viscosity motor oil like 0W-20 if your owner’s manual permits it. I also top off the gas tank more frequently in winter to prevent moisture buildup and fuel line freezing.
How much does it cost to fully winterize a car in the US?
A basic DIY winterization—checking tire pressure, topping off fluids, and testing your battery—can cost under $50 in supplies. If you add a set of four quality winter tires mounted and balanced, expect to spend $500–$1,000 total depending on your vehicle’s tire size and the brand you choose. A professional winterization service at a shop like Firestone or Pep Boys typically runs $100–$200 and covers fluid checks, battery testing, belt and hose inspection, and tire evaluation.
Do I really need to replace my car battery before winter?
Car batteries lose about 35% of their cranking power at 32°F and up to 60% at 0°F, which is why cold mornings are the number one time for no-start situations. If your battery is more than three years old, I strongly recommend having it load-tested at a parts store like AutoZone or O’Reilly—they do it for free. A replacement battery runs $120–$250 installed, which is far cheaper than an emergency tow and roadside service call in a snowstorm.
What winter emergency kit items should I keep in my car?
I keep a winter emergency kit in my trunk that includes a fleece blanket, flashlight with extra batteries, jumper cables, a small shovel, an ice scraper, and a bag of cat litter or sand for traction if I get stuck. Adding a portable phone charger, a first-aid kit, and a few bottles of water covers the essentials if you’re stranded for an extended period. This kit costs about $50–$75 to assemble and could genuinely save your life during a breakdown on a rural highway in freezing conditions.

