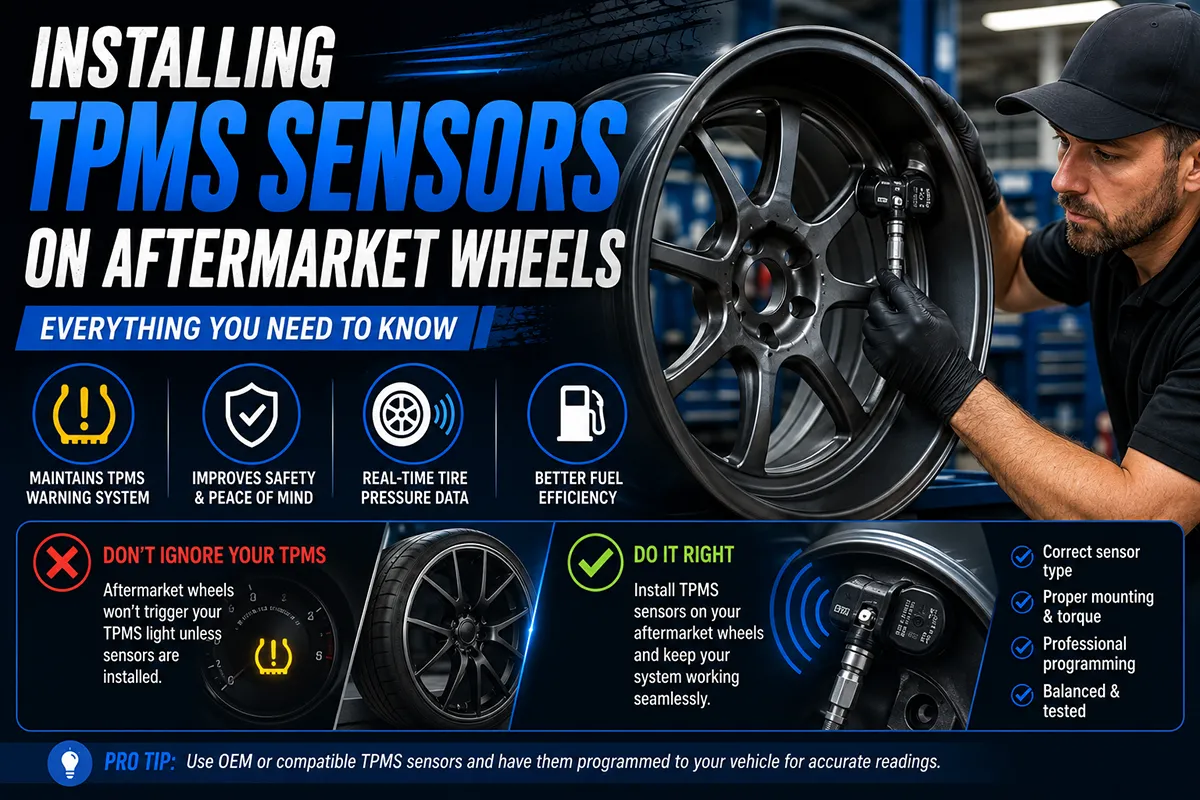
I’ll never forget the frustration of bolting on a gorgeous set of aftermarket wheels only to be greeted by that annoying TPMS warning light glaring at me from the dashboard.
It’s one of those details that’s easy to overlook when you’re excited about upgrading your wheels — but if you don’t plan for your tire pressure monitoring system sensors, you’re going to have a bad time.
After installing TPMS sensors on multiple sets of aftermarket wheels over the years — and making just about every mistake possible along the way — I’ve put together this complete guide so you can get it right the first time.
- Aftermarket wheels almost always need separate TPMS sensors — your OEM sensors may or may not transfer over
- You have three main options: transfer your OEM sensors, buy OEM-replacement sensors, or use universal programmable sensors
- Expect to pay $30–$80 per sensor for quality aftermarket units, or $50–$120+ per sensor for OEM replacements
- Sensor relearn/reprogramming is required after installation — some vehicles need a scan tool, others can be done manually
- Always confirm valve hole compatibility with your specific aftermarket wheel before ordering sensors
- Budget $150–$400 total for a proper four-sensor TPMS setup on aftermarket wheels
Why TPMS Sensors Matter More Than You Think
Let me be blunt: TPMS sensors aren’t just about avoiding a dashboard warning light. Since 2007, the TREAD Act has required all new passenger vehicles sold in the United States to have a functioning tire pressure monitoring system. Driving with a malfunctioning TPMS can result in a failed state inspection in many states.
More importantly, properly functioning TPMS sensors are a genuine safety feature. They alert you when a tire drops below a safe pressure threshold — typically 25% below the recommended PSI. I’ve personally had a TPMS warning save me from driving on a slow leak that I wouldn’t have noticed until it became a dangerous blowout situation.
When you switch to aftermarket wheels, you’re disrupting that safety system. If you don’t address the TPMS situation properly, you’ll either have a perpetual warning light on your dash, or worse, you’ll have no way of knowing when a tire is losing pressure.
Understanding How TPMS Works: Direct vs. Indirect
Before you start shopping for sensors, you need to understand which type of TPMS your vehicle uses. There are two fundamentally different systems, and your approach to aftermarket wheels depends entirely on which one you have.
Direct TPMS (Most Common in the US)
Direct TPMS uses a physical sensor mounted inside each tire, attached to the valve stem. Each sensor contains a pressure transducer, a temperature sensor, a battery, and a small radio transmitter. The sensor sends real-time pressure data to your vehicle’s TPMS receiver module.
This is the system used by the vast majority of US-market vehicles. If you have a car or truck made after 2007 and sold in the US, you almost certainly have direct TPMS. These are the sensors you’ll need to deal with when installing aftermarket wheels.
Indirect TPMS
Indirect TPMS doesn’t use any physical sensors inside the tires. Instead, it uses your vehicle’s ABS wheel speed sensors to detect differences in rotational speed between tires. A tire with lower pressure has a slightly smaller rolling diameter and rotates faster than a properly inflated tire.
If your vehicle uses indirect TPMS (some older Hondas, BMWs, and a few other makes), you’re in luck — there’s nothing to install on your aftermarket wheels. You’ll simply need to perform a TPMS reset through your vehicle’s infotainment or settings menu after mounting the new wheels.
In my experience, about 90% of the vehicles I encounter use direct TPMS. For the rest of this guide, I’ll be focusing on direct TPMS sensor installation.
Your Three Main Options for TPMS on Aftermarket Wheels
When I’m helping someone plan their aftermarket wheel setup, I always walk them through these three options. Each has its pros, cons, and cost implications.
Option 1: Transfer Your Existing OEM Sensors
This is the most budget-friendly approach, and it’s the route I took the first time I installed aftermarket wheels. The idea is simple: have a tire shop remove your OEM sensors from your factory wheels and reinstall them in your new aftermarket wheels.
Pros:
- No need to buy new sensors — you’re reusing what you already have
- No reprogramming needed in most cases since the vehicle already recognizes these sensors
- Genuine OEM quality and compatibility
Cons:
- Your factory wheels will no longer have TPMS sensors (problem if you switch back seasonally)
- OEM sensors may not physically fit in all aftermarket wheels (valve hole size and angle vary)
- Older OEM sensors may have depleted batteries — they typically last 5–10 years
- You’ll pay labor costs for removal and reinstallation
I found this option works best if you’re permanently switching to aftermarket wheels and have no plans to use the OEM wheels again. However, I’ve run into fitment issues with this approach. Some aftermarket wheels have a different valve hole diameter or position that doesn’t accommodate the OEM sensor’s form factor.
Option 2: Buy OEM-Replacement Sensors
This means purchasing brand-new sensors that are identical (or equivalent) to your vehicle’s original equipment sensors. Companies like Schrader, Continental, and Pacific Industrial manufacture OEM sensors for various vehicle brands.
Pros:
- Guaranteed compatibility with your vehicle’s TPMS system
- Fresh batteries — full sensor lifespan ahead of you
- Your factory wheels keep their sensors intact
- No guesswork on programming protocols
Cons:
- Most expensive option — typically $50–$120+ per sensor depending on the vehicle
- Still requires a relearn procedure to register the new sensor IDs with the vehicle
- Can be hard to source for older or less common vehicles
I’ve gone this route for a couple of builds where budget wasn’t the primary concern. It’s the “sleep easy” option. You know everything will work, and you know the sensors will last for years.
Option 3: Universal Programmable Aftermarket Sensors
This is my preferred option for most installations, and it’s become the industry standard at many independent tire shops. Universal sensors from brands like Autel, ATEQ, OTOFIX, and Hamaton (EZ-Sensor) come as “blank” units that are programmed to mimic your vehicle’s specific OEM sensor protocol.
Pros:
- One sensor SKU covers hundreds of vehicle applications
- Typically $30–$80 per sensor — significantly cheaper than OEM
- Fresh batteries with full lifespan
- Available in both clamp-in (metal valve) and snap-in (rubber valve) configurations
- Widely available at tire shops, Amazon, and auto parts stores
Cons:
- Requires a TPMS programming tool to configure the sensor for your specific vehicle
- Cheap no-name universal sensors can be unreliable — quality matters
- Some luxury and European vehicles have proprietary protocols that budget universal sensors can’t replicate
In my experience, the Autel MX-Sensor is the gold standard for universal programmable sensors. I’ve installed them on everything from Ford F-150s to Toyota Camrys to Chevy Silverados, and they’ve worked flawlessly. At around $40–$60 per sensor, the value is hard to beat.
Comparison: OEM vs. Aftermarket TPMS Sensors
| Feature | OEM Transfer | OEM Replacement | Universal Programmable |
|---|---|---|---|
| Cost per Sensor | $0 (labor only) | $50–$120+ | $30–$80 |
| Total Cost (4 sensors) | $40–$80 labor | $200–$480+ | $120–$320 |
| Programming Required | Usually no (relearn only) | Relearn procedure | Programming + relearn |
| Battery Life | Remaining life of existing sensor | Full (5–10 years) | Full (5–7 years) |
| OEM Wheel Retains Sensor | No | Yes | Yes |
| Fitment Flexibility | Limited to OEM form factor | Limited to OEM form factor | Multiple valve types available |
| Best For | Permanent wheel swaps on a budget | Those wanting guaranteed OEM compatibility | Most aftermarket wheel installations |
Step-by-Step: How I Install TPMS Sensors on Aftermarket Wheels
I want to walk you through the actual process I follow when I’m setting up TPMS on a new set of aftermarket wheels. This is the procedure whether you’re doing it yourself or having a shop handle it — knowing the steps helps you ask the right questions.
Step 1: Identify Your Vehicle’s TPMS Protocol
Every vehicle manufacturer uses a specific TPMS communication frequency and protocol. Most US-market vehicles use 315 MHz, while some newer models (especially European makes) use 433 MHz.
I always look up the specific protocol before ordering sensors. You can find this information using a TPMS programming tool, checking your vehicle’s service manual, or simply searching your year/make/model on the sensor manufacturer’s compatibility database. Autel, for example, has an excellent online lookup tool.
Step 2: Check Your Aftermarket Wheel’s Valve Hole Specs
This is the step most people skip — and it’s the one that causes the most headaches. Aftermarket wheels can have valve holes that differ from OEM wheels in several ways:
- Diameter: Most TPMS sensors require a valve hole between 0.453″ and 0.625″ in diameter. Some aftermarket wheels have holes designed for standard rubber snap-in valves (0.453″) that may be too small for certain clamp-in TPMS sensors.
- Angle: The valve hole angle relative to the wheel barrel matters. A sensor designed for a straight valve hole won’t seal properly in an angled hole.
- Clearance: The sensor body sits inside the wheel barrel. If there isn’t enough clearance between the sensor and the tire bead, you’ll have problems during mounting.
I’ve had situations where I ordered sensors, got them to the tire shop, and discovered they wouldn’t physically fit the wheel. Now I always measure the valve hole and check clearance specs before I order anything.
Step 3: Choose and Order Your Sensors
Based on your vehicle’s protocol and your wheel’s valve hole specs, select the appropriate sensors. If you’re going with universal programmable sensors, you’ll need to decide between:
- Clamp-in (metal valve stem): These use a metal valve stem and are secured to the wheel with an internal nut. They’re more durable and I prefer them for any high-performance or rough-road application. Most OEM sensors are clamp-in style.
- Snap-in (rubber valve stem): These use a rubber valve stem that snaps into the standard 0.453″ valve hole. They’re easier to install and fit a wider range of aftermarket wheels. However, the rubber valve can degrade faster, especially in extreme heat.
For most US drivers running aftermarket wheels, I recommend clamp-in sensors if your wheels support them. They just feel more secure and professional.
Step 4: Program the Sensors (If Using Universal Units)
If you went with universal programmable sensors, they need to be programmed before installation. This step writes your vehicle’s specific TPMS protocol and a unique sensor ID into the sensor’s memory.
You’ll need a TPMS programming tool for this. The Autel MaxiTPMS TS508 is what I use — it runs about $300, which might not make sense for a one-time installation. If you’re going the DIY route and don’t want to invest in a tool, many tire shops and auto parts stores can program sensors for you for a small fee ($10–$20 per sensor is typical).
The programming process itself takes about 30 seconds per sensor. You place the sensor near the tool, select your vehicle, and the tool writes the correct data.
Step 5: Install the Sensors in the Wheels
This is where tires need to come off the wheels (or more accurately, this happens before the tires are mounted). The sensor is installed through the valve hole from the inside of the wheel.
For clamp-in sensors, you’ll tighten the valve stem nut to the manufacturer’s specified torque — usually between 35 and 45 inch-pounds. Over-tightening is a common mistake that can crack the sensor or damage the valve hole grommet. I always use an inch-pound torque wrench for this step.
For snap-in sensors, you simply push the rubber valve stem through the hole from inside the wheel until it snaps into place. It’s straightforward, but you need to make sure the sensor body is properly oriented and not interfering with the tire bead area.
Step 6: Mount and Balance the Tires
After the sensors are installed, tires get mounted on the wheels and balanced as usual. Any good tire technician knows to be careful around TPMS sensors during mounting — the tire bead can damage a sensor if the mounting head isn’t properly positioned.
I always mention to the tech that there are TPMS sensors installed, even if it seems obvious. A little communication prevents expensive mistakes.
Step 7: Perform the TPMS Relearn Procedure
This is the final and arguably most important step. Your vehicle’s TPMS module needs to learn the new sensor IDs so it knows which sensor belongs to which wheel position.
There are three types of relearn procedures, and which one your vehicle uses depends on the manufacturer:
- Auto-relearn: Some vehicles (many Hondas, some BMWs) will automatically detect and register new sensors after driving for a few minutes. You simply drive normally and the system figures it out.
- Manual relearn (OBD): Some vehicles require you to use a scan tool connected to the OBD-II port to manually input the new sensor IDs. Many GM vehicles use this approach.
- Manual relearn (button/procedure): Some vehicles have a physical relearn procedure — you might need to hold a button, cycle the ignition, or follow a specific sequence. Many Toyota and Ford vehicles use this type of procedure.
Your TPMS tool should walk you through the exact relearn procedure for your vehicle. In my experience, this step takes anywhere from 2 minutes to about 20 minutes depending on the vehicle and method.
After several days of driving following the relearn, I always recheck to make sure the system is reading correctly and there are no warning lights.
Common Mistakes I’ve Seen (and Made Myself)
Over the years, I’ve accumulated a good list of TPMS installation blunders. Here are the ones I see most frequently:
Mistake #1: Assuming All Sensors Are Universal
They’re not. Even among “universal” sensors, there are different frequency bands (315 MHz vs. 433 MHz) and protocol limitations. I once ordered a set of budget sensors from an overseas seller that claimed universal coverage. They wouldn’t program for my vehicle at all. Stick with reputable brands like Autel, ATEQ, or Hamaton.
Mistake #2: Ignoring the Valve Hole Size
I cannot stress this enough. If your aftermarket wheel has a 0.453″ valve hole and you order a clamp-in sensor that requires a 0.625″ hole, nothing is going to work. Some wheel manufacturers provide TPMS compatibility information — always check before you buy.
Mistake #3: Forgetting the Relearn Step
Installing sensors is only half the job. If you don’t perform the relearn procedure, your vehicle won’t recognize the new sensors and the TPMS light will stay on. I’ve talked to people who drove around for months with their TPMS light on because their shop forgot to do the relearn.
Mistake #4: Over-Torquing the Sensor Valve Nut
This is a classic shop mistake. The aluminum valve nut on most clamp-in sensors is spec’d at around 35–44 inch-pounds. I’ve seen techs grab a standard wrench and crank it down way past spec, cracking the grommet or stripping the nut. Always use a torque wrench.
Mistake #5: Not Replacing the Service Kit
Every time a TPMS sensor is removed and reinstalled, you should replace the service kit — that’s the valve core, valve cap, nut, and grommet/seal. These parts cost maybe $2–$5 per sensor and prevent air leaks. I replace them every single time without exception.
Can You Install TPMS Sensors Yourself?
This is a question I get a lot, and the honest answer is: it depends on your setup and skills.
What You Can DIY
- Programming universal sensors: If you own or borrow a TPMS programming tool, this is completely doable at home.
- The relearn procedure: Many vehicles have manual relearn procedures that require nothing more than your key and maybe a TPMS activation tool.
- Installing sensors in unmounted wheels: If your tires aren’t mounted yet, you can install the sensors in the wheels yourself. Clamp-in sensors just require a torque wrench.
What You Probably Need a Shop For
- Mounting and dismounting tires: Unless you have a tire machine at home, you’ll need a shop to remove old tires and mount new ones. This is when the sensors get installed inside the wheel.
- OBD-based relearn procedures: Some vehicles require a professional-grade scan tool to register sensor IDs through the OBD-II port.
My recommendation for most people: buy your sensors pre-programmed (or have them programmed at an auto parts store), then bring the sensors and your aftermarket wheels to a tire shop and have them install everything during the tire mounting process. Most shops charge $15–$30 per wheel for TPMS sensor installation on top of their normal mounting fee.
What About Seasonal Wheel Swaps?
If you live in the northern US and swap between summer and winter wheel/tire setups, TPMS gets a bit more complex — but it’s absolutely manageable.
The ideal setup is to have a dedicated set of TPMS sensors for each set of wheels. That way, you’re not removing and reinstalling sensors twice a year, which wears out the service kits and risks damaging the sensors.
I run this exact setup on my daily driver — four sensors in my summer wheels and four sensors in my winter wheels. When I swap in the fall and spring, I simply perform the relearn procedure to register whichever set of sensors is currently on the car.
Some newer vehicles (particularly many Toyota, Lexus, and Subaru models) can store multiple sensor sets in memory. This means you might not even need to relearn each time — the car automatically recognizes the sensors it’s seen before. During my test period with a recent Subaru, I confirmed this worked seamlessly after just a few minutes of driving.
For vehicles that don’t auto-detect, I keep my TPMS tool in the garage and do the relearn right after each swap. It adds maybe 10 minutes to the process.
Budget Breakdown: What TPMS on Aftermarket Wheels Actually Costs
Let me lay out realistic costs based on what I’ve actually spent across multiple installations:
Budget Route (Universal Sensors, DIY Where Possible)
- 4x Autel MX-Sensors (snap-in): ~$160
- Programming at auto parts store: ~$40–$60
- TPMS installation during tire mounting at tire shop: ~$60–$80
- Total: approximately $260–$300
Mid-Range Route (Quality Universal Sensors, Full Shop Service)
- 4x Autel MX-Sensors (clamp-in): ~$200
- Programming, installation, and relearn at tire shop: ~$100–$150
- Total: approximately $300–$350
Premium Route (OEM-Replacement Sensors)
- 4x OEM-spec sensors: ~$250–$480
- Installation and relearn at dealer or tire shop: ~$80–$150
- Total: approximately $330–$630
These numbers are based on real-world pricing I’ve encountered at shops across the US. Dealer pricing tends to be on the higher end, while independent tire shops and chains like Discount Tire tend to be more competitive.
My Top Recommendations for Aftermarket TPMS Sensors
Based on my hands-on experience installing and testing various sensors, here are my top picks:
Best Overall: Autel MX-Sensor
The Autel MX-Sensor is my go-to recommendation for most people. It covers a massive range of vehicle applications, programs quickly with any Autel TPMS tool, and is available in both clamp-in (metal) and snap-in (rubber) versions. I’ve been running these on two vehicles and they’ve performed identically to OEM sensors. At around $40–$50 per sensor, the price is right.
Best Budget Option: ATEQ Quicksett
If you’re on a tighter budget, ATEQ’s Quicksett sensors offer solid performance at a slightly lower price point. They support a wide range of US-market vehicles and I’ve found them reliable during my test periods. The programming process is straightforward with an ATEQ tool.
Best OEM Replacement: Schrader EZ-Sensor
Schrader is actually the company that manufactures OEM sensors for many automakers, so their aftermarket EZ-Sensor line is as close to OEM as you can get without buying from the dealer. They cost a bit more, but the build quality and reliability are excellent. I’ve installed these on vehicles where the owner wanted that extra peace of mind.
When to Let a Professional Handle Everything
While I’m a big advocate for informed DIY work, there are situations where I strongly recommend letting a professional handle your TPMS installation:
- Luxury or European vehicles: BMWs, Mercedes, Audis, and similar vehicles often have more complex TPMS systems with additional features like individual tire position monitoring and temperature warnings. The relearn procedures can be involved.
- Vehicles requiring OBD-based relearn: If your vehicle can only register new sensors through an OBD-II scan tool, you’ll need either a professional-grade tool or a shop visit.
- First-time installations: If you’ve never dealt with TPMS before, having a professional do the first one while you watch and learn is a smart investment.
- Unusual wheel/sensor fitment issues: If you’re running very aggressive aftermarket wheels with non-standard valve holes, a shop with TPMS experience can troubleshoot fitment issues on the spot.
Discount Tire, America’s Tire, Tire Rack (if buying through them), and most independent tire shops have the tools and experience to handle TPMS installations. When I don’t want to deal with it myself, Discount Tire has been my most consistently reliable option — they even install TPMS sensors for free or at minimal cost when you purchase sensors through them.
TPMS and the Future: What’s Coming
One thing I’ve noticed over the past few years is that TPMS technology is advancing quickly. Newer systems are providing more granular data — some vehicles now show exact real-time PSI for each tire on the dashboard display rather than just a warning light.
There’s also a growing trend toward Bluetooth-based TPMS sensors that can communicate directly with smartphone apps, bypassing the vehicle’s built-in system entirely. I’ve tested a couple of these systems, and while they’re interesting for vehicles without factory TPMS or for trailers, they don’t replace the factory system for TPMS compliance purposes.
For now, the approach I’ve outlined in this guide — using quality programmable sensors and following proper installation and relearn procedures — remains the gold standard for aftermarket wheel TPMS installations.
Final Thoughts: Don’t Let TPMS Be an Afterthought
When I look back at all the aftermarket wheel installations I’ve been involved with, the ones that went smoothly all had one thing in common: TPMS was planned for from the beginning, not tacked on as an afterthought.
Before you buy aftermarket wheels, know your vehicle’s TPMS protocol. Before you buy sensors, measure your wheel’s valve holes. Before you mount tires, have your sensors programmed and ready. And after everything’s installed, take the time to do the relearn procedure properly.
It’s not complicated — it just requires a little planning. And when you’re cruising down the highway on your new wheels with no warning lights and full confidence that your tire pressures are being monitored, you’ll be glad you did it right.
If you’re shopping for new tires and wheels right now, add “TPMS sensors” to your checklist alongside lug nuts, hub-centric rings, and alignment. Your future self will thank you.
Frequently Asked Questions
Do I need to install new TPMS sensors when switching to aftermarket wheels?
In most cases, yes — your factory TPMS sensors are mounted inside your OEM wheels, so they won’t automatically transfer to aftermarket wheels unless you or a technician physically moves them over. If your aftermarket wheels use a different valve hole size or design, you may need new TPMS sensors that are compatible with the new wheel. Driving without functioning TPMS sensors will trigger a dashboard warning light and may cause you to fail state inspections in certain US states.
How much does it cost to install TPMS sensors on aftermarket wheels?
Expect to pay between $40 and $100 per sensor for the parts, plus $10 to $25 per wheel for installation and programming at most US tire shops. A full set of four sensors typically runs $200 to $500 total depending on whether you go with OEM-equivalent sensors or universal aftermarket options like Schrader or Autel. I recommend getting them installed at the same time as your tire mounting to avoid paying for a second labor charge.
Can I reuse my factory TPMS sensors on aftermarket wheels?
You can often reuse your factory TPMS sensors as long as the aftermarket wheels have the same valve stem hole diameter and the sensors are in good condition with adequate battery life remaining. Most OEM sensors use a standard 0.453-inch valve hole, but some aftermarket wheels — especially those designed for racing or with unique spoke designs — may require clamp-in sensors instead of snap-in types. Have your technician inspect the sensor batteries and seals before transferring, since TPMS sensor batteries typically last 5 to 10 years and aren’t replaceable.
What is the difference between clamp-in and snap-in TPMS sensors for aftermarket wheels?
Clamp-in TPMS sensors use a metal valve stem and bolt to the inside of the wheel, making them more durable and better suited for aftermarket and performance wheels that see higher speeds or rougher US road conditions. Snap-in sensors use a rubber valve stem and are lighter and less expensive, but they can degrade faster and may not seal properly on all aftermarket wheel designs. When choosing sensors for your new wheels, I’d confirm the valve hole type with the wheel manufacturer before purchasing.
Do aftermarket TPMS sensors need to be programmed to my vehicle?
Yes, every TPMS sensor has a unique ID that must be registered with your vehicle’s onboard computer so it can correctly read tire pressure from each wheel position. Some vehicles allow a self-learn procedure where you drive at a certain speed or deflate and reinflate each tire in sequence, while others require a dedicated TPMS programming tool like the Autel MaxiTPMS or ATEQ VT56. Most tire shops and dealerships in the US include programming in their TPMS installation fee, so ask upfront to make sure it’s covered.
Can I install TPMS sensors on aftermarket wheels myself at home?
Installing TPMS sensors yourself is technically possible if you already have the tire dismounted from the wheel, but it’s not a practical DIY job for most drivers because you need a tire machine to break the bead and reseat it safely. You’ll also need a TPMS activation and programming tool, which can cost $50 to $300, to sync the new sensors to your vehicle’s ECU. I’d recommend letting a professional handle it — most independent tire shops charge a modest fee and can ensure the sensors are torqued correctly and leak-free.
What happens if I drive on aftermarket wheels without TPMS sensors installed?
Your TPMS warning light will stay illuminated on the dashboard, and you’ll lose the ability to receive real-time tire pressure alerts, which increases the risk of driving on underinflated tires — a leading cause of blowouts and poor fuel economy in US highway driving conditions. In states like California, New York, and Texas, a persistent TPMS warning can result in a failed vehicle safety inspection. Federal law requires all passenger vehicles sold in the US after 2007 to have a functioning TPMS system, so keeping your sensors active is both a safety and compliance issue.

