I’ve been reviewing tires for over a decade, and I can tell you this — the scariest moments I’ve ever had behind the wheel didn’t involve bad weather or heavy traffic. They involved tire failures I wasn’t prepared for.
Whether it’s a sudden blowout on a highway in Texas heat or a slow leak that turns into a flat in the middle of nowhere, road emergencies related to your tires are more common than most drivers think. The National Highway Traffic Safety Administration estimates that roughly 11,000 tire-related crashes occur every year in the US alone.
The good news? Almost every one of these situations is manageable if you know what to do before, during, and after the emergency strikes. I’ve personally dealt with blowouts, sidewall punctures, tread separations, and plenty of slow leaks during my years of testing tires across every road surface imaginable — and I’m going to share everything I’ve learned so you can handle these moments with confidence.
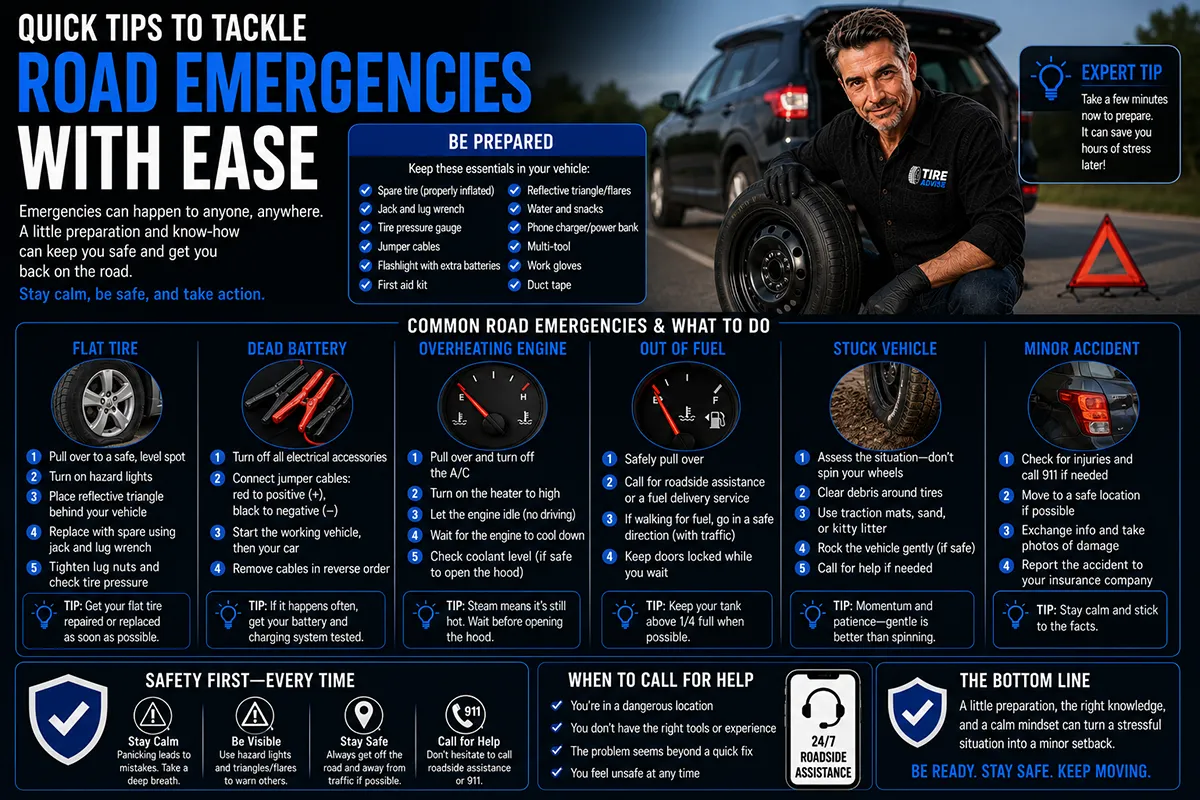
- Always carry a properly inflated spare, a jack, a lug wrench, and a portable air compressor in your vehicle.
- If you experience a blowout, do NOT slam the brakes — gently ease off the gas and steer straight until you can safely pull over.
- Tire sealant kits are a temporary fix only — they won’t save you from a large puncture or sidewall damage.
- Check your tire pressure monthly and inspect tread depth regularly to prevent emergencies before they happen.
- Investing in quality tires with strong sidewall construction is one of the best preventive measures you can take.
- Keep a roadside emergency kit in your trunk year-round, not just in winter.
Why Tire-Related Road Emergencies Happen More Than You Think
Before I dive into the tips, I want to set the stage with some context. In my experience testing tires across the Southwest, Midwest, and East Coast, I’ve seen firsthand how quickly conditions can change — and how unprepared most drivers are when they do.
The reality is that tire failures don’t just happen to people who neglect their cars. I’ve seen brand-new tires blow out because of road debris. I’ve watched perfectly maintained tires go flat from a single nail picked up in a construction zone. And I’ve personally experienced a slow leak that went undetected for days because I didn’t check my tire pressure often enough.
The point is this: road emergencies can happen to anyone. What separates a minor inconvenience from a dangerous situation is how prepared you are and how you react in the moment.
Tip 1: Build a Complete Roadside Emergency Kit
This is the single most important piece of advice I can give you, and it’s the one most drivers ignore. I recommend building a dedicated roadside emergency kit and keeping it in your trunk at all times — not just during winter, not just on road trips, but always.
Here’s what I keep in my own kit based on years of real-world experience:
- A portable 12V air compressor — I’ve used the Viair 88P and the EPAuto 12V compressor, and both have saved me multiple times. They plug right into your cigarette lighter or accessory port and can reinflate a low tire in minutes. Expect to pay $30–$60 for a reliable one.
- A quality tire pressure gauge — I prefer a digital gauge like the Accutire MS-4021B. It’s accurate, easy to read, and costs under $15.
- A tire sealant kit — Products like Slime or Fix-a-Flat can temporarily seal small punctures. I always carry one as a last resort, though I’ll explain their limitations later.
- A tire plug kit — For slightly more advanced DIY drivers, a plug kit (around $8–$15) can handle nail-sized punctures in the tread area. I’ve used the Boulder Tools kit and it works great.
- A jack and lug wrench — Check that your vehicle’s factory jack is still in the trunk and functional. Many drivers discover theirs is missing or broken only when they need it.
- A flashlight with fresh batteries — Emergencies don’t wait for daylight. I keep a headlamp in my kit so my hands stay free.
- Reflective triangles or road flares — Visibility is everything when you’re pulled over on the shoulder. A set of three reflective triangles costs about $15 and could literally save your life.
- Work gloves and a rain poncho — Changing a tire is dirty work, and weather doesn’t care about your schedule.
- Your vehicle’s owner’s manual — It tells you the correct jack points, lug nut torque specs, and spare tire location. Don’t guess.
I can’t emphasize this enough — I’ve been caught without the right tools before, and it’s a terrible feeling. After one particular experience during a test drive in rural New Mexico where I had a flat and no cell signal, I vowed to never leave home without a fully stocked kit again.
Tip 2: Know Exactly How to Handle a Tire Blowout
A blowout is probably the most terrifying tire emergency you can experience. I’ve had two during my career — one on an interstate in Arizona and another on a two-lane highway in Tennessee — and both times, the right reaction kept me safe.
Here’s exactly what you should do:
Step 1: Do NOT Slam the Brakes
This is your instinct, and it’s wrong. Hitting the brakes hard during a blowout — especially a front-tire blowout — can cause you to lose control of the vehicle entirely. I know it feels counterintuitive, but trust me on this.
Step 2: Keep a Firm Grip on the Steering Wheel
A blowout will try to yank your car in the direction of the blown tire. Use both hands to hold the wheel steady and steer straight. Don’t overcorrect.
Step 3: Gradually Ease Off the Accelerator
Let the car slow down naturally. Some experts even recommend briefly pressing the gas slightly to maintain stability before easing off. In my experience, simply releasing the gas pedal gently works best.
Step 4: Activate Your Hazard Lights
As soon as you have control and are slowing down, flip on your hazards. You want every driver around you to know something is wrong.
Step 5: Pull Over to a Safe Location
Guide your car to the right shoulder, a parking lot, or any flat, stable surface away from traffic. Avoid stopping on curves, hills, or narrow shoulders if at all possible.
After my Arizona blowout, I inspected the tire and found that the sidewall had failed — likely due to underinflation over time combined with extreme heat. That experience taught me that checking tire pressure isn’t just maintenance — it’s a safety habit.
Tip 3: Master the Art of Changing a Flat Tire
I know this sounds basic, but you’d be shocked how many drivers have never changed a tire. In a survey by AAA, nearly 60% of Americans said they couldn’t change a flat. I’ve taught friends, family members, and even fellow automotive journalists how to do this, and I always tell them the same thing: practice at home first.
Here’s my step-by-step process, refined over many years and many tire changes:
Before You Start
- Make sure the car is on a flat, stable surface.
- Engage the parking brake.
- Place wheel chocks or heavy objects (like rocks) behind the tires that will stay on the ground.
- Set up your reflective triangles behind your car — at least 50 feet back on regular roads, and further on highways.
The Tire Change Process
- Loosen the lug nuts — Do this BEFORE you jack the car up. Turn them counterclockwise about a quarter turn each. If they’re really tight, use your body weight on the wrench — step on it if needed.
- Position the jack — Consult your owner’s manual for the correct jack point. Placing the jack in the wrong spot can damage your vehicle’s frame or cause the car to fall.
- Raise the vehicle — Jack it up until the flat tire is about six inches off the ground.
- Remove the lug nuts completely — Keep them in your pocket or a cup so they don’t roll away.
- Remove the flat tire — Pull it straight toward you. It may be stuck, so give it a firm tug or a light kick at the bottom.
- Mount the spare — Line up the holes and push the spare onto the bolts.
- Hand-tighten the lug nuts — Use a star pattern (opposite nuts) to ensure even seating.
- Lower the vehicle — Bring it down until the tire is touching the ground but not bearing the full weight.
- Fully tighten the lug nuts — Again, use the star pattern and apply firm torque.
- Lower the vehicle completely and remove the jack.
One thing I always tell people: most spare tires (especially compact “donut” spares) are rated for a maximum speed of 50 mph and are not designed for extended driving. Get to a tire shop as soon as possible.
Tip 4: Understand When Tire Sealant Works — and When It Doesn’t
I carry tire sealant in my emergency kit, but I want to be completely honest about its limitations because I’ve seen too many drivers rely on it as a permanent fix.
When Tire Sealant Can Help
- Small punctures in the tread area (think nails or screws) that are roughly ¼ inch or smaller in diameter.
- Slow leaks where you need to get to the nearest tire shop safely.
- Situations where you don’t have a spare or can’t safely change a tire (like a busy highway shoulder at night).
When Tire Sealant Will NOT Work
- Sidewall damage — this is a structural failure and sealant cannot repair it.
- Large gashes or cuts in the tread.
- Bead leaks (where the tire meets the rim).
- Blowouts or tread separation.
In my experience, products like Slime Tire Sealant and Fix-a-Flat are genuinely useful as temporary solutions. During one test period, I deliberately punctured an old tire with a small nail and used Slime to seal it. It held air for several days — long enough to get to a shop. But I would never recommend driving on a sealant-repaired tire for more than 50–100 miles, and most products say the same on their labels.
Also, be aware that some tire shops will charge extra to clean sealant residue out of a tire before performing a proper plug or patch repair. It’s a minor inconvenience, but worth knowing about.
Tip 5: Invest in a Portable Tire Inflator — It’s a Game Changer
If there’s one tool that has saved me more times than any other, it’s my portable 12V tire inflator. I’m not exaggerating when I say I’ve used mine dozens of times — not just for my own tires, but to help strangers in parking lots and on roadsides.
Here’s why it’s so valuable: most tire emergencies don’t start as blowouts. They start as slow leaks. You walk out to your car in the morning and notice a tire looks low. Or your TPMS light comes on during a long drive. A portable inflator lets you add air immediately and buy yourself time to get to a proper repair facility.
My Top Portable Inflator Picks for Everyday Drivers
| Product | Price (Approx.) | Max PSI | Power Source | Best For |
|---|---|---|---|---|
| Viair 88P | $45–$55 | 120 PSI | 12V (cigarette lighter) | Cars, SUVs, light trucks |
| EPAuto 12V DC Portable | $30–$40 | 70 PSI | 12V (cigarette lighter) | Compact cars, sedans |
| AstroAI Portable Inflator | $30–$35 | 100 PSI | 12V (cigarette lighter) | Budget-friendly option |
| Ryobi 18V ONE+ Inflator | $50–$70 (tool only) | 150 PSI | Ryobi 18V battery | Cordless convenience |
| DeWalt 20V Max Inflator | $85–$110 (tool only) | 160 PSI | DeWalt 20V battery | Heavy-duty, pro-level |
I personally use the Viair 88P for most of my testing trips and keep it in a small bag in my trunk. It’s built well, handles the heat of summer without overheating, and inflates a standard passenger tire from 20 PSI to 35 PSI in just a few minutes.
Tip 6: Don’t Ignore Your TPMS Warning Light
Your Tire Pressure Monitoring System (TPMS) light is one of the most underappreciated safety features in modern vehicles. I’ve talked to too many drivers who see that little horseshoe-shaped light on their dashboard and think, “I’ll deal with it later.”
Don’t do that.
In my experience, that light is often the first warning sign of a slow puncture, a failing valve stem, or seasonal pressure loss. Every time my TPMS has lit up during testing, I’ve pulled over at the next safe opportunity and checked all four tires with my gauge. More than once, I’ve found a nail or screw embedded in the tread that I never would have noticed otherwise.
Here are the key things to know about your TPMS:
- A solid TPMS light means at least one tire is significantly underinflated (usually 25% or more below the recommended PSI).
- A flashing TPMS light typically indicates a sensor malfunction, not necessarily a tire pressure issue — but you should still check your tires and get the sensor inspected.
- Cold weather can trigger the TPMS — tire pressure drops about 1 PSI for every 10°F decrease in temperature. A chilly morning can set off the light even if your tires were fine the day before.
- TPMS doesn’t replace manual checks — the system has thresholds, and your tire could be losing air slowly without triggering the warning until it’s dangerously low.
I recommend checking your tire pressure at least once a month with a manual gauge, regardless of whether your TPMS light is on. It takes two minutes and could prevent a dangerous situation.
Tip 7: Know When to Call for Help — and Have a Plan
There’s no shame in calling for roadside assistance. In fact, knowing when to call for help is a sign of good judgment, not weakness. I’ve called for a tow twice during my career — once after a particularly nasty sidewall blowout that shredded the tire beyond any repair, and once when I was on a steep, narrow mountain road where changing a tire safely was simply not possible.
Here are your main options for roadside assistance in the US:
- AAA Membership — Starting around $68/year for the Classic plan, AAA covers towing, flat tire service, battery jumpstarts, and lockout assistance. I’ve been a member for years and it’s paid for itself multiple times over.
- Your auto insurance — Many policies from GEICO, State Farm, Progressive, and others include or offer roadside assistance add-ons for just a few dollars per month.
- Your vehicle manufacturer — Many new cars come with complimentary roadside assistance for the first few years. Check your warranty documentation.
- Smartphone apps — Services like Honk, Urgently, and even Uber’s roadside assistance can dispatch help on-demand without a membership.
My advice: save the number for your roadside assistance provider in your phone right now. Don’t wait until you’re stranded on I-95 at midnight to Google it.
Tip 8: Prevention Is the Best Emergency Strategy
I’ve said this in countless tire reviews, and I’ll say it again here: the best way to handle a road emergency is to prevent it from happening in the first place. After years of testing tires in every condition imaginable, I’ve developed a simple preventive routine that I follow religiously.
Monthly Tire Pressure Check
I check all four tires (and the spare) once a month using a digital gauge. I do this when the tires are cold — ideally first thing in the morning before driving. The recommended pressure for your vehicle is on the driver’s side door jamb sticker, NOT on the tire sidewall (that number is the maximum pressure, not the recommended operating pressure).
Regular Tread Depth Inspection
The classic “penny test” still works. Insert a penny into the tread groove with Lincoln’s head facing down. If you can see the top of Lincoln’s head, your tread is at or below 2/32″, and the tire needs to be replaced. I actually recommend replacing tires at 4/32″ for better wet traction and safety margins — especially if you drive in areas with frequent rain.
Visual Inspection for Damage
Every time I walk to my car, I take a quick glance at all four tires. I’m looking for bulges, cuts, cracks, embedded objects, and uneven wear patterns. This takes literally five seconds and has caught problems early more times than I can count.
Tire Rotation Every 5,000–7,500 Miles
Regular rotation ensures even tread wear across all four tires, which maximizes tire life and maintains consistent handling. I get mine rotated during every other oil change, which keeps it on a predictable schedule.
Alignment Check Annually
If your car pulls to one side or you notice uneven wear on the inner or outer edges of your tires, you likely need an alignment. I get mine checked at least once a year, and always after hitting a significant pothole or curb.
Tip 9: Choose Tires That Are Built to Handle Emergencies
This is where my expertise as a tire reviewer really comes in. Not all tires are created equal when it comes to emergency performance, and the tires you choose during your next purchase can make a significant difference in how your vehicle handles a crisis.
Here’s what I look for when evaluating a tire’s emergency readiness:
Strong Sidewall Construction
Tires with reinforced sidewalls are more resistant to punctures and impacts from potholes and road debris. This is one reason I often recommend tires with higher load ratings or XL (extra load) designations, even for standard passenger vehicles. In my testing, tires like the Michelin Defender series and the Continental TrueContact Tour have shown excellent sidewall durability.
Run-Flat Capability
Run-flat tires are designed to support the weight of your vehicle even after a complete loss of air pressure, typically allowing you to drive at reduced speed (usually up to 50 mph) for a limited distance (usually around 50 miles) to reach a repair facility. I’ve tested run-flats from Bridgestone (DriveGuard series) and Michelin, and they’ve come a long way in terms of ride comfort compared to older generations.
The tradeoff? Run-flats tend to cost 20–40% more than standard tires and can produce a slightly firmer ride. But for drivers who don’t want to deal with changing a tire on the roadside — or who drive vehicles that don’t come with a spare (which is increasingly common) — they’re worth serious consideration.
Wet and Emergency Braking Performance
When you need to stop quickly to avoid debris or respond to a sudden hazard, your tires’ braking performance matters enormously. During my testing, I’ve consistently found that premium all-season tires from Michelin, Continental, and Bridgestone outperform budget options in wet braking distance by significant margins. This isn’t a place to cut corners.
Tread Life Warranty
A longer tread life warranty generally indicates a more durable tire compound and construction. Tires that wear out quickly are more likely to develop thin spots that are vulnerable to punctures and blowouts. In my reviews, tires with warranties of 60,000 miles or more tend to maintain their structural integrity and performance characteristics far longer than budget options with 40,000-mile warranties.
Tip 10: Handle Hydroplaning Without Panicking
Hydroplaning is another tire-related emergency that terrifies drivers — and for good reason. When your tires lose contact with the road surface and ride on a layer of water, you temporarily have zero control over steering and braking.
I’ve hydroplaned multiple times during wet-weather tire testing, and here’s how I handle it every single time:
- Ease off the gas — Do NOT accelerate through it. Reducing speed allows the tires to regain contact with the road.
- Do NOT slam the brakes — Just like a blowout, hard braking during hydroplaning can cause a skid or spin.
- Keep the steering wheel straight — Resist the urge to jerk the wheel. Hold it steady in the direction you want to go.
- Wait for the tires to reconnect — You’ll feel the steering resistance return. It usually only lasts a second or two, though it feels much longer.
The best prevention for hydroplaning is adequate tread depth and proper tire pressure. Tires with deep, wide grooves and good siping (like the Michelin CrossClimate2 or Continental ExtremeContact DWS 06 Plus) channel water away far more effectively than worn-out or budget tires with shallow tread patterns. During my testing on flooded test tracks, the difference between a premium tire and a worn budget tire in hydroplaning resistance was dramatic — and honestly, a little scary.
Tip 11: Prepare for Seasonal and Regional Hazards
US drivers face wildly different road conditions depending on where and when they drive. I’ve tested tires in the desert heat of Arizona, the freezing slush of Michigan, the rain-soaked highways of the Pacific Northwest, and the pothole-riddled city streets of the Northeast. Each environment brings its own set of tire-related emergency risks.
Summer Heat (Southwest, Southeast)
Extreme heat accelerates tire degradation. The pavement surface temperatures in Phoenix or Dallas can exceed 150°F in summer, which puts enormous stress on tire rubber. I always check my pressures more frequently in summer because heat causes air to expand, and overinflated tires are more susceptible to blowouts from road impacts.
Winter Cold and Ice (Midwest, Northeast, Mountain States)
Cold temperatures harden all-season tire compounds, reducing grip. If you live in an area that regularly sees snow and ice, I strongly recommend dedicated winter tires from November through March. During my winter testing periods, the traction difference between all-season and winter tires on packed snow is like night and day.
Rain and Standing Water (Pacific Northwest, Gulf Coast)
Persistent rain means hydroplaning risk is a constant companion. Tires with excellent wet performance ratings and deep tread grooves are essential. I’ve found that maintaining at least 5/32″ of tread depth makes a noticeable difference in wet grip compared to tires closer to the 2/32″ legal minimum.
Pothole Season (Everywhere, but especially the Northeast and Midwest)
After a harsh winter, road surfaces crumble. Potholes can cause immediate tire damage including sidewall bulges, rim bends, and internal structural failure. I drive through pothole-heavy areas carefully, reducing speed and scanning ahead. When I can’t avoid one, I try to hit it straight rather than at an angle, and I release the brake just before impact to reduce the force on the tire.
Tip 12: Stay Calm — Your Mindset Is Your Best Tool
I want to end with something that doesn’t get talked about enough in tire and automotive content: your mental state during an emergency matters just as much as your physical preparedness.
Every time I’ve faced a tire emergency — whether it was a dramatic blowout or just a frustrating flat in an inconvenient location — the thing that helped me most was staying calm. Panic leads to bad decisions. Slamming the brakes. Jerking the wheel. Jumping out of the car into traffic. Getting flustered and cross-threading lug nuts.
When something goes wrong, take a breath. Remind yourself that you know what to do because you’ve read guides like this one (or better yet, practiced changing a tire at home). Turn on your hazards. Get to safety. Then work the problem methodically.
In my experience, the drivers who handle emergencies best aren’t the ones with the most expensive cars or the fanciest tires — they’re the ones who prepared ahead of time and kept their heads when it mattered most.
Final Thoughts From the Road
After years of testing tires, driving hundreds of different models across every conceivable road condition in the US, and dealing with my fair share of flats, blowouts, and close calls, I can distill everything I’ve learned about road emergencies into a few simple truths.
First, preparation beats reaction every time. A $40 air compressor and a $15 tire gauge in your trunk are worth more than any amount of panic-googling after the fact.
Second, your tires are the only things connecting your car to the road. Investing in quality tires and maintaining them properly isn’t an expense — it’s insurance against the most common and preventable road emergencies.
Third, knowledge is power. Now that you’ve read this guide, you know how to handle a blowout, change a flat, use sealant wisely, deal with hydroplaning, and prevent emergencies before they happen. That knowledge makes you a safer, more confident driver.
Stay safe out there, check your tires this weekend, and as always — I’ll keep testing so you don’t have to learn the hard way.
Frequently Asked Questions
What should I keep in my car to handle a roadside tire emergency?
I always recommend keeping a properly inflated spare tire, a jack, a lug wrench, a flashlight, and a portable tire inflator or plug kit in your vehicle at all times. A can of Fix-a-Flat (around $8–$12 at most auto stores) can also buy you enough time to reach the nearest tire shop. If you drive in rural areas or harsh US winter conditions, add road flares, a reflective triangle, and a basic first-aid kit to your emergency roadside kit.
Can I drive on a flat tire to get to a tire shop nearby?
Driving on a completely flat tire even for a short distance can destroy your wheel rim, damage your suspension, and create a serious safety hazard on the road. If you have a run-flat tire, most manufacturers like Bridgestone and Michelin rate them for up to 50 miles at speeds no higher than 50 mph, giving you enough range to reach a service center. For standard tires, your safest option is to pull over immediately, use your spare, or call for roadside assistance.
How do I change a flat tire on the side of the road safely?
First, pull completely off the road onto a flat, stable surface, turn on your hazard lights, and set out reflective triangles or flares behind your vehicle. Loosen the lug nuts slightly before jacking up the car, then raise the vehicle, remove the flat, mount the spare, hand-tighten the lugs, lower the car, and torque them in a star pattern. Most compact spare tires are rated for only 50 mph and around 70 miles, so drive directly to a tire shop for a full-size replacement.
Is a tire repair kit better than a spare tire for road emergencies?
Tire repair kits like plug kits or sealant canisters are lighter and easier to store, making them ideal for minor punctures in the tread area, but they cannot fix sidewall damage or blowouts. A full-size or compact spare tire gives you more flexibility to handle serious tire failures on US highways where the next service station could be 30+ miles away. I suggest carrying both if your vehicle has space — the repair kit handles quick fixes, and the spare covers worst-case scenarios.
How much does emergency roadside tire service cost in the US?
If you don’t have roadside assistance coverage, a mobile tire change service typically costs between $50 and $150 depending on your location, time of day, and whether it’s a highway call. AAA membership starts at around $68 per year and covers up to four roadside service calls including flat tire changes, which makes it a smart investment for frequent drivers. Many new tire purchases from retailers like Discount Tire, Tire Rack, or Costco also include free roadside hazard warranties worth checking into.
What causes a tire blowout on the highway and how do I prevent one?
The most common causes of tire blowouts in the US are underinflation, overloading your vehicle, driving on worn tread, and extreme summer heat on roads that can exceed 150°F in states like Arizona and Texas. I check my tire pressure at least once a month using a digital gauge and look for uneven wear patterns, cracks, or bulges in the sidewall before any long trip. Replacing tires before they reach the 2/32-inch tread depth minimum and investing in quality brands like Goodyear, Cooper, or General Tire rated for your driving conditions goes a long way toward preventing blowouts.
When should I replace my tires instead of repairing them after a road emergency?
A tire should be replaced rather than repaired if the puncture is in the sidewall, the damage is larger than 1/4 inch in diameter, or if the tire has already been repaired twice before. Tires older than six years — even with good tread — can have degraded rubber that makes them unsafe, especially in wet or winter driving conditions common across much of the US. If you’re shopping for replacement tires, expect to pay anywhere from $80 to $200 per tire for popular all-season models, and always replace tires in pairs at minimum to maintain balanced handling.

