

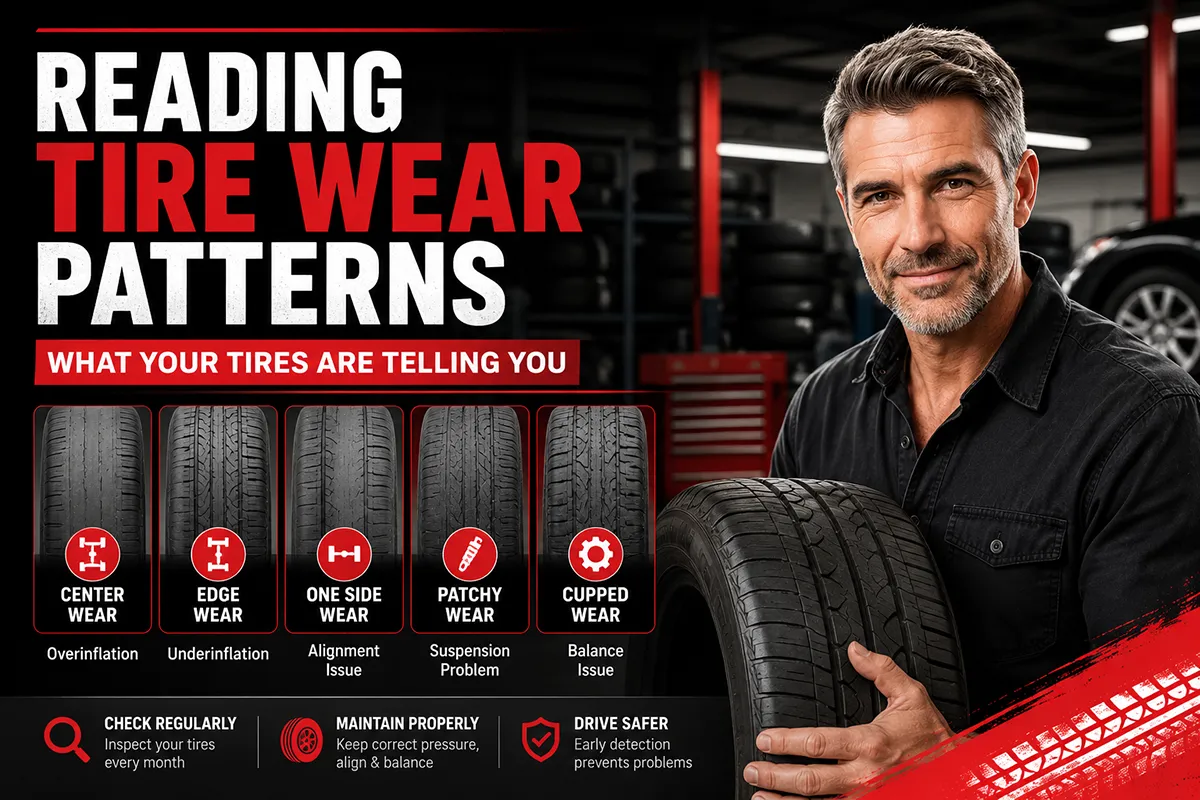
- Tire wear patterns reveal alignment, inflation, and suspension problems — fix these before buying new tires.
- Center wear means overinflation; edge wear means underinflation.
- One-sided wear usually points to an alignment issue (camber or toe).
- Cupping or scalloping signals worn shocks, struts, or suspension components.
- Feathering across the tread blocks is a classic sign of toe misalignment.
- Always address the root cause before mounting new tires, or you’ll destroy another set.
Liked this article?
Add TireAdvise as a preferred source so you see more of our tire reviews and guides on Google.
Why Reading Tire Wear Patterns Actually Matters
I’ll be honest — for years early in my career, I didn’t pay much attention to how tires wore down. I just looked at tread depth, decided if they were “done,” and moved on to picking replacements. It wasn’t until I started working closely with alignment technicians and suspension specialists that I realized how much information was sitting right there on the tire’s surface. Every abnormal wear pattern is a symptom. And if you treat the symptom (just replacing the tire) without treating the disease (the mechanical problem causing the wear), you’re going to burn through another set of tires way faster than you should. In my experience reviewing tires for over a decade, I’d estimate that at least one in three drivers I talk to has some form of uneven tire wear they haven’t noticed. And many of them are about to spend $500 to $1,000 on new tires without addressing the problem that chewed up their last set. This guide is designed to help you look at your current tires, understand what you’re seeing, and make an informed decision before you shop for replacements.What You’ll Need for a Basic Tire Wear Inspection
Before we dive into specific patterns, let me walk you through the simple inspection process I use every time I evaluate a set of tires. You don’t need any special tools.- Your hands: Run your palm across the tread surface in multiple directions. You’ll feel irregularities before you see them.
- A penny or quarter: The classic tread depth test. Insert Lincoln’s head upside down into the tread grooves — if you can see the top of his head, you’re at or below 2/32″ and need replacement.
- A flashlight: Angled light reveals subtle wear patterns that are invisible under overhead lighting.
- A notepad or your phone camera: Document what you see on each tire so you can show your mechanic or reference it when tire shopping.
The 7 Most Common Tire Wear Patterns and What They Mean
Over the years, I’ve cataloged the wear patterns I see most frequently. Here are the seven you’re most likely to encounter on your own vehicle, along with what’s causing them and what to do about it.1. Center Wear (Overinflation)
If the center of your tire tread is significantly more worn than the outer edges, you’re almost certainly running with too much air pressure. I see this constantly, especially on drivers who fill their tires at gas station air pumps without checking the recommended PSI. When a tire is overinflated, the center of the tread bulges outward and makes more contact with the road than the shoulders. The result is accelerated wear down the middle and a tire that’s actually providing less grip than it should — because you’re riding on a smaller contact patch. What to do: Check the tire placard on your driver’s side door jamb for the manufacturer-recommended PSI. Don’t use the number on the tire sidewall — that’s the maximum pressure the tire can handle, not the ideal pressure for your vehicle. In my experience, most passenger cars call for somewhere between 30 and 36 PSI, but always go with what your vehicle manufacturer specifies.2. Edge Wear / Both-Shoulder Wear (Underinflation)
This is the opposite problem. When both outer edges of the tire are worn more than the center, the tire has been running underinflated. I encounter this even more often than center wear, particularly in colder climates where tire pressure drops with temperature. Underinflated tires flex more, generate more heat, and wear disproportionately on the shoulders because the center of the tread sags inward and doesn’t maintain proper contact. This also increases rolling resistance, which means you’re burning more fuel. What to do: Inflate to the proper PSI and check your pressure at least once a month. I personally check mine every two weeks, and I keep a high-quality digital gauge in my glovebox. If you’re consistently losing pressure, have the tire inspected for a slow leak or consider that your valve stems might need replacement.3. One-Sided Wear (Camber Misalignment)
When only one edge of the tire — inside or outside — is significantly more worn than the other, you’re looking at a camber issue. Camber refers to the inward or outward tilt of the tire when viewed from the front of the vehicle. I tested a set of Continental CrossContact tires on an SUV a while back, and after several weeks of driving, the inside edges of the front tires were noticeably more worn than the outside. A quick alignment check revealed the camber was off by nearly two degrees — well outside the acceptable range. After the alignment was corrected, the new set I mounted wore beautifully. What to do: Get a four-wheel alignment. In the US, a standard alignment runs between $75 and $150 at most shops, including national chains like Firestone, Pep Boys, and Discount Tire. If you’ve hit a pothole, curb, or had any suspension work done, an alignment check should be your first step.4. Feathered Wear (Toe Misalignment)
Feathering is one of the trickier patterns to spot visually, but it’s one of the easiest to feel. Run your hand across the tread blocks from the inside edge to the outside edge (and then reverse direction). If the tread feels smooth one way but rough or “sawtooth” the other way, you have feathered wear. This happens when the tires are pointed slightly inward (toe-in) or outward (toe-out) instead of running perfectly parallel. It’s like dragging the tire sideways across the pavement with every revolution. What to do: A toe alignment correction is usually the simplest and least expensive part of an alignment service. In my experience, toe misalignment is the single most common alignment issue I see on everyday passenger vehicles, and it’s often caused by something as simple as bumping a curb in a parking lot.5. Cupping or Scalloping (Worn Suspension Components)
Cupping — sometimes called scalloping — shows up as a series of dips or scooped-out spots around the circumference of the tire. The tread looks wavy rather than smooth, and you’ll often hear a rhythmic humming or thumping noise at highway speeds. This is the pattern that concerns me the most because it almost always points to a worn shock absorber, strut, or other suspension component that’s allowing the tire to bounce rather than maintain consistent contact with the road. I’ve seen cupping develop in a matter of weeks on vehicles with badly worn struts. What to do: Have your shocks, struts, bushings, and ball joints inspected. Replacing shocks or struts typically costs between $200 and $600 per axle depending on the vehicle and whether you go with OEM or aftermarket parts. Do not put new tires on a car with worn suspension — I’ve seen brand-new Michelin Defenders develop visible cupping after just a couple of months on a vehicle with shot struts.6. Diagonal or Patchy Wear
Diagonal wear patterns — where you see worn strips running at an angle across the tread — or random patchy wear are often the result of multiple problems occurring simultaneously. I typically see this on vehicles that have both alignment issues and worn suspension components. It can also appear on tires that haven’t been rotated on schedule. If you’re running the same tires in the same position for an extended period, small irregularities compound over time. What to do: Start with a comprehensive inspection — alignment, suspension, and tire balance. Then commit to a regular rotation schedule. I rotate my test tires every time I evaluate their mid-life performance, and I recommend most drivers do it every other oil change or on whatever interval their tire manufacturer recommends.7. Flat Spot Wear (Brake-Related or Storage)
Flat spots are exactly what they sound like — a specific area of the tire that’s worn flat while the rest of the circumference is normal. This is caused by locked-wheel braking (common on older vehicles without ABS), or by leaving a car parked in one position for an extended period. I’ve personally experienced flat-spotting on a vehicle that sat in my driveway for several weeks during winter. The tires developed a noticeable thump-thump-thump that took a few days of driving to work out. On more severe cases, the flat spots become permanent. What to do: If you’re storing a vehicle, slightly overinflate the tires (5-10 PSI above recommended) and move the car periodically. If flat spots have already formed and don’t resolve after driving for a few days, the tires likely need to be replaced.Tire Wear Pattern Quick-Reference Comparison Table
| Wear Pattern | What It Looks Like | Most Likely Cause | Fix Before New Tires? | Estimated Fix Cost |
|---|---|---|---|---|
| Center wear | Middle strip worn smooth | Overinflation | Yes — adjust PSI | Free (just adjust air) |
| Both-edge wear | Shoulders worn, center intact | Underinflation | Yes — adjust PSI | Free (just adjust air) |
| One-sided wear | Inside or outside edge worn | Camber misalignment | Yes — alignment needed | $75–$150 |
| Feathered wear | Sawtooth feel across tread | Toe misalignment | Yes — alignment needed | $75–$150 |
| Cupping / scalloping | Dips/waves around tread | Worn shocks/struts | Yes — suspension repair | $200–$600 per axle |
| Diagonal / patchy | Irregular worn areas | Multiple issues + no rotation | Yes — full inspection | Varies |
| Flat spots | Localized flat area | Hard braking / long storage | Maybe — check brakes | $0–$300+ |
How I Actually Inspect Tire Wear: My Step-by-Step Process
I want to share the exact process I follow when I’m evaluating tires on a test vehicle or helping a friend figure out what’s going on with their car. It takes about 15 minutes and requires no special equipment.Step 1: Start With a Visual Walk-Around
I walk around the entire vehicle and look at each tire from the front and from the side. I’m looking for any obvious lean, bulging, or uneven tread depth that I can spot from a standing position. You’d be surprised how many serious alignment issues are visible just from standing a few feet away and looking at the tire’s stance.Step 2: Get Down and Touch the Tread
I kneel beside each tire and run my hand across the tread in multiple directions — inside to outside, outside to inside, and along the circumference. The tactile feedback tells me more than my eyes can. Feathered wear, in particular, is almost impossible to see but instantly obvious by touch.Step 3: Check Tread Depth at Three Points
Using a tread depth gauge (or a penny in a pinch), I measure the tread depth at three points across the tire: the inside edge, the center, and the outside edge. I write down all three numbers. If there’s a significant difference — say more than 2/32″ between any two measurements — there’s a wear issue.Step 4: Compare Front to Rear
I compare the front tires to each other and the rear tires to each other. If the front-left shows heavy inside wear but the front-right looks fine, that’s a clue pointing to a specific suspension issue on one side rather than a general alignment problem.Step 5: Document Everything
I take photos of each tire with my phone, including close-ups of any abnormal wear. When I bring the vehicle to an alignment shop, I show them exactly what I’ve found. This helps the technician zero in on the problem and, frankly, it keeps everyone honest.Real-World Examples From My Testing Experience
Let me share a few real situations I’ve encountered that illustrate why this matters.The Overinflated Commuter
A colleague asked me to look at his tires after he noticed they felt “slippery” in the rain. He was running Bridgestone Turanza QuietTrack tires — a tire I’ve reviewed and generally like for daily driving. But when I inspected them, the center tread was noticeably smoother than the shoulders. He’d been inflating to 44 PSI because that’s what was printed on the sidewall. His door placard said 35 PSI. After correcting the pressure and letting the tires wear for several more weeks, the remaining tread started wearing much more evenly, and his wet traction improved noticeably.The Pothole Victim
I was testing a set of Goodyear Assurance MaxLife tires on a family sedan, and after a couple of weeks, I noticed the front-right tire developing heavy inside-edge wear. It turned out the driver had hit a nasty pothole on I-95 — a common hazard on East Coast highways — and knocked the front-right camber out of spec. A quick alignment brought everything back into range, and the remaining tread wore evenly for the rest of my test period. Without catching that early, the tire would have been toast well before its expected lifespan.The Bouncing SUV
This one was dramatic. A reader sent me photos of their Falken Wildpeak A/T3W tires showing aggressive cupping on the rear axle after only a few months of ownership. The tires are excellent — I’ve tested them extensively — so I immediately suspected a suspension issue. Sure enough, both rear shocks were blown. After replacing the shocks and mounting fresh tires, the problem disappeared entirely. That reader would have ruined a second set of Wildpeaks if they hadn’t identified the cupping pattern first.Front-Wheel Drive vs. Rear-Wheel Drive vs. AWD: How Drivetrain Affects Wear
Your vehicle’s drivetrain plays a significant role in how and where tires wear. Here’s what I’ve observed across hundreds of tire tests.Front-Wheel Drive (FWD)
The front tires on FWD vehicles do everything — steering, accelerating, and most of the braking. I consistently see front tires wear significantly faster than rears on these vehicles. The most common pattern I encounter is a combination of shoulder wear (from cornering forces) and heel-toe wear on the front axle. Regular rotation is absolutely critical on FWD cars. I recommend a front-to-rear rotation pattern to equalize wear.Rear-Wheel Drive (RWD)
RWD vehicles tend to wear their rear tires faster, especially if the driver has a heavy foot. I’ve tested performance tires on RWD sports cars and sedans where the rear tires showed significant center wear from acceleration forces within a relatively short test period.All-Wheel Drive (AWD)
AWD systems can be the most sensitive to tire wear differences. Many AWD systems rely on all four tires being very close in circumference. If one tire is significantly more worn than the others, it can actually stress the drivetrain components. I always emphasize to AWD owners that keeping tires evenly worn (through consistent rotation) isn’t just about tire life — it’s about protecting your transfer case and differentials.When Is Uneven Wear Bad Enough to Replace Immediately?
This is a question I get asked all the time, and the answer depends on how severe the wear is and where it’s located. Replace immediately if:- Any portion of the tire has reached 2/32″ of tread depth or less (the legal minimum in most US states).
- You can see the wear indicators (those raised bars inside the grooves) are flush with the tread surface.
- Steel belts or cords are visible through the rubber — this is a safety emergency.
- Cupping is so severe that the tire vibrates noticeably at highway speeds.
- Wear is uneven but all areas still have 4/32″ or more of tread remaining.
- You’ve identified and corrected the underlying issue (alignment, pressure, suspension).
- A tire rotation can move the affected tires to a less demanding position.
How to Prevent Uneven Wear on Your New Tires
Once you’ve diagnosed the problem and invested in a new set of tires, here’s what I do to protect that investment.Get an Alignment With Every New Tire Purchase
I consider a four-wheel alignment to be a non-negotiable part of any new tire installation. Many tire shops offer alignment packages when you buy a set of four. Discount Tire, America’s Tire, Costco, and most Goodyear dealers will either include it or offer it at a reduced rate. The $100 you spend on an alignment can easily save you hundreds in premature tire replacement.Check Tire Pressure Monthly
I keep a digital tire pressure gauge in every vehicle I drive. It takes 60 seconds to check all four tires, and it’s the single easiest thing you can do to promote even wear. I check mine on a cool morning before the tires have been driven, since heat from driving temporarily inflates the reading.Rotate Religiously
I can’t overstate how important rotation is. For most drivers, I recommend rotating every time you get an oil change, which keeps it easy to remember. Many tire retailers — including Costco and Discount Tire — offer free rotation for the life of the tires when you buy from them. Take advantage of that.Don’t Ignore New Noises or Vibrations
After installing new tires, I pay close attention to how the car feels and sounds for the first few weeks. Any new vibration, pull to one side, or rhythmic noise is a red flag. Catching a problem early means you might lose a few percent of tread life instead of destroying the entire tire.Should You Replace Two Tires or Four?
If uneven wear has killed two of your tires but the other two still have life, you might be tempted to replace just the bad pair. I’ve been in this exact situation many times, and here’s my guidance. Replace all four if:- You drive an AWD vehicle (mismatched tread depths can damage the drivetrain).
- The remaining two tires have less than 5/32″ of tread.
- You want to switch to a different tire model or size.
- You drive a FWD or RWD vehicle.
- The remaining two tires are the same brand and model and have reasonable tread remaining.
- You mount the new tires on the rear axle (regardless of drivetrain) for better hydroplaning resistance.
What Your Tire Shop Should Be Telling You (But Often Doesn’t)
Here’s something that frustrates me. Too often, I see tire shops sell a customer four new tires without mentioning the wear patterns on the old ones. They’re leaving money on the counter and setting the customer up for the same problem all over again. A good tire shop should:- Show you the old tires and point out any abnormal wear.
- Recommend an alignment check if there’s any sign of uneven wear.
- Suggest a suspension inspection if they see cupping or scalloping.
- Set the tire pressure to the vehicle manufacturer’s specification — not the tire’s max PSI.
Final Thoughts: Your Tires Are Talking — Listen to Them
After years of testing tires and documenting their wear characteristics, I can tell you that reading tire wear patterns is one of the most valuable skills any driver can develop. It doesn’t require special training or expensive equipment. It just takes a few minutes of observation and a willingness to act on what you find. Before you start browsing Tire Rack or heading to your local Costco for a new set, take 15 minutes to inspect your current tires using the process I’ve outlined. Write down what you see. Take photos. Then address any underlying mechanical issues before you mount a single new tire. Your wallet will thank you, and your new tires will last as long as they were designed to. I’ve seen this process save drivers hundreds of dollars and give them confidence that they’re making a smart, informed purchase. And that’s exactly what TireAdvise.com is here for.Frequently Asked Questions
What do tire wear patterns tell you about your car?
Tire wear patterns are like a diagnostic report for your vehicle’s alignment, inflation, and suspension health. Center wear usually means your tires are overinflated, edge wear points to underinflation, and one-sided wear almost always signals an alignment issue. I always recommend checking your wear patterns every 5,000 miles or during oil changes so you can catch problems before they destroy a perfectly good set of tires.
What does inner tire wear mean and is it dangerous?
Inner tire wear, where the inside edge of the tread wears down faster than the rest, typically means your wheels have excessive negative camber or your alignment is off. This is especially common on US roads with lots of potholes and uneven surfaces that knock your suspension out of spec. It’s definitely dangerous because it reduces your contact patch and grip, particularly in rain, and I’d suggest getting an alignment check immediately—most shops charge between $75 and $120 for a four-wheel alignment.
How can I tell if my tires are worn unevenly from not rotating them?
If you skip regular tire rotations, you’ll typically see the front tires worn more aggressively on the outer edges from turning, while rear tires may develop a smoother, more even wear pattern. On front-wheel-drive vehicles, which make up the majority of cars on US roads, the front tires also wear faster because they handle both steering and power delivery. I recommend rotating your tires every 5,000 to 7,500 miles—most tire shops like Discount Tire and Costco offer free rotations if you purchased your tires there.
What causes cupping or scalloping on tires and how do I fix it?
Cupping, also called scalloping, shows up as a series of dips or wavy patterns around the tread surface and is usually caused by worn shocks, struts, or unbalanced tires. I’ve seen this happen frequently on vehicles driven regularly on rough US highways or poorly maintained city streets. To fix it, you’ll need to replace the worn suspension components and get a wheel balance, which typically runs $15 to $75 per tire, and then replace the cupped tires since the damage is usually too severe to reverse safely.
Can I pass a state inspection with uneven tire wear?
It depends on the state and how severe the wear is, but in states with mandatory vehicle safety inspections like Virginia, Texas, and Pennsylvania, tires must meet minimum tread depth requirements of 2/32 of an inch across the entire tread surface. If your uneven wear has created bald spots on any section of the tire, you’ll fail the inspection even if other parts of the tread look fine. I’d recommend using a tread depth gauge on the inner, center, and outer sections of each tire before heading to the inspection station.
How do I read tire wear patterns to know if I need new tires or just an alignment?
Start by examining all four tires and noting where the wear is heaviest. If only one side of the tread is worn down across multiple tires, you likely need an alignment first and then new tires, since installing fresh tires on a misaligned vehicle will just destroy them again. If the wear is centered, edges-only, or patchy, address the root cause—inflation pressure, balancing, or suspension—before spending $400 to $800 on a new set of replacement tires. Fixing the underlying issue first will save you significant money in the long run.
What does feathered tire wear look like and what causes it?
Feathered tire wear feels like a series of sharp edges on one side of each tread rib and smooth on the other, almost like a sawtooth pattern you can feel by running your hand across the tread. This is primarily caused by incorrect toe alignment, which is one of the most common alignment issues for US drivers and can develop after hitting a large pothole or curb. A proper four-wheel alignment will correct the toe angle and prevent further feathering, and I recommend addressing it quickly because feathered tires also tend to generate noticeable road noise at highway speeds.
