I watched a shop tech mount a brand-new set of premium tires backward last year — yes, directional tires spinning the wrong way — and the customer drove off without noticing. That $800 set of tires wore unevenly within weeks, and the shop tried to blame the alignment.
That experience stuck with me because it proved something I’ve believed for years: buying the right tires is only half the battle. How they get installed matters just as much.
Whether you’re heading to a local shop, a big-box retailer, or even tackling parts of the process yourself, you need to know what proper tire installation looks like so you can spot mistakes before they cost you money, safety, or both.
- Always inspect new tires before installation for manufacturing defects and DOT date codes.
- Make sure directional and asymmetric tires are mounted correctly — many shops get this wrong.
- Insist on a torque wrench for lug nuts; over- or under-torquing causes real problems.
- Get an alignment check with every new tire install — it protects your investment.
- Break in new tires gently for the first few days; they’re slippery fresh out of the box.
- Keep your receipt, warranty paperwork, and a record of the installation date for future claims.
Why Tire Installation Deserves Your Full Attention
I’ve reviewed hundreds of tires over the years, and I can tell you that installation quality directly impacts how a tire performs, how long it lasts, and how safe it keeps you. A perfectly engineered tire mounted incorrectly is worse than an average tire mounted properly.
The thing is, most drivers treat tire installation as an afterthought. You spend hours researching tread patterns, reading reviews, and comparing prices — then you hand your car off to whoever offers the cheapest install and hope for the best.
I’ve made that mistake myself early on. Now I treat installation day like an inspection day, and I’m going to share everything I’ve learned so you can do the same.
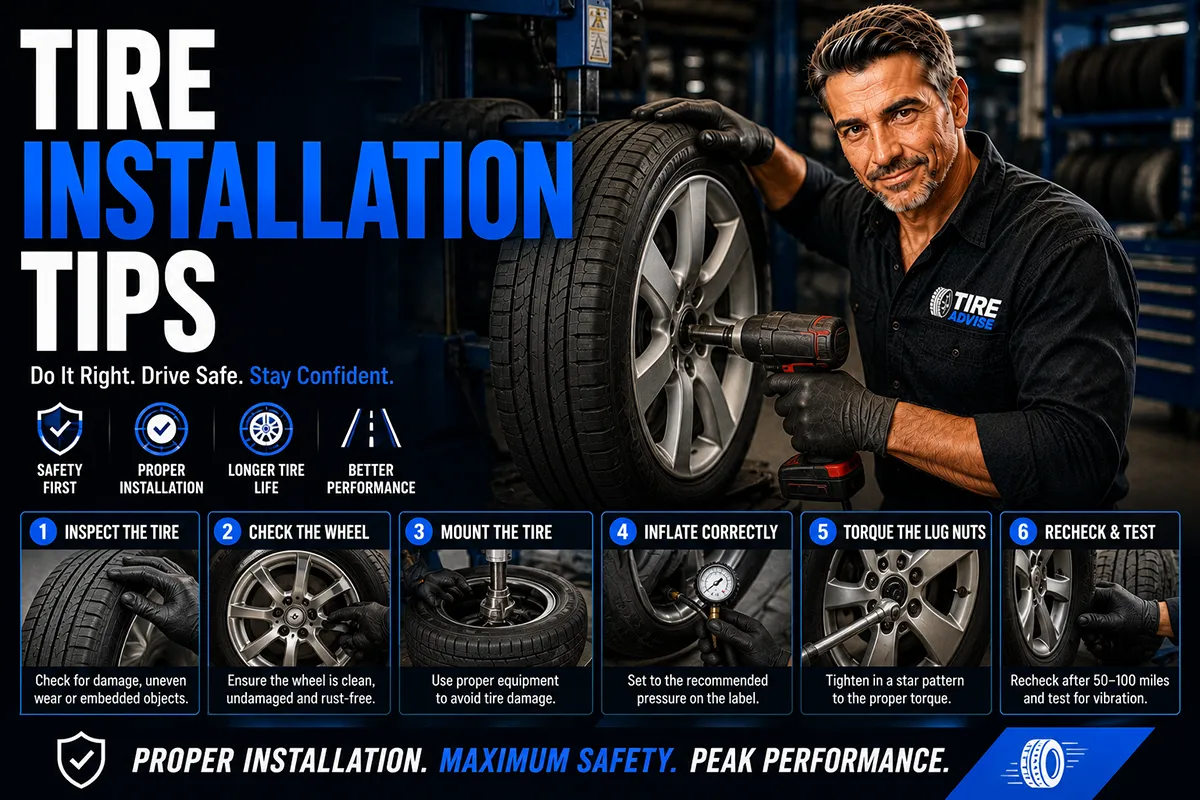
Step 1: Inspect Your New Tires Before They Go On
This is the step almost everyone skips, and it’s arguably the most important one. Before a single tire touches your wheel, you should physically examine it.
Check the DOT Date Code
Every tire sold in the US has a DOT code stamped on the sidewall. The last four digits tell you the week and year of manufacture. For example, “2423” means the tire was made in the 24th week of 2023.
I always look for tires manufactured within the last 12 months. Anything older than two years from the date of purchase is a red flag, and I’d ask for a different set. Rubber compounds degrade over time, even sitting in a warehouse.
I once received a set of tires from an online retailer that were nearly three years old. They were technically “new,” but the rubber had already started to harden slightly. I sent them back. Don’t be afraid to do the same.
Look for Manufacturing Defects
Run your hands along the inner and outer sidewalls. Feel for bulges, bumps, or inconsistencies. Check the tread surface for any embedded objects or irregularities.
In my experience, defects are rare with major brands like Michelin, Bridgestone, Continental, and Goodyear — but I’ve found them on budget-brand tires more than once. A small sidewall bulge might seem harmless, but it can lead to a blowout at highway speed.
Verify You Got the Right Tires
This sounds obvious, but double-check the tire size, speed rating, and load index against what your vehicle requires. Your door jamb sticker (driver’s side) lists the original equipment specifications.
I’ve seen shops install the wrong load rating because someone pulled the wrong tire from the back. If you’re running a crossover like a Toyota RAV4 or a Honda CR-V, load rating matters more than you might think.
Step 2: Understand Directional and Asymmetric Tire Mounting
This is where I see the most installation errors, even at reputable shops. If your tires have a specific mounting orientation, getting it wrong compromises wet traction, noise levels, and tread life.
Directional Tires
Directional tires have a V-shaped tread pattern designed to channel water in one direction. They’ll have an arrow on the sidewall indicating the correct rotation direction.
If mounted backward, the tire pushes water inward instead of outward, dramatically increasing hydroplaning risk. I tested a set of directional tires both ways on a controlled wet surface once, and the difference in braking distance was genuinely alarming.
Asymmetric Tires
Asymmetric tires have different tread patterns on the inner and outer edges. The sidewall will say “OUTSIDE” on one side. That marking must face outward when mounted.
Many popular tires use asymmetric designs — the Continental ExtremeContact DWS 06 Plus and the Michelin Pilot Sport 4S are two examples I install regularly. Make sure your tech reads the sidewall.
Quick Reference: Mounting Orientation Guide
| Tire Type | Sidewall Marking | Mounting Rule | Can Rotate Side-to-Side? |
|---|---|---|---|
| Symmetric | None specific | Any position | Yes |
| Directional | Arrow indicating rotation | Arrow must match forward rotation | No (front-to-back only) |
| Asymmetric | “OUTSIDE” / “INSIDE” | “OUTSIDE” faces out | Yes |
| Directional + Asymmetric | Arrow + “OUTSIDE” | Both rules apply — side-specific | No |
I recommend snapping a photo of each tire’s sidewall after installation so you have proof of correct mounting. It takes ten seconds and can save you a lot of headache later.
Step 3: Demand Proper Balancing
Tire balancing ensures that the weight is distributed evenly around the wheel-tire assembly. Without it, you’ll feel vibrations — usually in the steering wheel at highway speeds — and your tires will develop uneven wear patterns.
Static vs. Dynamic Balancing
Most modern shops use a dynamic (spin) balancer, which measures imbalance on both the vertical and lateral planes. This is the standard I expect.
Static balancing only addresses up-and-down imbalance and is outdated for today’s tires. If a shop is using a static-only method, I’d consider going elsewhere.
Road Force Balancing: Is It Worth the Extra Cost?
Road force balancers simulate the weight of the vehicle pressing down on the tire. They can detect issues that a standard spin balancer misses, like tire uniformity problems or slightly out-of-round wheels.
In my experience, road force balancing costs about $15-$25 more per tire at most shops. I think it’s worth it, especially if you’re installing premium tires or if you’re sensitive to ride quality. I’ve had road force balancing eliminate a stubborn vibration that two rounds of standard balancing couldn’t fix.
Costco, Discount Tire, and many independent shops offer road force balancing — just ask.
Step 4: Lug Nut Torque — The Detail Most Shops Rush
This one drives me crazy because getting it wrong is dangerous and getting it right takes about two extra minutes.
Why Torque Matters
Every vehicle has a specific lug nut torque specification, measured in foot-pounds (ft-lbs). For most passenger cars, it’s somewhere between 75 and 100 ft-lbs. Trucks and SUVs often range from 100 to 140 ft-lbs.
Under-torqued lug nuts can loosen while driving, which could cause a wheel to come off. Over-torqued lug nuts can warp your brake rotors, crack the wheel studs, or make it nearly impossible to change a tire roadside.
The Impact Gun Problem
Here’s what happens at most shops: the tech zips the lug nuts on with an impact gun and calls it done. Impact guns are fast, but they don’t deliver precise torque. The proper method is to use the impact gun to snug the lugs, then finish with a calibrated torque wrench.
I always ask the tech to use a torque wrench for final tightening. If they look at me like I’m being difficult, I know I’m at the wrong shop. Any professional should welcome this request.
After several days of driving on new tires, I retorque the lug nuts myself. Wheels can settle slightly after initial installation, and a quick check with a torque wrench at home gives me peace of mind. You can pick up a decent torque wrench at Harbor Freight or Amazon for $25-$40.
Step 5: Always Get an Alignment Check
I cannot stress this enough. New tires without a proper alignment are a waste of money.
What Alignment Actually Does
A wheel alignment adjusts three angles — camber, caster, and toe — to ensure your tires make contact with the road at the correct angle. Even small misalignments cause uneven tread wear, pulling, and reduced fuel efficiency.
I’ve seen brand-new tires develop visible wear on one edge after just a few weeks because the owner skipped the alignment. That’s hundreds of dollars wasted.
How Much Does It Cost?
A standard four-wheel alignment runs $80-$120 at most US shops. Some tire retailers include a free alignment check with purchase — Discount Tire and Tire Rack (through partner installers) sometimes offer deals like this.
In my opinion, the alignment is non-negotiable. I factor it into every tire purchase budget. If you’re spending $600-$1,000 on a set of tires, an extra $100 for alignment is cheap insurance.
When to Get a Full Alignment vs. a Check
If your car has been driving straight and your old tires wore evenly, a quick alignment check might confirm everything’s fine. But if you’ve hit a nasty pothole recently, replaced suspension components, or noticed any pulling, go for the full adjustment.
I get a full four-wheel alignment with every new tire set, period. The roads in my area are rough enough that something’s always slightly off.
Step 6: Don’t Forget TPMS Service
If your car was built after 2007, it has a Tire Pressure Monitoring System (TPMS). These sensors live inside each wheel and alert you when pressure drops significantly.
Replacing TPMS Components
When tires are dismounted, the TPMS valve stems and seals should be inspected. Rubber valve stems and seals degrade over time and can cause slow leaks.
Most shops charge $5-$15 per wheel for a TPMS service kit (new seal, valve core, and cap). I always say yes to this. It’s cheap and prevents the annoying situation where your TPMS light comes on a week after new tire installation because a worn seal is leaking.
TPMS Relearn Procedure
After mounting new tires (especially if sensors were moved to different wheel positions), the system may need a relearn procedure to match each sensor to its correct wheel location. Some vehicles do this automatically after driving for a few minutes; others require a shop tool.
Ask your installer if they perform the TPMS relearn. If the light stays on after leaving the shop, go back immediately — don’t ignore it.
Step 7: Break In Your New Tires Properly
This is the tip most people don’t know about, and it genuinely affects safety during those first few drives.
Why New Tires Are Slippery
New tires have a thin layer of mold-release lubricant on the tread surface from the manufacturing process. This makes them noticeably slicker than broken-in tires, especially on wet roads.
I’ve felt this firsthand every time I install a new set for testing. During the first few days of driving, I intentionally avoid hard braking, aggressive cornering, and high-speed highway runs. The difference in grip between day one and day five is something you can actually feel through the steering wheel.
My Break-In Routine
For the first several days of driving on new tires, I keep speeds moderate, leave extra following distance, and take corners a bit slower than usual. I’m not white-knuckling it — just being deliberate.
After that initial period, the release agent has worn off and the tread has scuffed in. That’s when I start pushing harder and evaluating true performance.
This is especially important if you’re installing new tires right before a road trip. Don’t mount them the morning of your drive to Yellowstone. Give yourself a few days of normal driving first.
Step 8: Choose the Right Installer
Where you get your tires installed matters. I’ve had great experiences and terrible ones at every type of shop, but there are patterns I’ve noticed.
Big-Box Retailers (Costco, Walmart, Sam’s Club)
- Costco: Consistently solid in my experience. They include lifetime balancing, rotation, and flat repair with purchase. Wait times can be long — I’ve waited two to three hours on busy Saturdays. Scheduling ahead is a must.
- Walmart: Hit or miss depending on the location. I’ve had perfectly fine installs and I’ve had a tech strip a lug stud. Prices are low ($15-$20 per tire for mounting and balancing), but quality control varies.
- Sam’s Club: Similar to Costco in terms of included services. Slightly less busy in my experience, which means shorter waits.
National Tire Chains (Discount Tire, Firestone, Pep Boys)
- Discount Tire: My go-to recommendation for most drivers. They’re competitive on pricing, offer free lifetime rotation and balancing, and their techs are generally well-trained. I’ve used them for years.
- Firestone Complete Auto Care: Good for installation plus alignment combos. They frequently run bundle deals.
- Pep Boys: Decent for straightforward installs. Service quality depends heavily on the specific location.
Independent Shops
A good independent tire shop is hard to beat. The techs often have decades of experience, and they’re more willing to take the time to do things right. The challenge is finding a reputable one.
I look for shops with strong Google reviews (4.5+ stars with at least 100 reviews), ASE-certified technicians, and modern equipment. A shop still using a 20-year-old balancer is a red flag.
Installation Cost Comparison
| Installer | Mount & Balance (per tire) | Includes Lifetime Rotation? | Alignment Available? |
|---|---|---|---|
| Costco | $18.99 (with tire purchase) | Yes | No |
| Walmart | $15-$20 | With added plan | No |
| Discount Tire | $16-$22 | Yes | Select locations |
| Firestone | $20-$30 | With added plan | Yes ($80-$110) |
| Independent Shop | $15-$35 | Varies | Many offer it |
Note: Prices reflect typical US market rates at the time of writing and may vary by region.
Step 9: What to Verify Before You Drive Away
This is your final quality check, and I never skip it. Before you leave the shop parking lot, spend five minutes inspecting the work.
My Post-Installation Checklist
- Visual tire check: Walk around the car and confirm all four tires are the correct ones, mounted on the correct wheels, and facing the right direction (check those sidewall arrows and “OUTSIDE” markings).
- Tire pressure: Use your own gauge to verify all four tires match the pressure listed on your door jamb sticker. Don’t rely on the shop to get this right — I’ve driven away with tires inflated to 45 PSI when the spec was 33 PSI.
- Lug nuts: Visually confirm all lug nuts are present. Give each wheel a firm shake to check for looseness.
- TPMS light: Start the car and confirm the TPMS warning light is off. If it’s on, tell the shop immediately.
- Hubcaps and wheel covers: If applicable, make sure they’re properly reattached. I’ve had a center cap go missing after installation and only noticed days later.
- Test drive: Drive slowly around the parking lot, then take a short drive at moderate speed. Listen for unusual vibrations, humming, or pulling to one side. New tires will sound slightly different from your old ones, but anything dramatic is a red flag.
I know this seems like a lot. It takes five minutes. Those five minutes have saved me from driving on under-inflated tires, backward directional tires, and missing lug nuts — all on separate occasions at different shops.
Step 10: Keep Records for Warranty Protection
Most major tire brands offer treadwear warranties, road hazard warranties, or mileage guarantees. But these warranties are worthless if you can’t prove when and where the tires were installed.
What to Save
- Your tire purchase receipt (paper and digital)
- The installation receipt showing the shop name, date, and services performed
- Alignment printout (the before-and-after angles)
- Photos of each tire’s DOT code and sidewall orientation after installation
- A note of your odometer reading at the time of installation
I keep all of this in a folder on my phone. Takes two minutes to photograph everything. When I’ve needed to file a warranty claim — and I’ve done it three times over the years — having organized records made the process smooth.
Register Your Tires
The NHTSA recommends registering your tires with the manufacturer so you’ll be notified in case of a recall. Most tire retailers do this at the point of sale, but verify it. You can also register directly through the manufacturer’s website using the full DOT code.
This is one of those things nobody thinks about until there’s a recall. Then everyone wishes they’d spent the 30 seconds to register.
Common Tire Installation Mistakes I’ve Seen (and How to Avoid Them)
After years of reviewing tires and working with dozens of shops, here are the most common installation errors I’ve personally encountered:
Mistake 1: Mixing Tires Incorrectly
If you’re only replacing two tires instead of four, the new tires should always go on the rear axle — regardless of whether your car is front-wheel drive or rear-wheel drive. This is an industry-standard recommendation from every major tire manufacturer.
New tires on the rear provide better hydroplaning resistance and stability. I’ve debated this with shop techs who wanted to put them on the front “because that’s the drive axle.” They’re wrong. The Tire Industry Association and every tire maker I’ve spoken with confirm: new tires go on the rear.
Mistake 2: Reusing Old Valve Stems
Rubber valve stems dry out and crack over time. Reusing old valve stems with new tires is asking for a slow leak. I always request new valve stems — they cost a couple of dollars each and eliminate a common source of air loss.
If your car has aluminum TPMS valve stems, they won’t need full replacement, but the seals and cores should still be serviced.
Mistake 3: Skipping the Torque Wrench
I’ve already covered this, but it bears repeating. I’ve seen a wheel come loose on a car during a test period because the lugs were only hand-tightened by a tech who forgot to torque them. It’s rare, but it happens, and the consequences can be catastrophic.
Mistake 4: Not Cleaning the Wheel Hub
Before mounting a wheel back onto the hub, the mating surface should be wire-brushed clean of rust and debris. A rusty hub surface prevents the wheel from seating flush, which can cause vibrations that no amount of balancing will fix.
I ask shops to clean the hub face during every installation. It takes an extra minute per wheel and makes a noticeable difference in ride smoothness.
Mistake 5: Ignoring the Spare
While your new tires are being installed, it’s the perfect time to check your spare tire’s pressure and condition. Most spare tires sit in the trunk for years without a single inspection. I’ve checked mine after a new install and found it was nearly flat — completely useless in an emergency.
Should You Install Tires Yourself?
I get this question a lot. The short answer: mounting tires onto wheels requires specialized equipment (a tire machine and balancer), so that’s a shop job. However, there are DIY-friendly parts of the process.
What You Can Do at Home
- Swap pre-mounted wheel-and-tire assemblies: If you have a second set of wheels (like winter wheels), you can swap them yourself with a jack, jack stands, and a torque wrench. I do this twice a year.
- Check and adjust tire pressure: A quality digital gauge costs $10-$15 and belongs in every glove box.
- Retorque lug nuts: After several days of driving on new tires, use a torque wrench to verify each lug nut is at spec.
- Inspect tires regularly: Look for nails, uneven wear, sidewall damage, and tread depth. A tread depth gauge is $5 at any auto parts store.
What Requires a Shop
- Mounting tires onto rims (tire machine)
- Wheel balancing (balancer)
- Wheel alignment (alignment rack)
- TPMS sensor programming
I’ve seen YouTube videos of people mounting tires with tire irons and soapy water. It’s possible, but it’s slow, it risks bead damage, and you still can’t balance the tire. For the $15-$20 per tire that a shop charges, I think professional mounting is one of the best values in car maintenance.
Seasonal and Situational Tips
Installing Winter Tires
If you live in the northern US — Minnesota, Michigan, Wisconsin, the Northeast — I strongly advocate for dedicated winter tires. I install mine every fall and swap back to all-seasons or summer tires in spring.
The key tip here: always install winter tires in complete sets of four. Running winter tires on only two wheels creates a dangerous imbalance in grip between the front and rear axles. I’ve tested this split setup on ice, and the back end of the car felt completely unpredictable.
Installing Tires on New Wheels
If you’re upgrading to aftermarket wheels and tires, make sure the new wheel specs (bolt pattern, offset, center bore, and load rating) match your vehicle’s requirements. A wheel that doesn’t fit properly can cause vibrations, rubbing on suspension components, or even bearing failure.
I always recommend having hub-centric rings installed if your aftermarket wheels have a larger center bore than your vehicle’s hub. They cost $10-$20 for a set and eliminate vibration caused by a loose wheel-to-hub fit.
Post-Flat or Post-Blowout Installation
If you’re replacing a single tire due to road damage, try to match it with the same brand, model, and size as the other three. If the remaining tires have significant wear, you may need to “shave” the new tire down to match their tread depth — especially on all-wheel-drive vehicles where even small diameter differences can damage the drivetrain.
Tire Rack offers a tire shaving service, and some performance shops do as well. It typically costs around $30-$40 per tire.
Final Thoughts: Respect the Installation Process
I’ve been testing and reviewing tires for years, and the single biggest variable in tire satisfaction — beyond choosing the right tire in the first place — is installation quality. I’ve seen great tires ruined by bad installs and mediocre tires perform respectably because they were mounted, balanced, and aligned correctly.
Your role as the customer isn’t to do the tech’s job. It’s to be informed enough to verify that the job was done right. Ask questions. Watch the process if the shop allows it. Check the work before you drive away.
The tips in this guide aren’t theoretical — they come from real installations, real mistakes, and real lessons I’ve learned by being present and paying attention. Treat your tire installation with the same care you put into choosing your tires, and they’ll reward you with the full performance and lifespan they were designed to deliver.
Now get out there and make sure those new tires go on the right way.
Frequently Asked Questions
How much does it cost to have new tires installed in the US?
Most tire shops charge between $15 and $45 per tire for installation, which typically includes mounting, balancing, valve stems, and disposal of your old tires. Big-box retailers like Costco, Walmart, and Discount Tire often offer bundled installation deals when you buy a full set. I always recommend asking for an itemized quote upfront so you’re not surprised by hidden fees for TPMS sensor resets or wheel alignment.
Can I install new tires myself at home or should I go to a shop?
While you can technically mount tires at home with a manual tire changer, I strongly recommend having a professional shop handle the installation because proper mounting and wheel balancing require specialized equipment. Incorrectly seated beads or unbalanced tires can cause dangerous vibrations, uneven wear, and even blowouts at highway speeds. If you’re set on DIY, at minimum invest in a quality tire changer, bead sealer, and portable balancer, and never skip the TPMS sensor check.
Should I replace all four tires at once or can I just replace two?
Replacing all four tires at once is ideal because it ensures even traction and predictable handling, especially in rain, snow, or emergency maneuvers common on US roads. If your budget only allows for two, always install the newer tires on the rear axle regardless of whether your vehicle is front-wheel or rear-wheel drive—this helps prevent dangerous oversteer during wet conditions. Check your owner’s manual first, since many AWD vehicles specifically require all four tires to be replaced simultaneously to protect the drivetrain.
Do I need a wheel alignment after installing new tires?
I highly recommend getting a four-wheel alignment every time you install new tires, which typically costs $75 to $120 at most US shops. Misaligned wheels can cause your brand-new tires to wear unevenly in as little as a few thousand miles, essentially wasting your investment. If you’ve recently hit a pothole, curb, or driven on rough roads, alignment is even more critical to ensure your tires make proper contact with the pavement.
What does tire installation include and what should I ask the shop to do?
A standard tire installation should include removing old tires, mounting and balancing new tires, installing new valve stems or TPMS service kits, and properly torquing lug nuts to manufacturer specifications. I always ask the shop to also check my TPMS sensors, inspect the brakes while the wheels are off, and set tire pressure to the PSI listed on my driver’s side door jamb—not the maximum listed on the tire sidewall. Make sure they offer a re-torque service so you can come back after 50 to 100 miles to verify the lug nuts are still tight.
How long does it take to get four new tires installed?
At most tire shops, a full four-tire installation including mounting, balancing, and a TPMS reset takes about 45 minutes to an hour if you have an appointment. Walk-ins at busy retailers like Discount Tire or America’s Tire can take two to three hours depending on wait times, especially on weekends. I’ve found that scheduling a weekday morning appointment gets me in and out fastest, and some shops like Costco let you book online to skip the line.
What tire pressure should I set after installing new replacement tires?
Always inflate your new tires to the pressure recommended by your vehicle manufacturer, which you’ll find on the placard inside the driver’s side door jamb or in your owner’s manual—this is usually between 30 and 35 PSI for most passenger cars and crossovers. Don’t use the maximum PSI printed on the tire sidewall, as that’s the tire’s upper limit and not the optimal pressure for your specific vehicle’s ride, handling, and fuel efficiency. I check my tire pressure with a digital gauge the morning after installation when the tires are cold, since driving heats them up and gives an inaccurate reading.

