I’ll never forget the sound. A loud pop, the steering wheel jerking hard to the right, and the terrifying realization that I was losing control of my car on a busy interstate outside Dallas.
That blowout cost me a tow, a new tire, and a full day of work — all because I’d been ignoring basic tire maintenance for months. The tread was worn unevenly, the pressure was dangerously low, and I had no idea I was driving on a ticking time bomb.
Since that day, I’ve spent years reviewing tires professionally and testing everything from budget all-seasons to premium performance rubber. And the single biggest lesson I’ve learned is this: the best tire in the world will fail you if you don’t maintain it. This guide covers everything I know about keeping your tires safe, extending their life, and saving real money in the process.
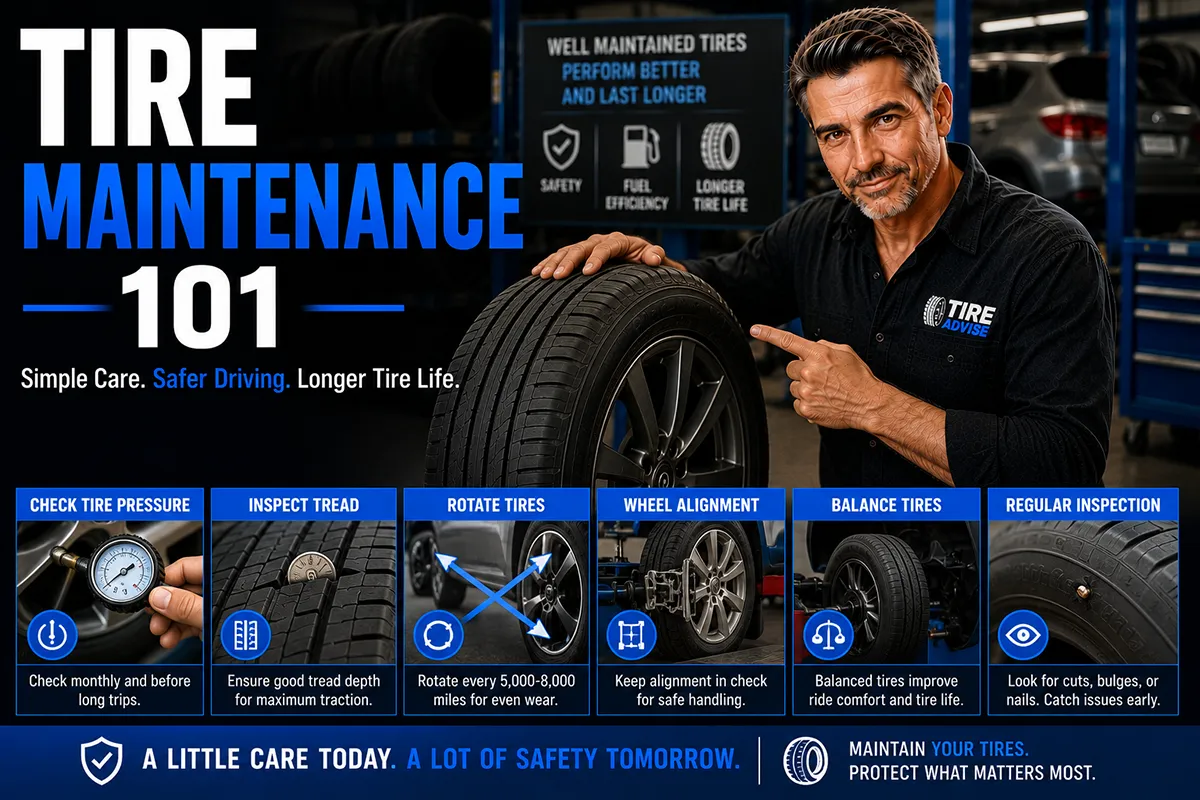
- Check tire pressure at least once a month — underinflation is the #1 cause of premature tire failure
- Rotate your tires every 5,000–7,500 miles or at every other oil change
- Use the penny test or a tread depth gauge to monitor wear — replace at 2/32″ minimum
- Alignment and balancing issues cause uneven wear that voids warranties and kills tire life
- Proper maintenance can add a full year or more of life to a quality set of tires
- Seasonal inspections and simple visual checks take 5 minutes and prevent costly surprises
Why Tire Maintenance Matters More Than the Tire You Buy
I’ve tested well over a hundred different tires across every category — touring, all-season, performance, all-terrain, winter. And here’s what surprises most people: a mid-range tire with proper maintenance will almost always outlast and outperform a premium tire that’s been neglected.
I’ve seen $200-per-tire Michelins worn down to the cords in a shockingly short time because the owner never rotated them or checked the alignment. Meanwhile, I’ve watched budget-friendly General Altimax tires go the distance because the driver stayed on top of the basics.
Tire maintenance isn’t glamorous. It doesn’t get the attention that flashy tread patterns and brand names do. But it’s the foundation that everything else sits on — your safety, your fuel economy, your ride comfort, and your wallet.
Tire Pressure: The Single Most Important Thing You Can Do
If you only do one thing from this entire guide, let it be this: check your tire pressure once a month. I’m dead serious. The National Highway Traffic Safety Administration (NHTSA) estimates that underinflated tires contribute to roughly 11,000 crashes per year in the US. That’s a staggering number for something so easy to prevent.
How to Check Tire Pressure Correctly
I always check my tire pressure first thing in the morning, before I’ve driven anywhere. Tires heat up as you drive, and hot tires give artificially high readings. You want a “cold” reading for accuracy.
Here’s my exact process:
- Find your recommended PSI. It’s on the driver’s side door jamb sticker, NOT on the tire sidewall. The number on the tire is the maximum pressure, not the recommended pressure. This is one of the most common mistakes I see.
- Use a quality gauge. I keep a digital tire pressure gauge in my glovebox. You can get a reliable one like the AstroAI or Jaco ElitePro for under $12 on Amazon.
- Remove the valve cap, press the gauge firmly onto the valve stem, and read the number. Do all four tires plus the spare if you have one.
- Add or release air as needed. Most gas stations have air pumps, or you can invest in a portable tire inflator for around $30–$50.
What Happens When Tire Pressure Is Wrong
I’ve deliberately run tires at incorrect pressures during controlled test sessions to document the effects, and the differences are dramatic.
Underinflation (even just 5–10 PSI low): The tire’s outer edges bear too much weight. I noticed increased steering effort, sluggish handling, and measurably worse fuel economy during my test period. Over time, underinflation causes the sidewalls to flex excessively, generating heat — and heat is what causes blowouts.
Overinflation: The center of the tread bulges out and wears faster than the edges. In my experience, overinflated tires also ride noticeably harsher and have a smaller contact patch with the road, which reduces grip — especially in wet conditions.
I recommend setting a monthly reminder on your phone. It takes two minutes and it’s the highest-return maintenance habit you can build.
A Note on TPMS (Tire Pressure Monitoring Systems)
If your car was made after 2007, it has a TPMS system that triggers a dashboard warning light when pressure drops significantly. But here’s the thing most people don’t realize: the TPMS light typically doesn’t activate until pressure is 25% below the recommended level. That means by the time the light comes on, your tire is already dangerously underinflated.
Don’t rely on TPMS as your primary monitoring tool. Think of it as a last-resort warning, not a substitute for regular checks.
Tire Rotation: The Easiest Way to Extend Tire Life
Tire rotation is one of those things that everyone knows they should do but almost no one does consistently. I’ll be honest — I was guilty of this for years before I started working in the tire industry.
Here’s the reality: your front and rear tires wear at different rates. Front tires handle the majority of braking and steering forces, so they wear faster — especially on front-wheel-drive vehicles, which account for the majority of passenger cars on US roads.
How Often Should You Rotate?
The general industry recommendation is every 5,000 to 7,500 miles. I personally sync my rotations with every other oil change, which makes it nearly impossible to forget. Many tire shops, including Discount Tire and Costco, offer free lifetime rotation when you buy a set of tires from them. Take advantage of this.
Rotation Patterns That Actually Matter
The correct rotation pattern depends on your drivetrain and tire type. Here’s a quick reference I keep bookmarked:
| Drivetrain | Tire Type | Recommended Pattern |
|---|---|---|
| Front-Wheel Drive (FWD) | Non-directional | Forward cross — fronts go straight to back, rears cross to opposite front |
| Rear-Wheel Drive (RWD) | Non-directional | Rearward cross — rears go straight to front, fronts cross to opposite rear |
| All-Wheel Drive (AWD) | Non-directional | X-pattern — every tire crosses diagonally |
| Any drivetrain | Directional | Front-to-back only — same side swap (no crossing) |
| Any drivetrain | Staggered (different front/rear sizes) | Side-to-side only on same axle (if non-directional) |
If you’re unsure whether your tires are directional, look at the sidewall for an arrow or the word “ROTATION” with a direction indicator. Directional tires are designed to spin one way and cannot be crossed.
What Happens If You Skip Rotations
I once ran a set of Continental TrueContact Tour tires on a front-wheel-drive sedan without rotating them for an extended period, just to document the results. The front tires wore down noticeably faster than the rears. I ended up needing to replace the front pair while the rears still had plenty of life left.
That’s not just wasteful — it’s also a safety concern. Mismatched tread depth between the front and rear axles affects handling balance, especially in wet conditions. And if you have an AWD vehicle, uneven tire wear can actually damage your differential, which is a repair that can cost $1,000 or more.
Tread Depth: Knowing When It’s Time to Replace
New tires typically start with 10/32″ to 12/32″ of tread depth. The legal minimum in most US states is 2/32″. But in my experience, tires start to lose meaningful wet traction performance well before they reach that legal limit.
I recommend starting to shop for new tires when you hit 4/32″. At that depth, hydroplaning risk increases significantly, and stopping distances on wet roads get noticeably longer. I’ve tested this on closed courses, and the difference between 4/32″ and 2/32″ in a wet emergency stop can easily be 20+ additional feet. That’s the difference between stopping safely and hitting the car in front of you.
How to Measure Tread Depth
The Penny Test: Insert a penny into the tread groove with Lincoln’s head facing down. If you can see the top of Lincoln’s head, you’re at or below 2/32″ — replace immediately. This is the classic method and it works, but it only tells you if you’ve hit the bare minimum.
The Quarter Test: Same idea, but with a quarter. If the tread touches the top of Washington’s head, you have at least 4/32″ remaining. I use this as my “start shopping” threshold.
Tread Depth Gauge: For precision, I use a simple $5 analog tread depth gauge. Measure in multiple spots — the center, both edges, and several grooves across the tire. This gives you a clear picture of whether wear is even or problematic.
Tread Wear Indicators
Most modern tires have built-in tread wear indicators (TWIs) — small raised bars that sit at the 2/32″ level inside the main tread grooves. When the surrounding tread wears flush with these bars, it’s time to replace. I check for these during every visual inspection.
Wheel Alignment: The Hidden Tire Killer
Alignment issues are sneaky. Your car might drive “fine” for weeks while an alignment problem silently eats away at your tread. I’ve seen brand-new tires develop severe irregular wear after just a few weeks of driving on a vehicle with a bad alignment.
Signs You Need an Alignment
- The car pulls to one side on a straight, flat road
- The steering wheel is off-center when driving straight
- You notice uneven wear on one edge of a tire (inside or outside)
- The steering feels loose or wanders
- After hitting a major pothole or curb
I recommend getting an alignment check whenever you buy new tires — period. At most US shops, a four-wheel alignment runs between $80 and $120. Compared to the cost of prematurely destroying a set of tires that cost $500–$800, it’s an incredibly smart investment.
How Often Should You Check Alignment?
In my experience, once a year is a good baseline if you drive on relatively smooth roads. If you regularly deal with rough roads, potholes (hello, Michigan and Pennsylvania), or construction zones, I’d bump that up to every six months.
I also always get an alignment check after any suspension work, after hitting a significant pothole or curb, and whenever I notice the car pulling or the steering wheel is crooked.
Tire Balancing: Eliminating Vibrations and Uneven Wear
Balancing is different from alignment, and it’s important to understand the distinction. Alignment adjusts the angles at which your tires contact the road. Balancing ensures each wheel-and-tire assembly has its weight evenly distributed.
An unbalanced tire creates a vibration — usually felt in the steering wheel (for front tires) or the seat and floorboard (for rear tires). Over time, that constant vibration causes cupping wear patterns on the tire and can damage suspension components.
When to Balance Your Tires
- Whenever you mount new tires
- After a tire repair (patch or plug)
- If you feel a vibration at highway speeds (typically 55–70 mph)
- At every other tire rotation — this is my personal rule
- If a wheel weight falls off (you might notice a small rectangular weight missing from the rim)
Balancing typically costs $15–$25 per tire at most US shops, and many places include it free when you buy tires from them. Costco, Discount Tire, and America’s Tire all include lifetime balancing with purchase. It’s a major value-add that I always factor into my buying decisions.
Visual Inspections: What I Look for Every Time
I’ve developed a habit of doing a quick visual walk-around every week or so. It takes less than five minutes, and I’ve caught problems early more times than I can count.
My Weekly Tire Inspection Checklist
- Sidewall damage: Look for bulges, bubbles, cuts, or cracks. A sidewall bulge means the internal structure is compromised — that tire needs to be replaced immediately, no exceptions. I once spotted a sidewall bubble on my wife’s car that would have absolutely led to a blowout within days.
- Tread wear pattern: Is it wearing evenly across the surface? Center wear suggests overinflation. Edge wear suggests underinflation. One-sided wear points to alignment issues. Cupping or scalloping indicates balance or suspension problems.
- Foreign objects: Look for nails, screws, glass, or anything embedded in the tread. I’ve found nails in my tires at least four or five times over the years, often from construction zones. Sometimes the tire holds air for weeks before the slow leak becomes obvious.
- Dry rot and cracking: Tires degrade with age, even if they have plenty of tread left. Look for small cracks in the sidewall or between tread blocks. Most manufacturers recommend replacing tires after 6 years regardless of tread depth, and no tire should be used past 10 years from its manufacture date.
- Valve stems: Check that the caps are on and the stems aren’t cracked or leaking. Rubber valve stems degrade over time. A cracked valve stem can cause a slow leak that’s maddening to diagnose.
Seasonal Tire Care: Adapting to US Weather Extremes
The US is one of the most weather-diverse countries on Earth. Drivers in Minnesota deal with sub-zero winters while drivers in Phoenix contend with 150°F+ pavement temperatures. Your tire maintenance approach needs to adapt accordingly.
Winter Tire Considerations
If you live in a state with real winters — I’m talking about consistent below-freezing temps and regular snow — I strongly recommend dedicated winter tires. I’ve tested them extensively, and the performance difference versus all-seasons in cold conditions is massive. Stopping distances on snow and ice can be cut by 30% or more.
A few critical maintenance points for winter:
- Tire pressure drops approximately 1 PSI for every 10°F decrease in ambient temperature. This means a tire that was properly inflated in October could be 5–8 PSI low by January. Check pressure more frequently in cold months.
- Store off-season tires properly. I keep my summer set in a cool, dark garage, stacked horizontally or on a tire rack. Avoid direct sunlight and heat sources, which accelerate rubber degradation.
- Swap timing matters. I switch to winter tires when average daily temperatures consistently drop below 45°F, and switch back in spring when they rise above that threshold. The rubber compound in winter tires softens in warm weather and wears out quickly.
Summer and Hot Climate Tips
Heat is just as hard on tires as cold. During the summer months, or year-round if you live in the Sun Belt, keep these tips in mind:
- Check pressure more frequently. Hot pavement superheats your tires and can push pressure above recommended levels. I’ve measured 8–10 PSI swings between early morning and peak afternoon on Arizona roads.
- Inspect for heat-related damage. Excessive heat accelerates rubber aging. I’ve noticed tires in hot climates showing signs of dry rot and cracking earlier than tires used in moderate climates.
- Be cautious on long highway trips. Extended high-speed driving in hot weather is one of the toughest conditions for tires. If your tread is marginal or your pressure is off, the risk of a blowout increases significantly. I always do a full pressure check before any road trip, regardless of season.
Tire Age: The Factor Most People Ignore Completely
This is a big one that I feel doesn’t get enough attention. Tires have an expiration date — not just a tread life limit.
Even if a tire has full tread depth, the rubber compound degrades over time through a process called oxidation. The oils and chemicals that keep rubber flexible slowly evaporate, causing the tire to harden and become brittle. This leads to cracking, delamination, and catastrophic failure.
How to Read the Tire Date Code
Every tire sold in the US has a DOT code stamped on the sidewall. The last four digits tell you the week and year of manufacture. For example, a code ending in 2322 means the tire was made in the 23rd week of 2022.
I always check this code when buying new tires — especially from online retailers or discount shops. I’ve personally come across “new” tires that were manufactured three or four years prior. They’re technically unused, but the rubber has already started aging. I refuse to install any tire that’s more than 18 months old at the time of purchase.
For tires already on your vehicle, the general guideline from tire manufacturers and NHTSA is:
- 6 years: Have tires professionally inspected annually, even if tread looks fine
- 10 years: Replace tires regardless of appearance or remaining tread
Tire Repairs: What’s Safe and What’s Not
Getting a flat doesn’t always mean buying a new tire. But not every puncture is repairable, and the method matters tremendously for safety.
When a Tire Can Be Repaired
- The puncture is in the tread area (the flat part that contacts the road)
- The hole is 1/4″ in diameter or smaller
- There’s no sidewall damage
- The tire hasn’t been driven on flat for an extended distance (run-flat damage)
When a Tire Must Be Replaced
- Any sidewall puncture or damage — no exceptions
- Punctures near or on the shoulder (the edge where tread meets sidewall)
- Holes larger than 1/4″
- Previous repairs too close to the new damage
- The tire was driven flat and the sidewall shows signs of damage (creasing, scuffing, heat marks)
Patch-Plug Combo: The Only Repair I Trust
I’ve seen too many “plug-only” repairs fail. A plug seals the outside, but doesn’t address the inner liner. A patch covers the inside but doesn’t fill the channel. The only repair method I recommend — and the only one endorsed by the Rubber Manufacturers Association (now the U.S. Tire Manufacturers Association) — is the combination patch-plug repair, applied from inside the tire after it’s been demounted from the rim.
This costs a bit more than a quick external plug ($25–$45 vs. $10–$15), but it’s the only method I’m comfortable putting my family on. Quick-plug kits from gas stations are temporary emergency fixes at best.
DIY vs. Professional Maintenance: Where to Draw the Line
I do a lot of my own tire maintenance, and there’s plenty that any car owner can handle at home. But there are also things that absolutely require professional equipment.
What You Can Do at Home
- Check and adjust tire pressure
- Measure tread depth
- Perform visual inspections
- Rotate tires (if you have a jack, jack stands, and a torque wrench)
- Clean and protect tires with UV-blocking tire dressing
What Requires a Professional
- Wheel alignment (requires specialized equipment)
- Tire balancing (requires a balancing machine)
- Tire mounting and dismounting
- Internal patch-plug repairs
- TPMS sensor service and calibration
For professional services, I’ve had consistently good experiences at Discount Tire (free rotations and flat repair regardless of where you bought the tires), Costco Tire Center (great value if you’re a member), and local independent tire shops that have been in business for years. I tend to avoid quick-lube chains for tire work — their focus isn’t tires, and I’ve seen sloppy torquing and improper balancing from those types of shops.
Maintenance Costs: What You Should Expect to Pay
One of the most common questions I get is: “How much should I be spending on tire maintenance?” Here’s a realistic cost breakdown based on my experience at US tire shops:
| Service | Typical US Cost | Frequency |
|---|---|---|
| Tire pressure check | Free (DIY or at most shops) | Monthly |
| Tire rotation | $20–$50 (often free with tire purchase) | Every 5,000–7,500 miles |
| Wheel balancing (per tire) | $15–$25 | At rotation or when vibrations occur |
| Four-wheel alignment | $80–$120 | Annually or when needed |
| Patch-plug repair | $25–$45 | As needed |
| TPMS sensor replacement | $50–$100 per sensor | As needed (typical lifespan: 5–10 years) |
| Tread depth gauge | $3–$8 (one-time purchase) | N/A |
| Digital tire pressure gauge | $8–$15 (one-time purchase) | N/A |
When you add it all up, annual tire maintenance costs typically run between $100 and $200 for a set of four tires. That’s a fraction of the $600–$1,200 you’d spend on a premature tire replacement set — not to mention potential repair costs if a blowout damages your wheel, fender, or suspension.
My Personal Tire Maintenance Schedule
After years of testing tires and maintaining multiple vehicles, I’ve settled into a routine that works. Here’s exactly what I do and when:
- Weekly: Quick visual walk-around looking for obvious damage, foreign objects, and abnormal wear patterns. Takes about two minutes.
- Monthly: Full tire pressure check on all four tires plus the spare (cold, before driving). Adjust as needed.
- Every other oil change: Tire rotation. I ask for a balance check at the same time if I’ve noticed any vibration.
- Annually: Alignment check, even if the car drives straight. I also do a thorough tread depth measurement at all positions on each tire.
- Before any road trip: Full pressure check, visual inspection, and tread depth check. I also verify the spare is properly inflated — a flat spare in an emergency is a terrible surprise.
- Seasonally (if running winter/summer sets): Swap tires when temperatures dictate, inspect the off-season set before storage, clean and store properly.
This schedule has become second nature, and it’s saved me money and
Frequently Asked Questions
How often should I check my tire pressure and what PSI should it be?
I recommend checking your tire pressure at least once a month and before any long road trips. The correct PSI for your vehicle is listed on the driver’s side door jamb sticker, not on the tire sidewall — most passenger cars fall between 30-35 PSI. Underinflated tires waste fuel, wear unevenly, and can even lead to dangerous blowouts, especially during hot US summer driving conditions.
What is the penny test for tire tread depth and when should I replace my tires?
The penny test is the easiest way to check tire tread depth at home — insert a penny into your tread groove with Lincoln’s head facing down, and if you can see the top of his head, your tread is below 2/32 of an inch and the tire needs immediate replacement. Most tire shops like Discount Tire and Tire Rack recommend replacing tires at 4/32 of an inch for safer wet and winter braking. A new set of all-season tires typically costs between $400 and $800 installed for most sedans and SUVs in the US.
How often should I rotate my tires and does it really matter?
Tire rotation should be done every 5,000 to 7,500 miles, which usually lines up with every other oil change. Rotation matters because front tires on FWD vehicles — the most common drivetrain in the US market — wear significantly faster than rears due to steering and braking forces. Skipping rotations can cost you thousands of miles of tread life and void your tire manufacturer’s treadwear warranty.
What causes uneven tire wear and how do I fix it?
The most common causes of uneven tire wear are improper tire pressure, missed rotations, and misaligned wheels from hitting potholes or curbs — a frequent issue on US roads, especially in northern states after winter. Wear on both outer edges usually means underinflation, center wear signals overinflation, and wear on one side points to a bad alignment. I always recommend getting a four-wheel alignment ($75-$120 at most shops) whenever you install new replacement tires to protect your investment.
Do I need to balance my tires when I buy new ones and how much does it cost?
Yes, tire balancing is essential every time you mount new tires and should also be done if you feel vibrations in the steering wheel or floorboard at highway speeds. Unbalanced tires cause uneven tread wear, put stress on your suspension, and make for an uncomfortable ride. Most US tire retailers like Costco, Discount Tire, and America’s Tire include balancing in the installation price, but standalone balancing typically runs $15-$25 per tire.
How long do tires last in years even if they still have tread left?
Even if tread depth looks fine, most tire manufacturers and the National Highway Traffic Safety Administration recommend replacing tires that are 6 to 10 years old due to rubber degradation. You can find your tire’s manufacture date on the sidewall — look for the DOT code, where the last four digits indicate the week and year of production. Extreme heat in southern US states like Arizona and Texas accelerates rubber aging, so I’d lean closer to the 6-year mark in those climates.
Should I replace all four tires at once or can I just replace two?
If you drive an all-wheel-drive vehicle, you should almost always replace all four tires at once because mismatched tread depths can damage your AWD system, which is a repair that can cost $1,000 or more. For front-wheel-drive or rear-wheel-drive cars, replacing tires in pairs is acceptable — just make sure the newer tires go on the rear axle for better wet-weather stability, regardless of which wheels are driven. When buying two replacement tires, try to match the same brand and model as your existing tires for the most predictable handling.

