I once watched a friend destroy a brand-new set of tires within weeks because he didn’t bother checking whether his wheel specs actually matched what his car needed.
He assumed “close enough” was good enough. It wasn’t — and the $700 lesson he learned the hard way is exactly why I wrote this guide.
Whether you’re replacing worn-out tires, upgrading to a new wheel-and-tire package, or switching between summer and winter setups, getting the details right matters more than most people realize.
- Always start with your vehicle’s OEM tire size — it’s on the driver’s door jamb sticker.
- Understand bolt pattern, offset, and hub bore before buying any aftermarket wheel.
- Proper tire pressure, torque specs, and break-in procedures extend tire life dramatically.
- Mixing tire sizes or types on the same axle is dangerous and often illegal in some states.
- TPMS sensors must be addressed whenever you swap wheels — don’t skip this step.
- Budget $50–$120 per tire for mounting, balancing, alignment, and valve stems.
Why a Proper Wheel and Tire Setup Actually Matters
I’ve reviewed hundreds of tires over the years, and I can tell you with absolute certainty: even the best tire in the world will underperform if it’s mounted on the wrong wheel, inflated to the wrong pressure, or installed without a proper alignment. The setup is the foundation that everything else depends on.
A bad setup doesn’t just wear out your tires faster. It affects braking distance, fuel economy, ride comfort, and — most critically — your safety in emergency maneuvers or wet-road situations.
I’ve personally seen tires that should have lasted years get chewed up in a matter of months because someone skipped the alignment or ran the wrong offset. This guide is designed to prevent that from happening to you.
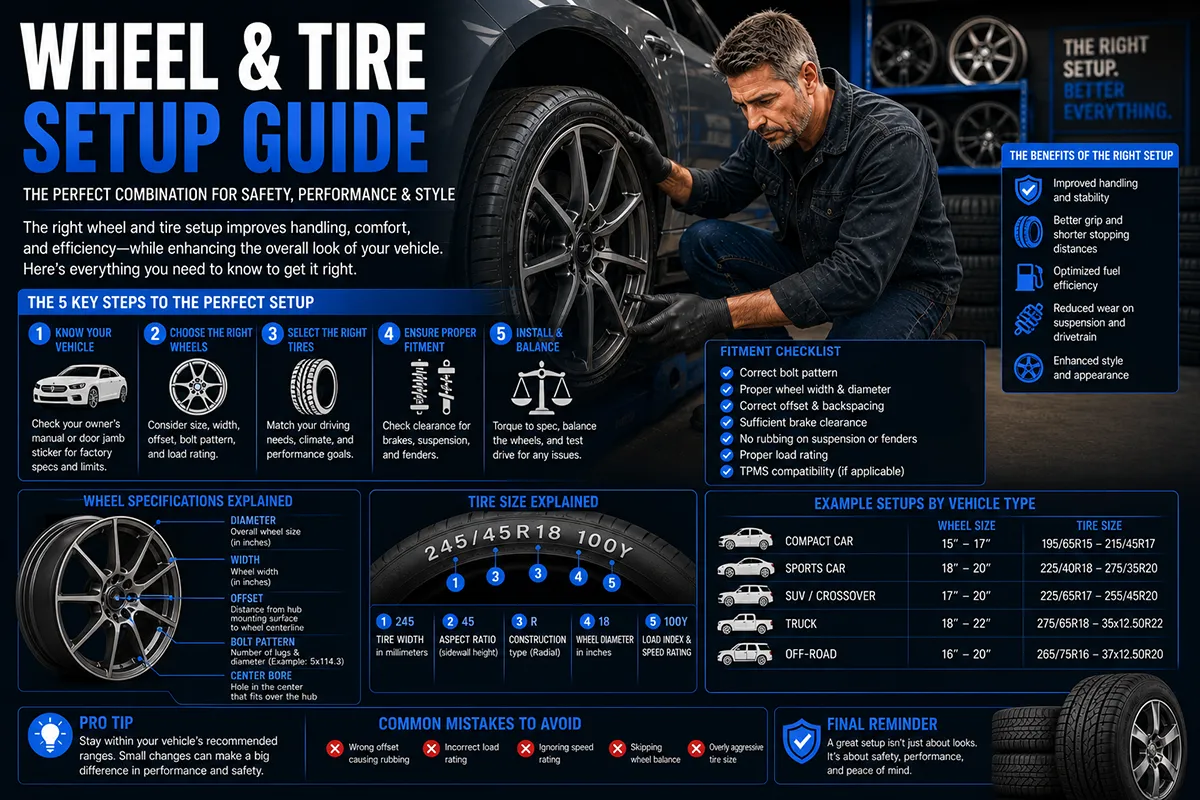
Step 1: Know Your Vehicle’s OEM Tire and Wheel Specs
Before you spend a single dollar, you need to know exactly what your car was designed to run. I always start here, and I recommend you do the same.
Where to Find Your Specs
Open your driver’s side door and look at the jamb. There’s a sticker — it’s been there since the car rolled off the assembly line — and it tells you the original tire size, recommended tire pressure (front and rear), and the vehicle’s gross weight rating.
Your owner’s manual has the same information, plus additional details about approved alternative sizes. I keep a photo of my door jamb sticker on my phone so I always have it when I’m shopping.
How to Read a Tire Size
Let’s say your sticker reads 225/65R17 102H. Here’s what each part means:
- 225 — The tire’s width in millimeters from sidewall to sidewall.
- 65 — The aspect ratio, meaning the sidewall height is 65% of the width.
- R — Radial construction (virtually all modern passenger tires are radial).
- 17 — The wheel diameter in inches that this tire fits.
- 102 — The load index (how much weight each tire can support).
- H — The speed rating (in this case, rated for sustained speeds up to 130 mph).
I cannot stress this enough: never downgrade your load index or speed rating from the OEM specification. Going up is fine. Going down is asking for trouble.
Step 2: Understanding Wheel Specifications
This is where most DIY buyers make their first mistake. Wheels aren’t just about diameter — there are several critical measurements that determine whether a wheel will actually fit your car safely.
Bolt Pattern
The bolt pattern (also called lug pattern) describes how many lugs your wheel has and the diameter of the circle they form. Common US patterns include 5×114.3 (very common on Hondas, Toyotas, and Nissans), 5×120 (BMW, many GM trucks), and 6×139.7 (full-size trucks and SUVs like the Silverado and F-150).
I’ve had readers ask me if they can “make” a different bolt pattern work with adapters. My answer: you can, but I don’t recommend it for daily drivers. Adapters add complexity, potential failure points, and can change your offset in ways that cause clearance issues.
Wheel Width
Every tire has an approved range of wheel widths it can be mounted on. A 225/65R17, for example, typically fits wheels that are 6 to 8 inches wide, with 6.5 inches being the ideal.
Mounting a tire on a wheel that’s too wide stretches the bead dangerously. Mounting on a wheel that’s too narrow pinches the tread and hurts handling. I always check the tire manufacturer’s spec sheet for the approved width range before buying wheels.
Offset and Backspacing
Offset is the distance from the wheel’s mounting surface to its centerline, measured in millimeters. A positive offset pushes the wheel inward (toward the suspension), while a negative offset pushes it outward (toward the fender).
In my experience, staying within 5mm of your factory offset is the sweet spot for avoiding rubbing, suspension stress, and premature bearing wear. Going beyond 10mm in either direction without modifications is risky on most vehicles.
Backspacing is a related measurement that’s more common in the truck and off-road world. It’s the distance from the mounting surface to the back edge of the wheel. If you’re buying wheels for an F-150 or a Jeep Wrangler, you’ll encounter this term a lot.
Hub Bore (Center Bore)
The hub bore is the center hole in the wheel that fits over the hub on your vehicle. OEM wheels are “hub-centric,” meaning the center bore is machined to fit your specific hub perfectly.
Aftermarket wheels usually have an oversized center bore to fit multiple vehicles. In that case, you absolutely need hub-centric rings — small plastic or metal rings that fill the gap. I always install them. Without them, you’re relying entirely on the lug nuts for centering, which can cause vibrations and uneven loading.
Step 3: Choosing the Right Tires for Your Driving Conditions
Once you know your size and wheel specs, it’s time to pick the actual rubber. I’ve tested tires across every major category, and the right choice depends entirely on where and how you drive.
Tire Category Comparison
| Tire Type | Best For | Limitations | Typical Price Range (per tire) |
|---|---|---|---|
| All-Season | Year-round driving in mild climates | Compromised in heavy snow and extreme heat | $80–$180 |
| Summer/Performance | Warm-weather grip, sporty handling | Dangerous below 40°F; shorter tread life | $120–$300 |
| Winter/Snow | Cold temps, snow, and ice | Wears quickly in warm weather; must be swapped seasonally | $100–$200 |
| All-Weather | Year-round including moderate snow (3PMSF rated) | Not as capable as dedicated winters in severe conditions | $100–$200 |
| Highway All-Terrain (AT) | Light off-road plus highway comfort (trucks/SUVs) | Slightly more road noise; heavier | $150–$280 |
If you live in the Sun Belt and rarely see snow, a quality all-season tire from brands like Michelin, Continental, or Bridgestone will serve you well. If you’re in Minnesota, Wisconsin, or the Northeast, I strongly recommend a dedicated winter set on separate wheels — it makes seasonal swaps quick and saves you mounting fees twice a year.
For truck owners who split time between pavement and dirt roads, I’ve found that all-terrain tires like the Falken Wildpeak AT3W or the BFGoodrich KO2 offer the best balance of on-road manners and off-road capability.
Step 4: Mounting and Balancing — Don’t Cut Corners Here
I see too many drivers obsess over which tire to buy and then hand the installation off to whoever’s cheapest without a second thought. Mounting and balancing are where precision matters most.
Mounting
Proper mounting means the tire bead is seated evenly around the entire circumference of the wheel. A good shop will use tire mounting paste (bead lubricant), check for leaks, and ensure the tire is indexed correctly.
Some premium tires have a red dot (high point of radial runout) and a yellow dot (lightest point of the tire). In my experience, most chain shops ignore these marks, but a good independent tire shop will align the red dot with the valve stem or the yellow dot with the valve stem, depending on whether the wheel has been match-mounted. It’s a small detail that can eliminate vibrations.
Balancing
Balancing compensates for slight weight imbalances in the tire-and-wheel assembly. If your tires aren’t balanced properly, you’ll feel vibrations — typically through the steering wheel at highway speeds.
I prefer road-force balancing over standard spin balancing. Road-force balancers (like the Hunter GSP9700) simulate the weight of the vehicle pressing down on the tire and can detect issues that a standard spin balancer misses. Most Discount Tire, America’s Tire, and Tire Rack-affiliated installers offer road-force balancing for a modest upcharge — usually $15–$25 per tire.
It’s worth every penny. I’ve personally had tires that balanced perfectly on a standard machine but still caused a shimmy at 65 mph. Road-force balancing caught the issue immediately.
Step 5: Setting Correct Tire Pressure
This is the single most impactful thing you can do for tire longevity, fuel economy, and safety — and it’s completely free.
Where to Find Your Correct Pressure
Use the number on your door jamb sticker, not the number on the tire sidewall. The sidewall number is the maximum pressure the tire can handle, not the optimal pressure for your vehicle. I see this mistake constantly.
For most passenger cars, the recommended cold pressure is between 32 and 36 PSI. “Cold” means the car hasn’t been driven for at least three hours, or has been driven less than a mile.
My Pressure-Check Routine
I check tire pressure at least once a month and always before long highway trips. I keep a digital tire gauge in my glove box — I’ve been using a Milton S-506 for years, and it’s consistently accurate to within 0.5 PSI.
Here’s my routine:
- Check all four tires plus the spare (if equipped) when cold.
- Inflate to the door jamb specification — not a single PSI more or less.
- If temperatures have swung more than 20°F since my last check, I recheck. Tires lose or gain roughly 1 PSI for every 10°F change in ambient temperature.
Under-inflation causes the outer edges of the tread to wear faster, increases rolling resistance (which kills fuel economy), and generates excess heat that can lead to blowouts. Over-inflation causes the center of the tread to wear faster and reduces your contact patch, hurting grip.
Step 6: Wheel Alignment — The Hidden Tire Killer
If I could only give one piece of advice to every tire buyer in America, it would be this: get an alignment every time you install new tires. No exceptions.
What Alignment Adjusts
A wheel alignment adjusts three angles:
- Toe — Whether your tires point inward or outward when viewed from above. Incorrect toe is the fastest way to destroy a tire.
- Camber — The inward or outward tilt of the tire when viewed from the front. Excessive negative camber wears the inner edge; positive camber wears the outer edge.
- Caster — The angle of the steering axis. This primarily affects steering feel and stability, not tread wear directly.
How Often to Align
I get an alignment at installation and then again every year or after hitting a significant pothole (which, if you live anywhere with real winters, happens more often than you’d like). A standard four-wheel alignment costs $80–$120 at most shops. Many tire retailers like Discount Tire and Costco will do it for less, or include it in a package deal.
In my experience, alignment issues are the number one reason I see tires with uneven wear patterns. I’ve tested tires that are known for excellent tread life and watched them get shredded because the owner never bothered with an alignment. Don’t be that person.
Step 7: Dealing with TPMS (Tire Pressure Monitoring System)
Every car sold in the US since 2008 is required to have a TPMS system. When you swap wheels or tires, you need to address your TPMS sensors — this isn’t optional.
Direct vs. Indirect TPMS
Most vehicles use direct TPMS, which means there’s a physical sensor inside each wheel that measures pressure and transmits it to the car’s computer. When you install new wheels, you either need to transfer your existing sensors or buy new ones.
Aftermarket TPMS sensors from brands like Schrader, Continental (VDO), and ATEQ typically cost $30–$60 per sensor. Your installer will need to program them to your vehicle using a TPMS tool.
A smaller number of vehicles (mostly older Hondas, Mazdas, and some Toyotas) use indirect TPMS, which relies on the ABS wheel speed sensors to detect pressure differences. These don’t require physical sensors in the wheel but do need to be reset after any tire service — usually through a button in the car or a menu in the infotainment system.
My TPMS Advice
If you’re running a winter wheel-and-tire set and a summer set, I recommend buying a second set of TPMS sensors that stay in your winter wheels year-round. This saves you the cost and hassle of transferring sensors every season, and it prevents sensor damage from repeated installations.
When I set up my own winter wheel package, I bought a set of Schrader EZ-Sensor clones for about $35 each. My local shop programmed them in about 15 minutes. Now I swap wheel sets in my driveway and just drive the car to trigger the sensors — the system picks them up within a few minutes of driving.
Step 8: Lug Nut Torque — Yes, It Matters
I know this sounds like overkill, but improper lug nut torque is a genuine safety issue. Over-torqued lugs can warp your brake rotors. Under-torqued lugs can come loose. Both scenarios are bad.
How to Torque Correctly
Every vehicle has a specific torque specification, usually between 80 and 140 ft-lbs for passenger cars and up to 150+ ft-lbs for trucks. You’ll find your spec in the owner’s manual.
I use a click-type torque wrench (mine is a Tekton 24335, which costs about $40) and tighten in a star pattern. I do an initial snug-up with a hand wrench, then go to final torque in sequence.
Critical step most people skip: re-torque your lug nuts after the first several days of driving on new wheels. Wheels can settle slightly after initial installation, and re-torquing ensures everything stays tight. I set a reminder on my phone for the day after installation.
Step 9: Break-In Period for New Tires
New tires have a thin layer of mold release compound on the surface from the manufacturing process. This makes them slippery for the first period of use.
I recommend driving conservatively for the first few days — avoid hard braking, aggressive cornering, and high-speed highway driving. During my test periods with new tires, I always notice that grip improves noticeably after the first several days of normal driving as the release compound wears off and the tread surface scuffs in.
This isn’t just my opinion — every major tire manufacturer, including Michelin, Goodyear, and Continental, includes break-in guidance in their product documentation.
Step 10: Rotation Schedule and Ongoing Maintenance
Once your new setup is installed, the work isn’t over. Regular tire rotation is the key to maximizing tread life and getting the most value out of your investment.
My Rotation Schedule
I rotate my tires every oil change — which for most modern cars means roughly every six months under normal driving. On front-wheel-drive cars (which make up the majority of sedans and crossovers in the US market), the front tires wear significantly faster than the rears because they handle both steering and power delivery.
For most vehicles, I follow a simple front-to-back rotation pattern:
- Front-wheel drive: Front tires move straight to the rear; rear tires cross to the opposite front.
- Rear-wheel drive / AWD: Rear tires move straight to the front; front tires cross to the opposite rear.
- Directional tires: Front-to-back on the same side only (no crossing).
- Staggered setups (different front/rear sizes): Cannot be rotated front-to-back. Side-to-side only if tires are non-directional.
Many tire warranties require proof of regular rotation to honor tread life guarantees. Keep your receipts.
Common Wheel and Tire Setup Mistakes I’ve Seen
Over the years, I’ve seen every mistake in the book. Here are the ones that come up most often:
Mixing Tire Types on the Same Axle
Never put an all-season tire on one side and a summer tire on the other. I’ve seen this cause unpredictable handling — especially in rain — because the two tires have completely different grip characteristics. In fact, running mismatched tires on the same axle can void your vehicle’s warranty and may fail state inspections in some states.
Ignoring Load Ratings on Trucks and SUVs
If you’re driving a half-ton pickup like a Ram 1500 or Ford F-150, your tires may have an LT (Light Truck) rating with a specific load range (C, D, or E). Switching to a P-metric (passenger) tire to save money or get a smoother ride reduces your load capacity and can be dangerous if you tow or haul.
I learned this lesson firsthand when I tested a set of P-rated all-terrain tires on a loaded-down Silverado. The ride was butter-smooth on the highway, but the sidewalls visibly flexed under load in ways that made me deeply uncomfortable. I switched back to LT-rated tires within days.
Buying Wheels Without Checking Brake Clearance
Aftermarket wheels — especially those that are thinner or have different spoke designs — may not clear your brake calipers. I always recommend test-fitting at least one wheel before committing to a full set. This is especially common when downsizing from 18-inch or 19-inch OEM wheels to 17-inch winter wheels.
Forgetting About the Spare
If your car has a full-size spare, it should match the rest of your tires in size, type, and ideally wear level. If it’s a compact spare (donut), remember that it has speed and distance limitations — usually 50 mph max and limited driving range. Don’t forget it exists, and check its pressure every few months. I’ve seen spares that have gone completely flat sitting in the trunk for years.
Budgeting for a Complete Wheel and Tire Setup
Let me break down the real costs so you know what to expect. These are based on current US pricing I’ve encountered at national chains and independent shops.
| Item | Estimated Cost | Notes |
|---|---|---|
| Tires (set of 4) | $320–$1,200 | Depends on size, brand, and category |
| Aftermarket wheels (set of 4) | $400–$1,600 | Steel wheels start at ~$60 each; alloy from ~$100+ |
| Mounting & balancing | $60–$120 total | $15–$30 per tire at most shops |
| TPMS sensors (if needed) | $120–$240 total | $30–$60 per sensor, plus programming |
| 4-wheel alignment | $80–$120 | Essential for new setups |
| Hub-centric rings | $10–$25 (set of 4) | Needed for most aftermarket wheels |
| New valve stems | $4–$12 total | Replace rubber stems every time; metal stems can be reused |
| Total (tires only, existing wheels) | $460–$1,450 | Tires + mount/balance + alignment |
| Total (new wheels + tires) | $1,000–$3,300 | Full package with everything included |
Pro tip: Tire Rack often runs package deals where mounting and balancing are included when you buy a wheel-and-tire package. I’ve used their services multiple times, and the convenience of receiving pre-mounted, balanced assemblies that I can bolt on in my garage is hard to beat.
My Recommended Approach for First-Time Buyers
If this is your first time setting up a wheel-and-tire package and you’re feeling overwhelmed, here’s the simplified process I follow every time:
- Step 1: Photograph your door jamb sticker and note your current tire size.
- Step 2: If keeping your current wheels, just shop for tires in your OEM size. Stick with name brands you recognize — Michelin, Continental, Bridgestone, Goodyear, Pirelli, Cooper, Falken, or Yokohama.
- Step 3: If buying new wheels, confirm bolt pattern, offset, center bore, and brake caliper clearance before ordering.
- Step 4: Have a reputable shop mount, balance (road-force if available), and align.
- Step 5: Verify TPMS is working before you leave the shop.
- Step 6: Drive conservatively for the first few days, then re-torque your lug nuts.
- Step 7: Set a recurring reminder to check pressure monthly and rotate on schedule.
That’s it. Seven steps, and you’re set up properly.
Where to Buy Wheels and Tires in the US
I’ve purchased from most major US retailers over the years. Here’s a quick rundown of my experience with each:
- Tire Rack (tirerack.com) — Best selection, excellent technical resources, and they ship pre-mounted packages to your door or to a local installer. I buy from them most often.
- Discount Tire / America’s Tire — Great in-store experience, price matching, and free lifetime rotation and balancing with purchase. My go-to for in-person shopping.
- Costco Tire Center — Competitive pricing, includes installation, balancing, rotations, and flat repair. Limited brand selection compared to Tire Rack, but hard to beat on value if your size is in stock.
- Walmart Auto Care — Budget-friendly pricing, but in my experience, the quality of installation varies significantly by location.
- SimpleTire / Priority Tire — Online alternatives with solid selection and competitive pricing. Good for finding deals on closeout models.
Final Thoughts: Do It Right Once, Enjoy It for Years
I’ve been through more wheel-and-tire setups than I can count, on everything from economy sedans to full-size trucks, and the lesson is always the same: the time and money you invest in getting the setup right pays dividends for the entire life of your tires.
A properly specced wheel, correctly mounted and balanced tire, accurate alignment, and disciplined maintenance routine will give you the best ride, the longest tread life, and — most importantly — the safest driving experience possible.
Don’t rush through it. Don’t cheap out on the installation. And for the love of your tires, check your pressure once a month.
If you have questions about a specific setup for your vehicle, drop a comment below — I read every one and I’m happy to help you get it right.
Frequently Asked Questions
What is a wheel and tire setup and why does it matter for my vehicle?
A wheel and tire setup refers to the complete combination of your wheels (rims) and tires, including the correct size, bolt pattern, offset, and tire specifications matched to your vehicle. Getting this right matters because an improper setup can cause poor handling, uneven tire wear, speedometer inaccuracy, and even damage to your suspension components. I always recommend starting with your vehicle’s door placard or owner’s manual to find the factory-recommended specifications before making any changes.
How do I read my tire size and match it to the right wheel?
Your tire size is printed on the sidewall in a format like P225/65R17, where 225 is the tread width in millimeters, 65 is the aspect ratio (sidewall height as a percentage of width), and 17 is the wheel diameter in inches. To match the right wheel, you need a 17-inch rim with a recommended width range that supports a 225mm tire, which is typically between 6 and 8 inches wide. Getting this pairing wrong can lead to poor tire bead seating and compromised road safety, so I always double-check using a tire-to-wheel fitment chart.
What is wheel offset and why does it affect my tire setup?
Wheel offset is the distance in millimeters between the wheel’s mounting surface and the centerline of the rim, and it determines how far in or out your wheels sit relative to the fender. A positive offset pushes the wheel inward, while a negative offset pushes it outward, and choosing the wrong offset can cause rubbing against fenders, brake caliper interference, or abnormal bearing wear. For most US drivers sticking close to OEM replacement specs, I recommend staying within 5mm of your factory offset unless you’re specifically building a custom setup.
Can I put bigger wheels and tires on my car without modifications?
You can often go up one inch in wheel diameter using a plus-sizing strategy, where you increase the rim size while decreasing the tire’s sidewall height to keep the overall diameter nearly identical. This approach avoids speedometer errors and clearance issues without requiring suspension modifications. However, going more than two inches over stock usually requires fender rolling, lift kits, or leveling kits, and it can cost anywhere from $800 to $3,000+ depending on the vehicle and components involved.
What bolt pattern and hub bore size do I need for my replacement wheels?
Your bolt pattern, such as 5×114.3 or 6×139.7, refers to the number of lug bolts and the diameter of the circle they form, and it must match your vehicle exactly for safe wheel mounting. The hub bore is the center hole diameter of the wheel and should match your vehicle’s hub to ensure a hub-centric fit that prevents vibrations at highway speeds. If you buy aftermarket wheels with a larger hub bore, you can use hub-centric rings, which typically cost $10 to $30 for a set, to fill the gap and maintain a proper center fit.
Should I buy a wheel and tire package or purchase them separately?
Buying a pre-assembled wheel and tire package from retailers like Tire Rack, Discount Tire, or America’s Tire is usually the easier and more cost-effective route, since packages often include mounting, balancing, and TPMS sensor installation at a bundled price. Purchasing separately can save money if you find deals on wheels and tires from different sources, but you’ll need to pay $25 to $50 per wheel for mounting and balancing at a local shop. I generally recommend packages for beginners because they eliminate the guesswork around fitment compatibility.
How do I choose the right tire type for my wheel setup based on US driving conditions?
For most US drivers in moderate climates, all-season tires like the Michelin Defender 2 or Continental TrueContact Tour offer the best year-round balance of traction, tread life, and comfort. If you live in northern states with harsh winters, I strongly recommend a dedicated winter wheel and tire setup with snow-rated tires, since swapping complete wheel-tire assemblies each season saves on mounting costs and preserves your summer rims from road salt damage. For drivers in the South or Southwest dealing with extreme heat, look for tires with high UTQG temperature ratings to resist heat-related degradation on long highway drives.

