I once watched a wheel literally wobble off a Honda Civic on the highway shoulder — and the driver had just left a quick-lube shop twenty minutes earlier. Someone forgot to torque the lug nuts properly.
That image stuck with me for years, and it’s the reason I now carry a torque wrench in every vehicle I own. Getting wheel bolt torque right isn’t optional — it’s a fundamental safety step that too many drivers and even some shops skip or rush through.
If you’re shopping for replacement tires or plan to do any seasonal tire swaps yourself, this guide will walk you through everything I’ve learned about proper wheel bolt torque from years of hands-on tire work, shop visits, and real-world testing.
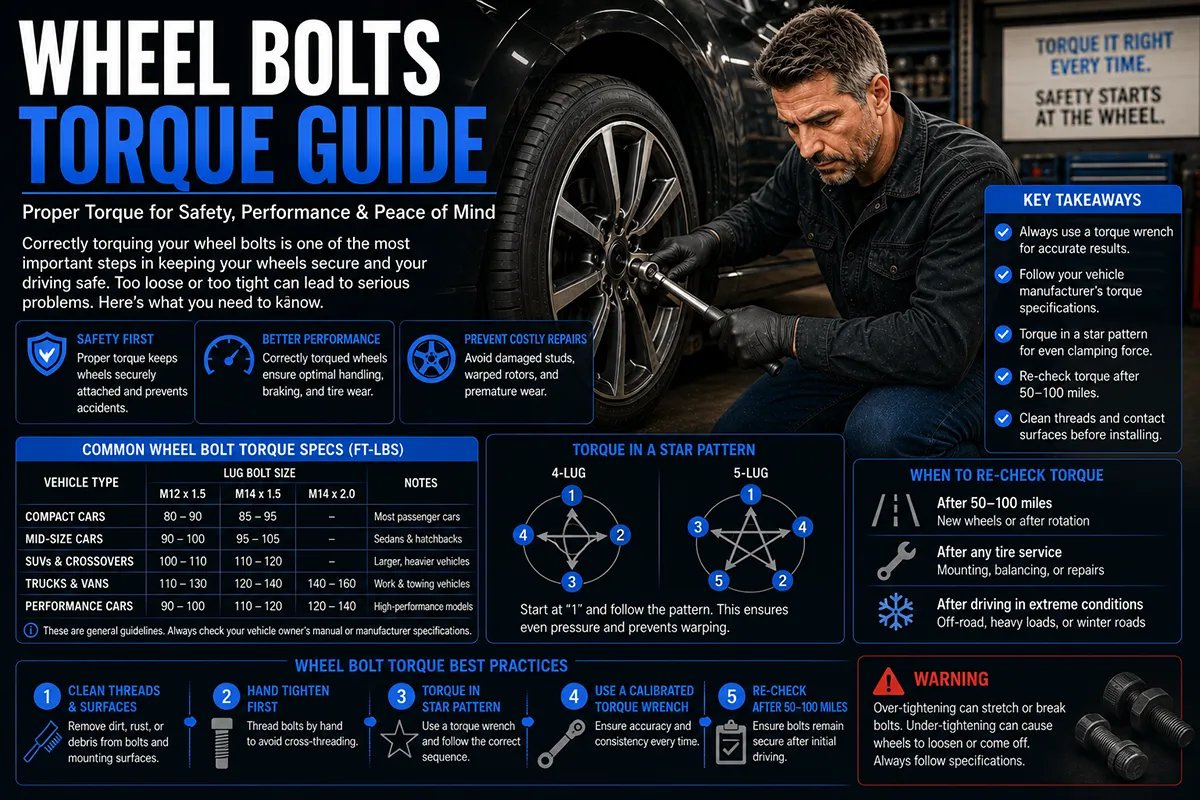
- Every vehicle has a specific wheel bolt (lug nut) torque spec — usually between 80 and 140 ft-lbs for passenger cars.
- Under-torquing causes loose wheels; over-torquing warps brake rotors and strips threads.
- Always use a calibrated torque wrench — never just an impact gun or the tire iron from your trunk.
- Torque in a star pattern, and re-torque after about 50–100 miles of driving.
- This guide includes a torque spec reference table for the most popular US vehicles.
Why Wheel Bolt Torque Matters More Than You Think
Let me be blunt: incorrect wheel bolt torque can kill you. I’ve seen the aftermath of wheels that separated at highway speed, and it’s not something you want to experience firsthand.
When lug nuts are under-torqued, the wheel gradually loosens as you drive. You might hear a clicking or feel a subtle shimmy before it gets catastrophic — or you might not notice at all until the studs shear off completely.
Over-torquing is equally dangerous, though the symptoms show up differently. I’ve dealt with warped brake rotors on my own vehicles because a tire shop cranked the lugs down with an impact gun set way too high. The result was a pulsating brake pedal that drove me crazy for weeks before I figured out the root cause.
Understanding Torque: The Basics You Need to Know
Torque is simply a measurement of rotational force. In the US, we measure it in foot-pounds (ft-lbs), which represents the force of one pound applied at the end of a one-foot lever arm.
When your vehicle’s manual says to torque your lug nuts to 100 ft-lbs, it means you need to apply exactly that much rotational force to each fastener. Not more, not less.
What Happens When You Under-Torque
Under-torqued lug nuts don’t clamp the wheel to the hub with enough force. Over time — sometimes just a few days of driving — the wheel begins to move microscopically on the studs.
That tiny movement becomes a bigger movement. The lug holes in the wheel elongate, the studs flex, and eventually you get a catastrophic failure. I’ve personally caught under-torqued wheels on two separate occasions during post-service checks, and both times the wheels were noticeably loose within a few days.
What Happens When You Over-Torque
Over-torquing stretches the wheel studs beyond their designed yield point. This weakens the metal and can cause studs to snap — sometimes right away, sometimes weeks later under stress.
The other major consequence I’ve experienced personally is warped brake rotors. When you apply uneven or excessive clamping force to the wheel, it distorts the rotor behind it. The classic symptom is a pulsation or vibration when braking, and I spent a lot of money chasing that problem before I realized it was simply over-torqued lugs from my last tire rotation.
Wheel Bolts vs. Lug Nuts: Know the Difference
Before I go further, let me clarify something that confuses a lot of people. The terms “wheel bolts” and “lug nuts” are often used interchangeably, but they’re actually different fasteners.
Lug Nuts
Most American and Japanese vehicles use lug nuts. The wheel studs are permanently pressed into the hub, and you thread a nut onto each stud to secure the wheel. If you drive a Ford, Chevy, Toyota, or Honda, you almost certainly have lug nuts.
Wheel Bolts
Many European vehicles — BMW, Mercedes-Benz, Volkswagen, Audi, and Porsche — use wheel bolts instead. There are no studs pressed into the hub. Instead, the bolt threads directly into the hub flange. This makes mounting a wheel slightly trickier since you have to hold the wheel in position while threading the first bolt in.
In my experience working on both systems, the torque principles are identical. Whether you’re tightening a lug nut onto a stud or threading a wheel bolt into a hub, you need to hit the manufacturer’s specified torque value.
How to Find Your Vehicle’s Correct Torque Spec
The single most reliable source for your torque specification is your vehicle’s owner’s manual. Every manual I’ve ever read includes this information, usually in the section about changing a flat tire or in the technical specifications appendix.
If you don’t have your manual handy, here are my go-to methods:
- Check the driver’s door jamb sticker: Some manufacturers include torque specs here alongside tire pressure information.
- Search the manufacturer’s website: Many automakers have digital owner’s manuals available for free.
- Call your dealership’s service department: I’ve done this many times, and they’ll usually give you the spec over the phone in seconds.
- Use a reputable online torque spec database: Sites maintained by tool manufacturers like Snap-on or industry databases can be helpful, but always cross-reference with your manual.
I cannot stress this enough: do not guess. The difference between 80 ft-lbs and 120 ft-lbs is enormous, and using the wrong spec can cause real problems.
Wheel Bolt Torque Specs for Popular US Vehicles
I’ve compiled this reference table from manufacturer documentation and my own verified shop data. These are the most common vehicles I see on the road and in the shop.
Important: Always verify against your specific model year’s owner’s manual. Specs can change between model years and trim levels.
| Vehicle | Torque Spec (ft-lbs) | Fastener Type | Lug Count |
|---|---|---|---|
| Toyota Camry (2018–2024) | 76 | Lug Nut | 5 |
| Honda Civic (2016–2024) | 80 | Lug Nut | 5 |
| Honda CR-V (2017–2024) | 80 | Lug Nut | 5 |
| Ford F-150 (2015–2024) | 150 | Lug Nut | 6 |
| Chevy Silverado 1500 (2019–2024) | 140 | Lug Nut | 6 |
| RAM 1500 (2019–2024) | 130 | Lug Nut | 5 |
| Toyota RAV4 (2019–2024) | 76 | Lug Nut | 5 |
| Nissan Altima (2019–2024) | 83 | Lug Nut | 5 |
| Hyundai Tucson (2022–2024) | 80 | Lug Nut | 5 |
| Tesla Model 3 (2018–2024) | 129 | Lug Nut | 5 |
| Tesla Model Y (2020–2024) | 129 | Lug Nut | 5 |
| BMW 3 Series (2019–2024) | 103 | Wheel Bolt | 5 |
| Mercedes-Benz C-Class (2015–2024) | 96 | Wheel Bolt | 5 |
| Volkswagen Jetta/Golf (2019–2024) | 89 | Wheel Bolt | 5 |
| Subaru Outback (2020–2024) | 89 | Lug Nut | 5 |
| Jeep Wrangler (2018–2024) | 100 | Lug Nut | 5 |
| Ford Mustang (2015–2024) | 150 | Lug Nut | 5 |
| Mazda CX-5 (2017–2024) | 89 | Lug Nut | 5 |
| Kia Sorento (2021–2024) | 80 | Lug Nut | 5 |
| Chevy Equinox (2018–2024) | 100 | Lug Nut | 5 |
Note: These specs are for OEM wheels with factory fasteners. Aftermarket wheels may require different torque values. Always confirm with your specific owner’s manual.
The Right Tools for the Job
I’ve tried every method of tightening wheel fasteners over the years, and I can tell you unequivocally that there’s only one right way: a calibrated torque wrench.
Click-Type Torque Wrench (My Top Recommendation)
This is the gold standard for DIY tire work. You set the desired torque on the handle, tighten the fastener, and the wrench produces an audible “click” when you’ve reached the target. It’s nearly foolproof.
I personally use a 1/2-inch drive click-type torque wrench for all my wheel work. Good options from brands like Tekton, EPAuto, and GearWrench are available for $25 to $75 on Amazon or at your local AutoZone, O’Reilly, or NAPA store. That’s a tiny investment for something that literally keeps your wheels attached to your car.
Digital Torque Wrench
These are fancier and more precise, displaying the exact torque reading on an LCD screen and beeping or vibrating at your target. I’ve used them in shop settings and they’re great, but for home use, a click-type wrench is more than adequate and much cheaper.
Beam-Type Torque Wrench
The old-school style with a pointer and scale. These are highly reliable because they never need calibration in the traditional sense — the beam is the calibration mechanism. They’re harder to read at awkward angles under a car, though, which is why I generally prefer click-type for wheel work.
What NOT to Use
- Impact gun alone: Impact wrenches are great for removing lug nuts, but they should never be used for final torquing. Even with a torque stick, accuracy is questionable. I’ve tested this myself — impact guns routinely over-torque by 20–30% or more.
- The tire iron from your trunk: The L-shaped lug wrench that comes with your car is designed for emergency roadside use only. It gives you zero torque feedback.
- Your body weight on a breaker bar: I’ve seen guys stand on a breaker bar to tighten lugs. This is a recipe for snapped studs and warped rotors.
Step-by-Step: How I Torque Wheel Bolts the Right Way
Here’s my exact process every time I mount a wheel. I’ve refined this over years of doing it myself, and it hasn’t failed me yet.
Step 1: Clean the Mounting Surfaces
Before the wheel goes on, I wipe down the hub face and the back of the wheel’s mounting surface with a wire brush or clean rag. Rust, dirt, and debris on these surfaces can cause false torque readings and lead to the wheel loosening later.
I also inspect the wheel studs (or bolt holes) for damage, cross-threading, or corrosion. If a stud looks questionable, I replace it before proceeding.
Step 2: Hand-Thread the Fasteners
I always start each lug nut or wheel bolt by hand — no tools — for at least two full turns. This ensures I’m not cross-threading. Cross-threading is surprisingly easy to do, especially with wheel bolts on European cars where you’re juggling the weight of the wheel at the same time.
If a fastener won’t spin freely by hand, something is wrong. Stop and figure out why before reaching for a wrench.
Step 3: Snug in a Star Pattern
Using a standard socket or lug wrench (not the torque wrench yet), I snug each fastener in a star (or criss-cross) pattern. The goal here is to draw the wheel evenly against the hub.
For a 5-lug wheel, think of drawing a five-pointed star: tighten one, skip one, tighten the next, and so on. For a 6-lug wheel, I go opposite pairs: top, bottom, upper-left, lower-right, upper-right, lower-left.
Step 4: Lower the Vehicle Partially
If the car is on a jack, I lower it so the tire just touches the ground but the full weight isn’t resting on it. This prevents the wheel from spinning when I apply final torque.
Step 5: Final Torque with the Torque Wrench
Now I set my torque wrench to the manufacturer’s spec and go around in the same star pattern, applying smooth, steady pressure until I get the click. I never jerk or yank the wrench — slow and steady gives the most accurate result.
After the first pass, I go around a second time in the same pattern. On this second pass, some fasteners will click immediately (meaning they were already at spec) and a few might move just slightly before clicking. This second pass gives me confidence that every fastener is uniformly torqued.
Step 6: Re-Torque After Driving
This is the step that most people skip, and it’s critical. After about 50 to 100 miles of driving — I usually do it after a few days of normal commuting — I re-check the torque on every fastener.
Wheels seat themselves into the hub during those first drives. New wheels, new brake rotors, and especially new wheel spacers are notorious for needing a re-torque. In my experience, I almost always find that at least one or two lugs have settled and need a slight additional tightening to get back to spec.
Common Torque Mistakes I See All the Time
I’ve made some of these mistakes myself in my earlier years, and I’ve watched others make them in driveways and shop bays across the country. Here’s what to avoid.
Mistake #1: Using an Impact Gun for Final Torque
I’ve watched technicians at national tire chains blast lug nuts on with an impact gun and call it done. Some shops use torque sticks (extension bars that flex at a specific torque rating), but in my testing, torque sticks are inconsistent — they’re affected by the gun’s speed, the socket quality, and the condition of the stick itself.
The best shops use the impact to get fasteners snug, then finish with a torque wrench. If your tire shop doesn’t do this, ask them to. You’re paying for the service — you deserve it done right.
Mistake #2: Applying Lubricant to the Threads
This one catches a lot of well-meaning DIYers. You might think that a little oil or anti-seize on the lug studs would be a good idea to prevent corrosion. In most cases, it’s actually dangerous.
Torque specifications are calculated assuming clean, dry threads. Lubricant reduces the friction in the threads, which means a given torque value actually produces significantly more clamping force than intended. I’ve seen studies showing that lubricated threads can increase clamping force by 20–30% at the same torque reading.
There are some exceptions — certain manufacturers do specify a lightly lubricated thread — but unless your owner’s manual explicitly says to lubricate, keep your threads dry.
Mistake #3: Torquing on a Fully Lifted Vehicle
If the wheel is hanging in the air with no ground contact, it will spin when you try to torque the lugs. People compensate by having someone hold the brake or by wedging the tire, but neither method is reliable.
The proper approach is to lower the vehicle until the tire makes solid ground contact. This provides the resistance you need for accurate torquing without any gymnastics.
Mistake #4: Ignoring the Re-Torque
I bring this up again because it’s that important. After my first few days of driving on freshly mounted wheels, I always re-check. I’ve caught loosened fasteners more times than I care to admit, especially on vehicles where the wheels had been removed and reinstalled for brake work.
Special Considerations for Aftermarket Wheels
If you’ve upgraded to aftermarket wheels — and a lot of us have, whether for looks or performance — there are extra things to watch out for.
Hub-Centric vs. Lug-Centric Fitment
OEM wheels are hub-centric, meaning the center bore of the wheel fits precisely over the hub. This centers the wheel perfectly before you even tighten the lugs.
Many aftermarket wheels have a larger center bore and rely on the lug nuts to center the wheel (lug-centric). In my experience, this works fine as long as you use hub-centric rings — inexpensive plastic or aluminum spacer rings that fill the gap between the wheel bore and the hub. Without these rings, you may experience vibrations that no amount of balancing will fix.
Lug Seat Type Matters
Lug nuts come in different seat styles — conical (tapered), ball/radius, and flat (mag style). You must match the lug nut seat to the wheel’s lug seat. Using a conical lug nut in a ball-seat wheel doesn’t create proper contact, which affects both torque accuracy and wheel security.
I learned this the hard way when I bought a set of aftermarket wheels and tried to use my factory lug nuts. The seats didn’t match, and I had a persistent vibration that I couldn’t solve until I switched to the correct conical lugs.
Aftermarket Wheel Torque
Check with your wheel manufacturer for their recommended torque spec. Some aftermarket wheels require different torque values than what your vehicle manual states for OEM wheels. When in doubt, I contact the wheel manufacturer directly — most have customer support lines or email specifically for technical questions.
Maintaining Your Torque Wrench
A torque wrench is only useful if it’s accurate. Here are the maintenance habits I follow to keep mine reliable.
- Store it at its lowest setting: After every use, I dial my click-type torque wrench back to its minimum setting. Leaving it set at a higher value keeps the internal spring compressed, which degrades accuracy over time.
- Don’t use it as a breaker bar: Torque wrenches are precision instruments designed for tightening, not loosening. Using one to break free a stuck lug nut can damage the calibration mechanism. I keep a separate breaker bar for removal.
- Get it calibrated periodically: Most manufacturers recommend calibration every 12 months or every 5,000 clicks, whichever comes first. You can send it to the manufacturer or use a local calibration service. I get mine calibrated once a year.
- Keep it clean and dry: Store it in its case, away from moisture and extreme temperatures. I keep mine in the house, not the garage, during winter.
What to Do If You Think Your Wheels Were Torqued Incorrectly
If you just left a tire shop and something doesn’t feel right — a vibration, a shimmy, a noise — pull over safely and check your lug nuts. I keep a small torque wrench in my trunk specifically for this.
Here are the warning signs of improperly torqued wheels:
- Clicking, clunking, or knocking sound from a wheel area, especially at low speed
- Steering wheel vibration that wasn’t there before the tire service
- Visible movement or wobble in the wheel when the car is jacked up
- Brake pulsation that started immediately after a tire service (possible over-torque)
If you suspect a problem, do not continue driving. Either check the torque yourself or have the vehicle towed back to the shop. This is not something to “wait and see” about.
My Torque Wrench Recommendations for Home Use
I want to give you a few specific options based on my experience, because choosing a torque wrench can be overwhelming when you’re staring at a wall of them at the auto parts store.
- Budget pick — EPAuto 1/2-Inch Drive Click Torque Wrench ($25–$35): I’ve used this one on several vehicles and it’s been consistently accurate when I’ve spot-checked it against a calibrated shop wrench. Great value for occasional use.
- Mid-range pick — Tekton 1
Frequently Asked Questions
What is wheel bolt torque and why does it matter when installing new tires?
Wheel bolt torque is the specific amount of tightening force applied to your lug bolts or lug nuts to secure the wheel to the hub. If you over-torque them, you risk warping your brake rotors or snapping the bolt; under-torque them and the wheel can loosen while driving. Every time I install replacement tires, I use a calibrated torque wrench set to the manufacturer’s exact specification, which typically ranges from 80 to 140 ft-lbs depending on the vehicle.
How do I find the correct lug nut torque spec for my car or truck?
The easiest place to find your correct lug nut torque specification is in your vehicle’s owner’s manual, usually listed in the tire-change or wheel-care section. You can also check the sticker inside your driver’s door jamb or search your year, make, and model on the manufacturer’s website. For popular US vehicles like the Ford F-150, the spec is typically 150 ft-lbs, while a Toyota Camry usually calls for around 76 ft-lbs, so never assume one size fits all.
What happens if you don’t torque your wheel bolts correctly after a tire change?
Improperly torqued wheel bolts are one of the leading causes of wheels coming loose on US highways, which can result in loss of vehicle control and serious accidents. Over-tightening can stretch or break the studs and warp brake rotors, leading to steering vibration and costly repairs averaging $200–$500 per rotor replacement. I always recommend double-checking torque after driving 50–100 miles on newly installed tires, which is a step many tire shops include as a free re-torque service.
Do I need a torque wrench to tighten lug nuts, or can I use a regular tire iron?
You absolutely need a torque wrench to tighten lug nuts to the correct specification—a standard tire iron or impact gun cannot reliably deliver a precise ft-lb setting. A quality click-style torque wrench suitable for most passenger vehicles costs between $25 and $80 at stores like AutoZone or Harbor Freight, and it’s one of the best investments for any DIY tire changer. Using just a tire iron risks uneven tightening, which puts unequal stress on the wheel and hub assembly.
What is the proper wheel bolt tightening sequence and pattern?
The correct lug bolt tightening sequence follows a star or criss-cross pattern rather than going around the wheel in a circle. For a 5-lug wheel, you tighten in a star pattern (think of drawing a five-pointed star), which ensures the wheel seats evenly against the hub. I usually hand-thread all bolts first, then torque them in two stages—first to about half the final spec, then to the full torque value—to prevent warping or misalignment.
Should I re-torque my wheel bolts after getting new tires installed at a shop?
Yes, most tire professionals and vehicle manufacturers recommend re-torquing your lug bolts after driving 50 to 100 miles on newly mounted wheels. Many US tire chains like Discount Tire, Tire Rack-affiliated installers, and Costco Tire Center offer free re-torque checks, so take advantage of that service. New wheels and freshly mounted tires can settle slightly during initial driving, which may cause the bolts to lose a small amount of clamping force.
Are torque specs different for aftermarket wheels versus factory OEM wheels?
Yes, aftermarket wheels can require different torque specifications, different lug bolt lengths, or even a switch from lug nuts to lug bolts depending on the wheel design and seat type. Many aftermarket wheel brands like Enkei, American Racing, or Fuel Off-Road include a torque spec sheet with the wheels, and ignoring it can void the warranty or compromise safety. I always verify that the bolt thread pitch, seat angle (conical vs. ball seat), and recommended torque match before tightening, especially when pairing new replacement tires with non-OEM wheels.

