A slow leak ruined my Tuesday commute. My left rear tire was sitting at 18 PSI when I got to the car at 6 AM — and the culprit wasn’t a nail. It was a $2 rubber valve stem that had cracked from age and UV exposure.
I’ve since replaced dozens of valve stems, and I can tell you: it’s one of those small repairs that drivers overlook until it leaves them stranded
Replacing a rubber snap-in valve stem costs $2–$5 in parts and is best done when the tire is off the rim (at a shop or at home if you have a tire machine). TPMS metal stems cost $15–$75+ and require a sensor reset. A cracked, corroded, or leaking stem should be replaced immediately — never just re-torque or cap it and hope for the best. Skip ahead to the step-by-step section if you’re already familiar with the basics.
What Is a Tire Valve Stem — And Why Does It Fail?
The valve stem is the small tube-like port on your wheel that lets you add or release air from the tire. It sounds trivially simple, but it’s under constant stress.
Every time you drive, the stem flexes slightly with the wheel. It bakes in the sun during summer, freezes in winter, and sits in contact with road grime, brake dust, and cleaning chemicals year-round.
There are two broad categories you’ll encounter:
Rubber snap-in valve stems are the standard on most factory steel wheels and many alloy wheels. They’re held in place by a rubber grommet that “snaps” through a hole in the rim. They’re inexpensive and easy to replace, but the rubber degrades over time — typically 5–10 years depending on climate and exposure.
TPMS (Tire Pressure Monitoring System) valve stems are found on most vehicles built after 2007, when federal regulations made TPMS mandatory in the U.S. These are metal-bodied and house a battery-powered sensor that transmits tire pressure data to your dashboard.
They’re significantly more expensive and the replacement procedure is more involved.
In my experience, the most common reasons a valve stem fails are:
- Age and UV cracking — the rubber dries out and develops hairline cracks near the base
- Physical damage — getting clipped by a curb, a pressure gauge slammed on too hard, or damage during a tire rotation
- Corrosion — especially on metal TPMS stems where the aluminum corrodes against the steel or alloy rim
- Improper installation — an undertightened valve core, or a stem that wasn’t seated cleanly through the rim hole
A lot of people assume a slow leak is always a nail or road hazard. Always check the valve stem first — it’s the fastest diagnosis and the cheapest fix.
How to Tell If Your Valve Stem Needs Replacing
You don’t always get a warning. But here are the signs I look for before assuming a tire has a more expensive problem:
1. Slow leak that keeps coming back. If you’re adding air every week or two and can’t find a nail, start at the stem. Apply soapy water around the base of the stem and the valve core area. Bubbles don’t lie.
2. Visible cracking or dry rot on the rubber. On rubber snap-in stems, look at the base where the stem meets the rim. Cracking there almost guarantees a leak is coming, even if it’s not there yet.
3. A hissing sound when you press the valve core. This usually points to a bad valve core (the inner Schrader valve), which you can replace without pulling the stem. But persistent hissing after replacing the core means the stem itself is suspect.
4. TPMS warning light combined with one low tire. If your dash is showing a TPMS fault on a specific corner, it might be a dead sensor battery (they last 5–10 years), or it could be a corroded metal stem losing its seal.
5. Corrosion or green/white buildup around the stem base. This is galvanic corrosion and is especially common on aluminum TPMS stems installed in steel wheels, or in high-salt-road environments.
Tools and Parts You’ll Need
For Rubber Snap-In Stems (DIY at Home)
| Item | Approximate Cost |
|---|---|
| Replacement rubber valve stems (pack of 10) | $5–$10 |
| Valve stem tool / valve core remover | $3–$8 |
| Valve stem insertion tool (or needle-nose pliers) | $5–$15 |
| Tire bead breaker (if tire is still mounted) | $20–$40 or rent |
| Soapy water in a spray bottle | ~$0 |
| Tire pressure gauge | $10–$20 |
The honest truth: replacing a snap-in rubber stem while the tire is still mounted on the rim is doable, but it requires breaking the tire bead to access the inside of the rim. Most DIYers don’t have the equipment for that.
If you’re doing a full tire swap or rotation anyway, doing the stem at a shop during that visit is the most practical move. The labor charge is usually minimal if the tire is already off the car.
For TPMS Metal Valve Stems
| Item | Approximate Cost |
|---|---|
| OEM or aftermarket TPMS sensor/stem | $15–$75+ per wheel |
| TPMS programming tool (for aftermarket sensors) | $30–$200+ |
| Torque wrench (for stem nut) | If you don’t own one |
| Valve core tool | $3–$8 |
TPMS replacement is a job I’ll always recommend doing at a shop unless you have a TPMS programming tool and know your vehicle’s relearn procedure.
The sensor has to be registered to the vehicle’s ECU, and doing it wrong means a permanently lit TPMS light — or worse, an inaccurate pressure reading.
Valve Stem Replacement Cost: What to Expect at a Shop
If you’re taking the car in, here’s what I’ve seen charged across different shop types in the U.S.:
| Service Type | Estimated Cost per Stem |
|---|---|
| Rubber snap-in stem (at tire shop, tire already off) | $5–$15 |
| Rubber snap-in stem (tire removal included) | $20–$40 |
| TPMS metal stem replacement (parts + labor) | $50–$150+ |
| TPMS sensor + stem replacement (full unit) | $75–$200+ per wheel |
Most tire shops will replace rubber stems for free or minimal cost when you’re buying tires or having them mounted. If you’re just getting a rotation or a flat fixed, ask them to inspect and replace the stems while the tires are off. At $5–$10 per stem, it’s cheap insurance.
For TPMS sensors, pricing varies wildly based on your vehicle. A domestic sedan might run $50–$80 per corner at an independent shop. European luxury vehicles with proprietary TPMS protocols can push $150–$200 per sensor at a dealership.
Aftermarket universal sensors (brands like Autel, SCHRADER EZ-sensor, or Dorman) have brought costs down significantly and work on most vehicles — but require programming.
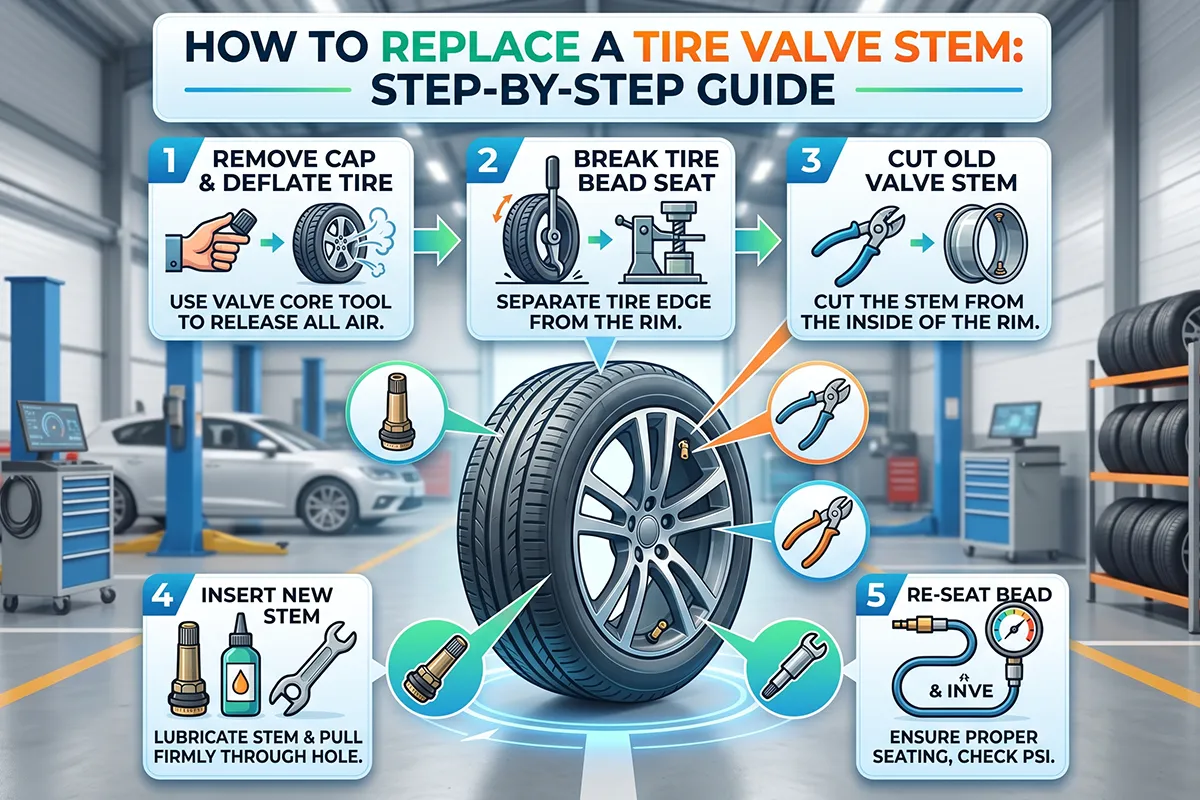
Step-by-Step: How to Replace a Rubber Snap-In Valve Stem
This process assumes the tire is already dismounted from the vehicle and you’re working at a shop with a tire machine, or you have the means to break the bead at home.
Step 1: Deflate the tire completely. Remove the valve core with a valve core tool. Get every last bit of air out before breaking the bead.
Step 2: Break the tire bead. On a tire machine, this takes seconds. At home, you can use a bead breaker tool or the weight of a car jack positioned carefully. The bead needs to unseat from the rim edge on at least one side to give you access to the inside of the rim.
Step 3: Remove the old valve stem. From the inside of the rim, use a valve stem removal tool (or needle-nose pliers and some patience) to pull the old stem through the hole. It should come out with moderate force. If it’s corroded or fused to the rim hole, a razor knife to cut the rubber flange from the outside helps.
Step 4: Clean the valve stem hole. Use a clean rag to wipe out any debris, old rubber, or corrosion from the rim hole. For metal TPMS stems, a bit of emery cloth on the hole edge is worth the extra 30 seconds.
Step 5: Lubricate and insert the new stem. Apply a small amount of rubber lubricant or soapy water to the new stem’s base. Using a valve stem insertion tool, pull the new stem through the hole from the outside until the flange seats flush and snug against the rim. You should hear or feel a clear “snap.”
Step 6: Verify the stem is seated properly. From the outside, the stem should sit perpendicular to the rim with no gap between the rubber flange and the rim surface. From the inside, the retaining flange should be fully seated with no folding or pinching.
Step 7: Remount and inflate the tire. Mount the tire back on the rim, inflate to spec, and do the soapy water test around the new stem. No bubbles means a good seal. Check pressure after 24 hours to confirm there’s no slow leak.
Step-by-Step: Replacing a TPMS Metal Valve Stem
This is a more involved procedure. I’ll walk through the general process, but the specific relearn procedure varies by vehicle make and model — always check your owner’s manual or a vehicle-specific resource.
Step 1: Confirm the sensor is the problem. Use a TPMS diagnostic tool to read the sensor ID and battery status. If the sensor battery is dead (typically after 5–10 years), the entire sensor unit must be replaced — there’s no battery swap option on sealed TPMS sensors.
Step 2: Dismount the tire and remove the old sensor. After deflating and dismounting the tire, unscrew the nut holding the TPMS stem to the rim from the outside. Carefully remove the sensor and stem assembly from the inside.
Step 3: Install the new sensor. Insert the new TPMS stem through the valve hole. Hand-tighten the retaining nut, then torque to spec — typically 35–62 in-lbs depending on the sensor brand. Over-torquing is one of the most common installation mistakes and can crack the sensor housing.
Step 4: Reinstall the tire and inflate. Follow the same process as a standard tire mount. Use a new valve core.
Step 5: Program the sensor and perform a system relearn. This is where most DIYers get stuck. The new sensor’s ID must be registered with the vehicle’s TPMS ECU. There are three common approaches:
- Auto-relearn: Some vehicles (many GMs, some Fords) learn new sensor IDs automatically after driving 10–15 minutes above 15 mph.
- Stationary relearn using the dash: Some vehicles allow you to initiate a learn mode through the instrument cluster menu.
- OBD-II tool relearn: A TPMS programming tool (like Autel MaxiTPMS or similar) plugs into the OBD-II port and programs the sensor ID directly.
Check your specific vehicle’s procedure before assuming it’ll sort itself out. A misregistered TPMS sensor will trigger a permanent warning light.
Can You Just Replace the Valve Core Instead?
Yes — and it’s worth trying first if you’re not sure whether the leak is from the core or the stem body.
The valve core is the small pin-and-spring assembly inside the stem. It’s held in by threads and can be removed with a valve core tool for about $3. Replacing just the core costs under $1 per piece and takes two minutes with the tire still on the car (you’ll lose some air during the swap, so top it off after).
If the soapy water test shows bubbles coming specifically from the tip of the valve (where the cap screws on), a bad valve core is your culprit. If bubbles are coming from the base of the stem where it meets the rim, the stem body itself needs to go.
How Often Should Valve Stems Be Replaced?
There’s no hard rule written into most manufacturer maintenance schedules, which is part of why stems get overlooked. Here’s what I recommend based on practical experience:
Rubber snap-in stems: Replace every tire change, or at minimum every 5–7 years. They’re so cheap there’s no reason not to. If a shop is mounting new tires and wants to charge you for new stems, say yes without hesitation.
TPMS metal stems: Inspect at every tire rotation. Replace the valve core and valve cap on every tire swap. Replace the full sensor when the battery life indicator shows depletion (many TPMS tools will tell you remaining battery percentage), or if you see physical corrosion on the stem.
High-mileage and older vehicles: On anything over 100,000 miles, I’d proactively replace rubber stems rather than wait for a symptom.
Seasonal tire swappers: If you’re running a separate set of winter tires, inspect both sets of stems at every changeover — that’s your built-in maintenance checkpoint.
Common Mistakes to Avoid
I’ve seen all of these in the shop and heard about them from readers:
Overtightening TPMS stems. The sensor housing is usually plastic or thin aluminum. Torque to spec — don’t just crank it tight.
Using the wrong stem for the rim hole size. Stem diameters aren’t universal. The standard is 0.453″ (11.5 mm) for most passenger cars, but some rims use a larger 0.625″ (15.9 mm) hole. Measure or check your rim spec before buying stems in bulk.
Forgetting the valve cap. Valve caps aren’t just decorative — they provide a secondary seal against dirt and moisture. Use metal caps if you can; cheap plastic caps crack and get stuck. Torque specs for caps are light (just snug), but don’t leave them off.
Assuming a TPMS warning means you need new tires. I’ve seen people buy four new tires when all they needed was a $20 sensor with a dead battery. Diagnose first.
Skipping the soapy water test. It takes 30 seconds and will catch a bad installation before you put the tire back on the car. Never skip it.
When to Let the Shop Handle It
There’s no shame in handing this one off. Here’s when I’d recommend it:
- You have TPMS and don’t own a programming tool
- You don’t have access to a tire machine or bead breaker
- The stem is on a run-flat tire (these require specialized equipment to dismount safely)
- The rim hole shows corrosion damage that might need reaming or repair
- Your vehicle uses a direct TPMS system with proprietary protocols (most European brands)
For rubber stems during a standard tire change or rotation, just ask the shop to include them. Any reputable shop will do it for a few dollars per stem, and they’re already doing the work.
Frequently Asked Questions
How much does it cost to replace a tire valve stem?
Rubber snap-in stems cost $2–$5 per stem in parts. With labor at a tire shop, expect $5–$15 if the tire is already off, or $20–$40 including dismount. TPMS metal stems with sensors run $50–$200+ per corner depending on your vehicle and whether you use OEM or aftermarket sensors.
Can I replace a valve stem without removing the tire?
For a standard rubber snap-in stem, you technically need to break at least one side of the bead to access the inside of the rim — which effectively means the tire is off the rim. You can’t replace the stem body from the outside without bead-breaking tools. You can replace the valve core (the inner Schrader valve) without removing the tire.
How do I know if my valve stem is leaking?
Spray soapy water around the base of the stem and the tip where the cap sits. If you see bubbles forming, you have a leak. Also check by pressing a wet finger over the open valve — if you feel air escaping without depressing the core pin, the stem or core is leaking.
How long do valve stems last?
Rubber snap-in stems typically last 5–10 years but degrade faster in high-UV or harsh climates. Metal TPMS stems can last longer physically, but the integrated sensor battery typically lasts 5–10 years. Most manufacturers recommend replacing rubber stems with every tire set.
Do I need to replace valve stems when getting new tires?
It’s strongly recommended. New rubber stems cost a few dollars and the shop already has the tire off the rim. It’s the easiest and cheapest time to replace them, and fresh stems mean you’re not chasing a slow leak six months after buying new tires.
Can a bad valve stem cause a TPMS warning light?
Yes. If a TPMS metal stem corrodes and loses its seal, or the integrated sensor battery dies, your TPMS warning light will illuminate. However, a standard rubber snap-in stem failure (without a sensor) will cause a pressure loss that triggers the TPMS light indirectly, but won’t generate a sensor fault code.
What size valve stem do I need?
Most passenger cars use a standard 0.453″ (11.5 mm) diameter stem hole. Some aftermarket wheels and trucks use a larger 0.625″ (15.9 mm) hole. Always verify your rim’s valve hole diameter before purchasing replacement stems. Length varies too — standard is around 1.25″ to 2″ for most applications.
Is it safe to drive with a leaking valve stem?
No. A leaking stem will cause progressive tire pressure loss. Driving on significantly underinflated tires is dangerous (reduced handling, risk of blowout) and causes accelerated, uneven tire wear. If you discover a leaking stem, inflate the tire to proper pressure, drive to a shop as soon as safely possible, and don’t make long highway trips on a tire you know is losing air.
Final Thoughts
The valve stem might be the most underappreciated part of your wheel assembly. It’s a $3 component doing a thankless job 24/7, and when it fails, it makes life miserable at the worst possible time. The good news is it’s one of the cheapest fixes in automotive maintenance — and one of the easiest to prevent problems with.
If your tires are due for a rotation or replacement, ask the shop to check and replace your stems. If your TPMS light keeps coming on and there’s no obvious road damage, get the sensors read before assuming the worst. And if you’re seeing a slow leak that a plug or patch hasn’t fixed, start at the stem.
For more guidance on keeping your tires in top shape — including pressure schedules, rotation intervals, and how to read wear patterns — check out my tire buying and maintenance guide for a full breakdown of everything you need to know as a tire owner.