I’ve mounted tires in everything from a climate-controlled shop with a $15,000 tire machine to a gravel driveway with nothing but a pair of tire irons and some dish soap — and I can tell you from experience that knowing how to do it yourself changes the way you think about tire work entirely.
Putting a tire on a wheel involves lubricating the bead, working one sidewall onto the rim at a time using tire irons (or a machine), then seating the bead with short bursts of air. It’s doable at home for experienced DIYers, but requires the right tools and technique to avoid damaging a $200+ tire or injuring yourself. If you’re new to this, a shop will do it for $15–$25 per tire — worth it the first few times while you learn.
Why I Decided to Learn This Myself
The first time I swapped to a winter tire set, I paid a shop to mount all four. Second year, I watched them do it. Third year, I did it myself. That progression is pretty common among serious car folks, and it’s a skill that genuinely saves money if you’re the type who rotates tires often or switches between summer and winter sets.
But let me be straight with you: mounting a tire on a wheel isn’t the kind of thing you should rush into with no prep.
Done wrong, you can slice a bead (a $200+ mistake), damage an alloy rim, or — most seriously — seat the bead incorrectly and have a tire blow off the rim while driving. So I’m going to walk you through exactly how it’s done, what tools you actually need, and where the real risks lie.
[IMAGE PLACEHOLDER] Alt: “Pressing the tire bead over the rim with tire irons” | AI Prompt: Close-up of hands pressing a car tire bead over the edge of a steel wheel rim using tire irons, with white tire lubricant visible on the bead. Workshop floor, realistic style.
What You Need Before You Start
The Essential Tools
Don’t skip the prep list. Using the wrong tools is the number-one cause of damaged tires and busted knuckles during a DIY mount.
- Tire irons (2–3, at least 12 inches long) — not screwdrivers, not pry bars
- Bead lubricant — dedicated tire lube, or dish soap in a pinch (never petroleum-based products)
- Air compressor — capable of at least 120 PSI, with a quality chuck
- Valve stem tool and replacement stems
- Wheel balancer — if you plan to balance yourself; otherwise, take to a shop
- Bead seater / bead blaster (optional but helpful for low-profile tires)
- Safety glasses
- Gloves — tire beads are sharp
If you’re doing this regularly, a manual or electric tire changer is worth the investment. Harbor Freight sells a manual one that works well for standard passenger tires. But I’ll also walk you through the tire-iron-only method, which is what I used for the first two years.
Understanding Tire and Rim Anatomy (Quick Refresher)
Before we get into steps, it helps to know the parts we’re working with:
| Part | What It Means for Mounting |
|---|---|
| Bead | The stiff inner edge of the tire that locks onto the rim’s bead seat. This is what you’re working when mounting. |
| Bead seat | The angled ledge on the rim where the tire bead rests. Must be clean and undamaged. |
| Drop center | The recessed middle of the rim — your best friend during mounting. The tire bead drops into here to give you working slack. |
| Sidewall | The vertical wall of the tire. Low-profile sidewalls are much stiffer and harder to mount manually. |
| TPMS sensor | If present, it’s mounted inside the rim near the valve stem. Don’t hit it with your irons. |
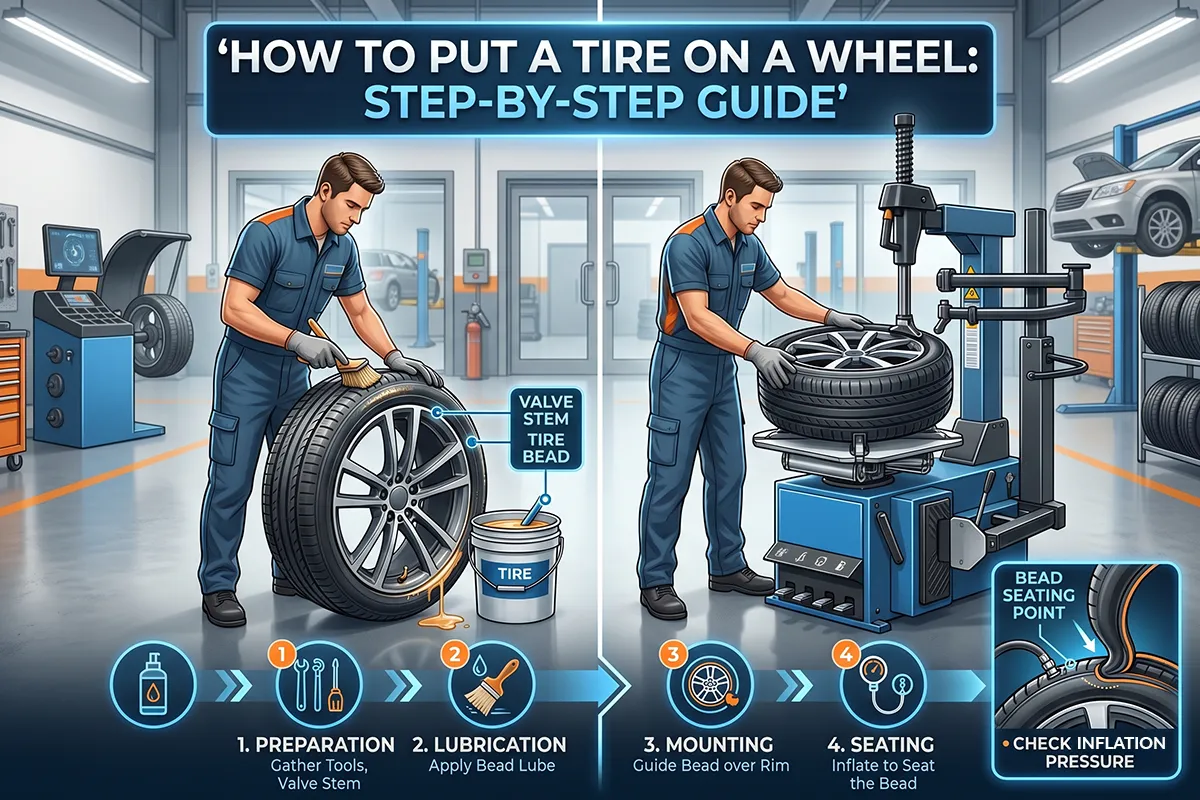
How to Put a Tire on a Wheel: Step-by-Step
Step 1: Inspect and Prep the Rim
Start with the wheel flat on the ground or on a stable surface. Check the bead seats for rust, nicks, or old rubber residue.
If it’s a used rim, clean the bead seat area with a wire brush and a rag. Any debris here can prevent the tire from seating evenly — and trust me, you’ll know when that happens because the tire will leak no matter how much air you pump in.
Also check the drop center channel (the middle recess). That’s where you’ll be pushing the tire bead as you work it over the lip — it needs to be clear of debris.
Step 2: Replace the Valve Stem
If you’re mounting a tire on a rim for the first time or doing a full swap, always install a new valve stem. Old rubber stems crack and leak — they cost under a dollar each. Use a valve stem tool to pull the old one through, seat the new one, and trim any excess rubber flush.
If your vehicle uses TPMS (Tire Pressure Monitoring System), the sensor is attached to a metal valve stem and you should not replace it without a TPMS-compatible tool and new sensor seal. I cover TPMS in more detail in my
If your vehicle uses TPMS, the sensor is attached to a metal valve stem and you’ll need to reseal it. Always check your tire pressure after mounting — check out my tire buying and maintenance guide for TPMS best practices and pressure specs.
Step 3: Lubricate the Tire Bead
This step is non-negotiable. Apply bead lubricant (or dish soap solution) generously all the way around both beads of the tire and both bead seats on the rim. Do not skip this or use petroleum-based lubes — they degrade rubber over time.
How do you know if you’ve used enough? The bead should look slightly shiny all the way around. Too little lube and you’ll be fighting the tire the entire time; it might not seat at all.
Step 4: Work the First Bead Onto the Rim
Lay the rim flat on the ground. Set the tire on top with one side facing down. Push the bottom bead over the top edge of the rim — start at one point and work around.
The key here is to always keep the bead in the drop center (the low middle section of the rim) as you work around. That slack is what allows the opposite side to stretch over the lip.
For most all-season and touring tires, the first bead goes on by hand. If it doesn’t, lube it more and make sure you’re dropping into the center channel. Ultra-low-profile tires (35-series and below) may require tire irons even for the first bead.
Step 5: Work the Second Bead — The Hard Part
This is where most people run into trouble. The second bead is stiffer and has less slack to work with. Here’s my method:
- Stand the wheel up and push the top of the second bead over the lip directly at the 12 o’clock position — as far as it will go by hand.
- Use your body weight (knee on the tire) to keep the bead seated on the opposite side in the drop center.
- Insert a tire iron about 2 inches from where the bead last went over the lip. Lever it gently over the rim edge. Do NOT pry aggressively — you’re coaxing, not forcing.
- Use a second iron 2–3 inches from the first to hold your progress, then move the first iron forward another 2–3 inches.
- Continue walking both irons around the rim. The last few inches are the hardest — the tire will pop over with a satisfying snap.
Critical tip: if the bead keeps jumping back off the far side, you don’t have enough bead in the drop center. Stop, push the bead back into the drop center all the way around, and start again. That extra slack is everything.
Step 6: Seat the Bead
With the tire now on the rim, it won’t be sealed yet — the bead will be sitting loose inside the rim flanges. To seal it, you need to inflate the tire enough to pop both beads outward onto the bead seats. This is called seating the bead, and it’s a dramatic process the first time you see it.
Here’s how I do it safely:
- Set the wheel on the ground, tire side up
- Attach your air chuck and begin inflating — do not stand over the wheel
- Watch and listen: you’ll hear two loud pops — one for each bead snapping into place
- Once you hear both pops, check that the alignment ring (the thin raised line on the sidewall near the bead) is visible and even all the way around both sides
- Inflate to the manufacturer’s recommended pressure — not above 40 PSI without good reason
If the bead won’t seat: Deflate, re-apply lube all around, and try again. If it still won’t seat, you may need a bead seater (sometimes called a “bead blaster”) — a specialized tool that delivers a sudden blast of high-volume air. Shops use these routinely.
Do NOT use starting fluid or flammable gases to seat beads. That method exists on YouTube and it has put people in the hospital.
⚠️ Safety Note
Never exceed 40 PSI during bead seating on a passenger tire. The Tire Industry Association recommends always using an inflation cage or safety restraint when seating beads. If the bead hasn’t seated by 40 PSI, stop and re-lube.
Step 7: Check Your Work
Once both beads are seated, deflate to operating pressure (check your door jamb sticker or my
Once both beads are seated, deflate to your vehicle’s operating pressure (check your door jamb sticker — or reference my tire buying and maintenance guide for how to read tire pressure specs).
Inspect the alignment ring on both sidewalls — it should be evenly spaced from the rim all the way around. Any uneven sections mean the bead isn’t fully seated.
Then install the valve core (if you removed it), check for leaks by spraying soapy water around both beads and the valve stem, and you’re ready for balancing.
Do You Need to Balance After Mounting?
Yes. Every time you mount a tire, it needs to be balanced. Period. Even if it’s the exact same tire going back on the same wheel, the position shifts.
Static balancing (the bubble kind) is fine for slower vehicles, but for anything driven above 45 mph regularly, dynamic balancing on a spin balancer is the standard. Most shops charge $10–$15 per wheel for balancing — it’s fast and worth every dollar.
If you’re doing a lot of this yourself, tabletop wheel balancers exist for home use, though quality varies widely. I’ve tested a few and the results are acceptable for non-performance driving, but they don’t replace a shop balancer for precision.
Tire Machine vs Tire Irons: Which Should You Use?
| Factor | Tire Machine | Tire Irons (Manual) |
|---|---|---|
| Speed | 2–3 min per tire | 15–30 min per tire |
| Rim damage risk | Low (if used correctly) | Moderate (iron can slip) |
| Low-profile tires | Handles well | Very difficult |
| TPMS safety | Better control | Higher risk of sensor hit |
| Cost to DIY | $200–$800 (machine) | $30–$60 (irons) |
| Best for | 4+ tires regularly | Occasional use, emergencies |
My honest take: if you’re doing one set of tires per year, tire irons are fine and a good skill to have. If you’re doing seasonal swaps for two vehicles or more, a basic tire machine pays for itself in two years.
The Harbor Freight manual changer (with proper lube and patience) handles most passenger tires without damaging rims if you know what you’re doing.
Does Tire Type Affect How You Mount It?
Yes — not the process, but the difficulty. Here’s what I’ve noticed from mounting dozens of tires across different categories:
Standard All-Season Tires (65-series and above)
Easiest to mount by hand. The taller sidewall gives you flexibility and the rubber is generally compliant. This is where I’d recommend starting if you’re learning.
Performance and Summer Tires (45- to 55-series)
Stiffer sidewalls mean more resistance. You’ll definitely need tire irons for the second bead, and rim protectors are a good idea on alloys. These tires also tend to be more bead-critical — improper seating shows up quickly as a shimmy or wobble.
Ultra-Low-Profile Tires (35-series and below)
Genuinely difficult to mount manually. The sidewall offers almost no flex and the bead is extremely tight. I’d recommend a machine or a professional for these, especially on expensive forged wheels. One slip of a tire iron and you’ve scratched a $400 rim.
Run-Flat Tires
Do not attempt to mount run-flat tires without a machine designed for them. The reinforced sidewall is extremely stiff and the bead is under high tension even unmounted. I’ve seen tire irons bend trying to work run-flats manually.
The speed rating printed on your tire sidewall also tells you something about its construction stiffness. Tires rated V, W, or Y are typically higher-performance compounds with stiffer construction. My tire speed ratings chart explains what each rating means and how they relate to tire build — which matters when you’re working with the bead.
[IMAGE PLACEHOLDER] Alt: “Comparison of standard sidewall vs low-profile performance tire” | AI Prompt: Side by side comparison of a tall sidewall all-season tire vs a low-profile performance tire, both standing upright on a white background. Clean product photography, realistic.
Common Mistakes (And How to Avoid Them)
1. Not Lubricating Enough
I cannot overstate this. Dry mounting a tire is how you slice beads, scratch rims, and end up with a tire that won’t seat. Lube both beads and both bead seats generously — you should be able to see it.
2. Forgetting the Drop Center
Every time the bead pops off the far side as you work around the rim, it’s because the bead isn’t sitting in the drop center. Push it back in before continuing. Every single time.
3. Over-Inflating to Seat the Bead
40 PSI is your ceiling for bead seating on passenger tires. Going higher doesn’t help — if it hasn’t seated by 40, deflate and re-lube. Exceeding 40 PSI with a poorly seated bead is how tires explode off rims.
4. Hitting the TPMS Sensor with Tire Irons
If your vehicle has TPMS, that sensor is sitting right next to the valve stem inside the rim. Know where it is before you start prying. Work your irons away from the sensor location whenever possible.
5. Skipping the Balance
A mounted but unbalanced tire will vibrate at speed, wear unevenly, and put stress on suspension components. Always balance after mounting.
6. Mounting a Directional Tire Backwards
Directional tires have a rotation arrow on the sidewall. They must be mounted so the arrow points in the direction of travel when rolling forward. If you mount them backwards, you lose the performance benefits and water evacuation the tread was designed for.
When to DIY vs. When to Just Go to a Shop
I’m a big advocate for learning this skill, but not at any cost. Here’s my honest breakdown of when each makes sense:
Do It Yourself When…
- You have the right tools (proper irons, compressor, lube)
- The tires are standard size with normal-height sidewalls
- You’re comfortable with hands-on mechanical work
- You’re doing multiple sets per year and want to save money
- It’s a non-emergency situation with time to do it carefully
Go to a Shop When…
- You have ultra-low-profile or run-flat tires
- Your rims are expensive alloys or forged wheels
- Your vehicle has TPMS and you don’t have the right tools to handle sensors
- It’s your first time — watch a pro do it first
- You’re in a hurry — rushing tire mounting is how mistakes happen
Shops typically charge $15–$25 per tire for mounting and balancing. For a full set of four, that’s $60–$100 — reasonable for the equipment and expertise. If you’re buying tires from Discount Tire or Tire Rack, both offer installation partnerships where the tires ship to a local installer and the mounting is either free or discounted.
About My Testing and Experience
Everything in this guide comes from hands-on experience mounting tires across different rim types, tire profiles, and conditions — from steel wheels on budget commuters to alloy rims on sports sedans. I’ve made most of the mistakes above myself, which is how I know exactly what they feel like and why they happen.
I don’t have a factory shop setup. I work with a manual tire changer, a quality 30-gallon compressor, and a static wheel balancer for most jobs — with occasional use of a shop machine for run-flats and ultra-low-profile fitments.
That context matters because this guide is written for people doing this at home or in a small garage, not a professional shop environment.
Frequently Asked Questions
Can I put a tire on a rim without a machine?
Yes — it’s called manual mounting, and tire irons plus bead lubricant are all you technically need. It’s harder on larger or stiffer tires, but completely doable for standard passenger tires with practice.
What can I use instead of tire lube?
Dish soap mixed with water works well and is safe for rubber. Never use WD-40, motor oil, or any petroleum-based lubricant — they degrade the rubber bead over time.
How do I know when the bead is seated?
You’ll hear two distinct pops (one per bead) as you inflate. Then check the alignment indicator — the thin raised line on the tire sidewall near the bead should be evenly spaced from the rim edge all the way around. Any inconsistency means the bead isn’t fully seated.
My tire keeps losing air after mounting. What’s wrong?
Three common culprits: the bead isn’t fully seated (deflate, re-lube, re-inflate), there’s debris on the bead seat (clean the rim), or the valve stem is leaking (replace it). Spray soapy water around both beads and the stem to isolate the leak.
Do I need to balance my tires if I’m putting the same tires back on the same wheels?
Yes. Any time a tire is removed and remounted, the dynamic balance changes. Always re-balance after mounting.
Can I mount a tire on the wrong size rim?
No. Tire width and rim width must be matched within a compatible range. Mounting a tire on a rim that’s too wide or too narrow affects bead seating, handling, and safety. Check the tire manufacturer’s rim width range before mounting.
Related Posts
If you found this guide useful, you may also want to read:
→ Tire Speed Ratings Chart: What Every Letter Means
→ Complete Tire Buying and Maintenance Guide
Final Thoughts
Putting a tire on a wheel is one of those skills that feels intimidating the first time and almost automatic by the fifth. The key variables are lubrication, patience, and understanding the drop center concept — once those click, the process makes complete sense.
If you’re doing it for the first time, I’d strongly recommend watching a professional do it once at a local shop (most don’t mind if you watch). Then try it yourself on a steel wheel with a standard all-season tire — the most forgiving combination. Keep your first attempt off your nicest rims.
Get the process right and you’ll never pay full shop labor for a seasonal tire swap again. That’s money back in your pocket every year, and the confidence that comes with knowing how your tires actually end up on your car.