Before you can check your tire pressure correctly, you need to know what pressure your tires should actually be at — because checking against the wrong target number is just as useless as not checking at all.
- Remove the valve cap, press your gauge firmly onto the valve stem, read the PSI, compare it to the number on your driver’s door jamb sticker (not the tire sidewall). If your sticker is missing or unreadable, check our database for the recommended tire pressure by vehicle, and add or release air as needed.
- Always check cold tires — before driving, or after at least 3 hours parked.
- The whole process takes under 5 minutes for all four tires.
For the full picture on tire care from purchase to replacement, our tire buying and maintenance guide covers everything in one resource.
What You Need Before You Start
Checking tire pressure requires very little equipment, but getting the two essentials right makes the difference between a useful check and a wasted two minutes.
1. A reliable pressure gauge. A quality digital gauge (I recommend the JACO ElitePro or the AstroAI for budget-conscious buyers) is far more accurate than the pencil-style gauges most people have buried in their glove box. Gas station air hose gauges are convenient but often read 3–6 PSI off. If you’re going to the effort of checking, use a gauge you can trust.
2. Your vehicle’s recommended PSI. This is the number printed on the sticker inside your driver’s door jamb — the white or yellow label on the door frame or door edge. It shows recommended cold inflation pressure for front and rear tires separately. Do not use the large number stamped on the tire sidewall — that’s the tire’s maximum pressure limit, not your car’s recommendation.
Keep both of these within arm’s reach before you start.
When to Check: Why Cold Tires Matter
Every pressure recommendation you’ll ever see — from your door sticker, from the owner’s manual, from any tire professional — is based on cold inflation pressure. Cold means the tire hasn’t been driven on for at least three hours.
Here’s why it matters: as tires roll down the road, friction heats the air inside them. Hot air expands, which raises the pressure. After 20–30 minutes of highway driving, tire pressure typically reads 4–8 PSI higher than the cold pressure.
If you check a hot tire and it reads 38 PSI, you have no way of knowing whether it was 30 PSI cold (dangerously low) or 34 PSI cold (perfectly correct).
The practical rule: Check your tires first thing in the morning before the car moves, or after it’s been parked for at least three hours. That’s when you’re measuring what the door sticker is referring to.
If you genuinely can’t check cold — you’re at a gas station mid-trip and one tire feels low — add a few PSI conservatively and plan to check again cold before your next drive. Don’t bleed air out of a hot tire to hit the recommended number.
How to Check Tire Pressure: Step-by-Step
This is the complete process I follow every time. It takes about four minutes for all four tires once you’ve done it a few times.
Step 1: Park on a flat, level surface
An uneven surface puts slightly uneven load on the tires and can affect the shape of the contact patch. It’s a minor factor, but parking level is a good habit. A flat driveway, garage floor, or level parking lot is ideal.
Step 2: Find your recommended PSI
Open the driver’s door and look at the inner door frame or the door edge. The sticker lists recommended cold inflation pressure — typically separate values for front and rear tires. Write it down or take a photo with your phone. You’ll be referring to this number for all four tires.
Step 3: Locate the valve stem on the first tire
Be gentle when handling the valve stem, especially if your car is equipped with a direct tire pressure sensor (TPMS), as these electronic components are attached directly behind the valve and can be damaged by rough handling.
The valve stem is the small rubber or metal protrusion sticking out from the inner edge of the wheel, close to the rim. On most vehicles it points outward or at a slight angle. On tires with TPMS (most cars made after 2007), the stem will be metal rather than rubber.
Step 4: Remove the valve cap
Unscrew the small cap clockwise to remove it. Set it somewhere safe — in your pocket, on the hood, or in your hand. Don’t set it on the ground; they’re easy to kick under the car.
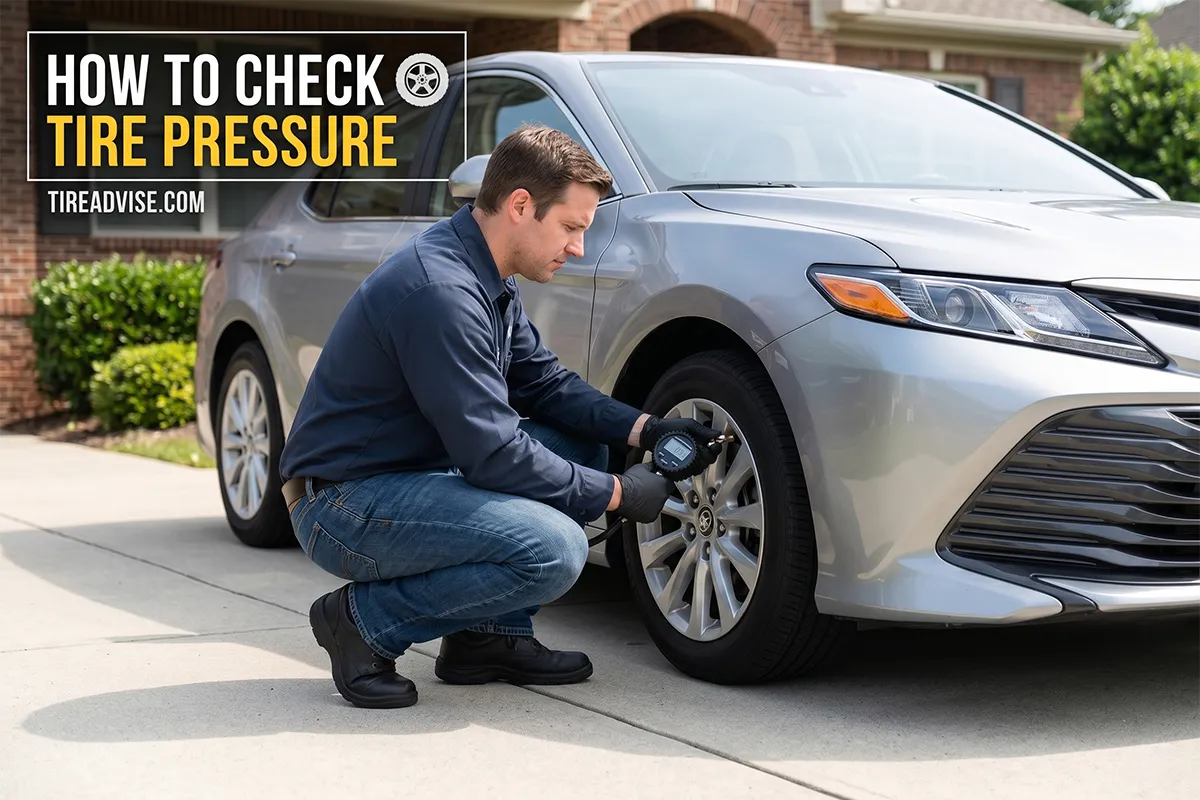
Step 5: Press the gauge firmly and straight onto the valve stem
This is the step most people get wrong. Hold the gauge chuck squarely against the valve stem and press firmly in one smooth motion. You’re depressing a small pin inside the valve stem that opens it and allows the air to flow into the gauge.
If you hear a quick hiss of air escaping, the chuck isn’t seated straight. Lift off, reseat, and press again. You should get a clean seal with no audible escaping air within a second or two.
Step 6: Read the pressure
On a digital gauge, the reading will appear on the display within a second. If your gauge locks the reading after removal (like the JACO ElitePro does), you can check it after pulling away from the stem. On a dial gauge, read the needle while the gauge is still connected for the most accurate reading.
Step 7: Compare to your recommended PSI
Is the reading above, below, or at your target PSI? Note the difference. Most drivers are a few PSI low — that’s normal if it’s been a few months since the last check.
Step 8: Add or release air as needed
If low: use a compressor or gas station air hose to add air in short bursts, rechecking between each burst. It’s easy to overshoot.
If high: use the small pin in the center of the valve stem tip to release air. Press it briefly with a fingernail, pen cap, or the back end of a pencil gauge. Release a small amount and recheck. Repeat until at target.
Step 9: Replace the valve cap
Hand-tighten only — the cap is plastic and strips easily. Its job is to keep dirt and moisture out of the valve, not to provide an airtight seal. Finger-tight is correct.
Step 10: Repeat for all remaining tires
Getting into the habit of checking all four tires manually will prevent surprises on the road. Remember, if you wait until the low tire pressure light comes on, your tires are already significantly underinflated, which means you are already losing fuel economy and compromising your safety.
Check all four — not just the one that looked low. I’ve found the visually obvious tire isn’t always the lowest-pressure one. And don’t forget: if your car has a full-size spare in the trunk or underneath the vehicle, it’s worth checking that too, since a flat spare is useless when you need it.
How to Use a Tire Pressure Gauge: The Details That Matter
If you’ve ever gotten an inconsistent reading—pressed the gauge on twice and gotten two different numbers—the problem is usually your technique or a cheap tool.
Before starting, make sure you are using one of the best tire pressure gauges (ideally digital or a high-quality dial), and follow these steps.
Seating the chuck correctly is everything. The chuck needs to engage squarely with the valve stem, creating an airtight seal. A slight angle means air is escaping even as you read, causing the reading to drop progressively. Press firmly, hold steady, and read quickly on gauges without a lock feature.
One press, one reading. Don’t press repeatedly on the same valve — each connection opens the valve and releases a tiny amount of air. On a perfectly inflated tire, three presses can drop it by 0.5–1 PSI. Check once, note the reading, then decide what to do.
Let the gauge stabilize before reading. On dial gauges especially, give the needle a full second to settle before reading. The first half-second can show a spike as pressure equalizes.
Digital gauges: watch the auto-off timing. Most consumer digital gauges shut off after 30–90 seconds. If you’re working slowly, the display can go dark while the gauge is still attached. Either work quickly or use a gauge with a lock feature.
Cold hands affect grip, not accuracy. Gauge accuracy doesn’t meaningfully change with temperature on quality units. What does change in very cold weather is battery performance in digital gauges — a dying battery in a digital gauge can cause erratic or inaccurate readings. If a digital gauge behaves strangely in winter, check the battery first.
How to Check Tire Pressure at a Gas Station
Gas stations are a convenient option if you don’t have a compressor at home and you need to add air, not just check. Here’s how to do it correctly.
Step 1: Know your target PSI before you pull in. Check your door sticker before driving to the station. You need to know your target number — don’t rely on figuring it out in the moment.
Step 2: Pull up so all four valve stems are reachable from the hose. Most gas station air hoses are 8–12 feet long. Park so the hose reaches all four tires without having to move the car mid-session. Pulling forward slightly past the machine usually gives the best coverage.
Step 3: Use your own gauge to check first, then use the station hose to add air. Gas station gauges built into the hose chuck are often inaccurate. My approach: check all four tires with my own gauge first, note which ones are low and by how much, then use the station hose strictly to add air — adding roughly the PSI I know I need — and recheck with my own gauge to confirm.
Step 4: Add air in short bursts. Hold the chuck firmly on the valve stem and press the lever in short bursts rather than a long continuous press. Station air hoses flow fast and it’s easy to overshoot by 3–5 PSI in one burst. Short bursts give you more control.
Step 5: Recheck with your gauge after each tire. Don’t assume the station gauge reading is accurate. After inflating each tire, pull your own gauge and verify. Adjust as needed.
Step 6: If you accidentally overfill, release air at the valve stem. Press the small pin in the center of the valve stem tip briefly to let a small amount of air escape. Check and repeat until at target.
How is Tire Pressure Measured?
Tire pressure is measured in PSI — pounds per square inch — in the United States. This represents the force the air inside the tire exerts on each square inch of the inner tire surface.
Most other countries use bar (1 bar ≈ 14.5 PSI) or kPa — kilopascals (100 kPa = 14.5 PSI). If you’re looking at a European vehicle spec or a tire manufactured abroad, you may see bar or kPa on the sidewall or in the documentation. Converting to PSI is straightforward:
| Unit | Conversion to PSI |
|---|---|
| 1 bar | 14.504 PSI |
| 100 kPa | 14.504 PSI |
| 2.2 bar | ≈ 32 PSI |
| 2.4 bar | ≈ 35 PSI |
| 2.5 bar | ≈ 36 PSI |
| 2.7 bar | ≈ 39 PSI |
In the US, all door stickers and owner’s manuals express tire pressure in PSI. Consumer gauges sold in the US read in PSI (and sometimes dual PSI/bar).
The measurement is technically gauge pressure — meaning it represents pressure above atmospheric (14.7 PSI at sea level).
The absolute pressure inside the tire is higher, but gauge pressure is the universally used standard for tire inflation. When someone says “35 PSI tire,” they mean 35 PSI above atmospheric pressure.
Vehicle-Specific Tire Pressure Guides
The process is the same for every car — but here are the typical recommended PSI values for some of the most common vehicles I get asked about. Always verify against your own door sticker, since values can vary by trim level, wheel size, and model year.
How to Check Tire Pressure on a Honda Civic
The Honda Civic is one of the most popular vehicles on the road, and its tire pressure setup is refreshingly consistent across generations.
Recommended cold PSI (most years): 32 PSI front, 32 PSI rear
Some sport/Si trims: 35 PSI front and rear
The Civic’s door sticker is on the driver’s door frame — open the door and look at the B-pillar (the vertical post between the front and rear doors). The valve stems are standard rubber on base trims; TPMS metal stems on most trims from 2008 onward.
For newer Civics (2016–present) with the digital instrument cluster, you can check tire pressure directly from the driver info display: press the INFO button on the steering wheel until you find the TPMS screen, which shows individual PSI for all four tires in real time.
How to Check Tire Pressure on a Honda Accord
The Accord runs slightly different pressures depending on trim and wheel size — larger wheel packages on higher trims sometimes carry a different recommendation.
Recommended cold PSI (most years, standard wheels): 32 PSI front, 32 PSI rear
Sport and Touring trims with larger wheels: 35 PSI front and rear
The sticker is in the same location as the Civic — driver’s door frame on the B-pillar. If your Accord has the Honda Sensing or multi-information display, the TPMS screen is accessible through the driver info button on the steering wheel.
One thing worth noting on older Accords (2003–2007 in particular): these models used indirect TPMS, meaning there’s no individual sensor per wheel.
The TPMS light on these cars requires a manual reset after you inflate — hold the TPMS button (usually under the steering wheel or in the glove box) until the light blinks and releases. Consult your owner’s manual for the exact procedure on your year.
How to Check Tire Pressure on a Honda CR-V
The CR-V is a crossover, so it runs slightly higher pressure than a standard sedan.
Recommended cold PSI (2017–present): 33 PSI front, 33 PSI rear
Some AWD variants: 33 PSI front, 33 PSI rear (consistent)
Older generations (2012–2016): 30–32 PSI front, 30–32 PSI rear — verify your sticker
The CR-V sticker is on the driver’s door frame. On 2017-and-newer CR-Vs, the multi-information display accessible via the steering wheel buttons shows individual tire pressures when you navigate to the vehicle status screen.
If the TPMS light comes on during cold weather on a CR-V, temperature-related pressure drop is the most common culprit — the CR-V’s recommended 33 PSI sits close to the threshold where a 10–15°F overnight drop can trigger the warning.
How to Check Tire Pressure on a Mazda CX-5
The Mazda CX-5 is another crossover with a consistent pressure spec across most model years.
Recommended cold PSI (2017–present, most trims): 33 PSI front, 33 PSI rear
Turbo and AWD trims: 33 PSI front, 33 PSI rear
The sticker is on the driver’s door jamb in the standard location. Mazda’s infotainment system on 2019+ CX-5 models shows TPMS data through the vehicle status menu — accessible from the home screen, then Vehicle Status Monitor, then Tyre Pressure.
The CX-5 uses direct TPMS with standard TPMS relearn triggered automatically after driving at speeds above 25 mph for a few minutes following any tire service. No manual reset procedure is typically needed after a simple inflation check.
How Often Should You Check Tire Pressure?
The answer I give everyone: once a month, plus before any road trip.
Here’s why monthly is the right interval. Tires lose approximately 1–3 PSI per month through natural air permeation alone — even with no damage, no leaks, and perfectly healthy valve stems. Over three months of skipping checks, you could be 6–8 PSI below spec before the TPMS light triggers. That’s a meaningful amount.
Monthly checks also let you catch slow leaks early — a nail or screw that’s losing 3 PSI per week will show up as a pattern (one tire consistently lower than the others) long before it becomes a roadside emergency.
| Checking Frequency | Effect on Tire Health |
|---|---|
| Weekly | Ideal — catches every issue early; impractical for most drivers |
| Monthly | Recommended — balances thoroughness with realistic habit formation |
| Every 3 months | Minimum acceptable — risks missing slow leaks and seasonal pressure loss |
| Only when light comes on | Reactive only — by the time the light is on, damage is already accumulating |
Easy monthly habit: I pair my tire pressure check with my first drive of every month — same day, same routine. It takes four minutes and consistently pays off in even tire wear, better fuel economy, and zero TPMS surprises.
FAQ: How to Check Tire Pressure
How do I check tire pressure without a gauge?
Honestly, you can’t do it accurately. The eyeball test — looking to see if the tire looks flat — is wildly unreliable. A tire can be 10 PSI below spec and look almost normal. You need a gauge. A decent digital model costs $10–$15 and lasts for years.
Can I check tire pressure when tires are hot?
You can, but the reading will be 4–8 PSI higher than the cold pressure due to heat-expanded air. Hot readings are only useful for comparison (e.g., comparing pressures between tires after a drive) rather than setting correct inflation levels. Always inflate and verify using cold pressure readings.
What does the tire pressure number on the sidewall mean?
That number is the maximum pressure the tire is designed to safely contain — not your car’s recommended operating pressure. On a tire marked “Max 51 PSI,” the correct operating pressure for your car might be 32–35 PSI. Always use your door sticker number, not the sidewall.
How do I check tire pressure on a spare tire?
The same way as any other tire. The spare is often neglected because it’s out of sight, but a flat spare is useless in an emergency. Check it monthly along with the other four. Most full-size spares should be kept at the same pressure as the regular tires; compact spares (“donuts”) typically specify 60 PSI on their sidewall.
Is there an app to check tire pressure?
Not reliably without a connected OBD-II adapter. Some Bluetooth TPMS sensor kits replace your valve stems with sensors that pair to a smartphone app — these provide continuous real-time readings. They work well but are overkill for most drivers. If your car has a driver info display, that’s typically the most convenient built-in option.
How do I check tire pressure on a car with low-profile tires?
Exactly the same way. Low-profile tires (shorter sidewall, wider tread) may have slightly higher recommended pressures than standard tires — check your door sticker. One practical note: low-profile tires look “flat” even at correct pressure because the sidewall is so short. Never judge their inflation by eye.
What’s the best time of day to check tire pressure?
Early morning before the car is driven, when tires are at ambient outdoor temperature. This is when the reading is most stable and closest to the true cold pressure the door sticker references.
Final Thoughts
Checking tire pressure is one of those maintenance tasks that rewards you every time you do it — better fuel economy, even tire wear, safer handling, and fewer TPMS surprises — and it asks almost nothing in return. A quality gauge, five minutes, once a month.
If you’re doing it right: you’re checking cold tires, using your door sticker number (not the sidewall), and verifying all four tires rather than just the one that caught your eye. That’s genuinely all there is to it.
For everything else you need to know about maintaining your tires — including pressure recommendations by vehicle type, seasonal adjustments, and when to consider replacing your tires — our tire buying and maintenance guide covers the full picture.
Tried a method that worked particularly well for your vehicle, or have a question about a car not covered here? Leave it in the comments — I read every one.